


<PARAM NAME="element18"
VALUE="zone,0,0, /comfort/status.gif,0 ,
/comfort/status.gif , 125,430,1">
<PARAM NAME="state1"
VALUE="195, 430, /comfort/base.gif,
/comfort/idle.gif, /comfort/trouble.gif, /comfort/alert.gif, /comfort/alarm.gif, 1">
<PARAM NAME="element19"
VALUE="zone,0,220, /comfort/stop.gif,0 ,
/comfort/stop.gif, 535,425,1">
<PARAM NAME="arm1" VALUE="310, 425, /comfort/disarm.gif,350, 425,
/comfort/away.gif,390, 425, /comfort/night.gif,430, 425, /comfort/day.gif,470, 425,
/comfort/vacation.gif, 1">
<FONT color=#000000>
Sorry, your browser doesn't support Java.</FONT>
</APPLET>
</BODY>
</HTML>
To try this example, refer to the section on Uploading Files to CWM. Rename
the index.htm file as sampleindex.htm. Look for the file sampleoffice.htm and
rename it to index.htm. Close the browser window and access the IP address of
CWM again.
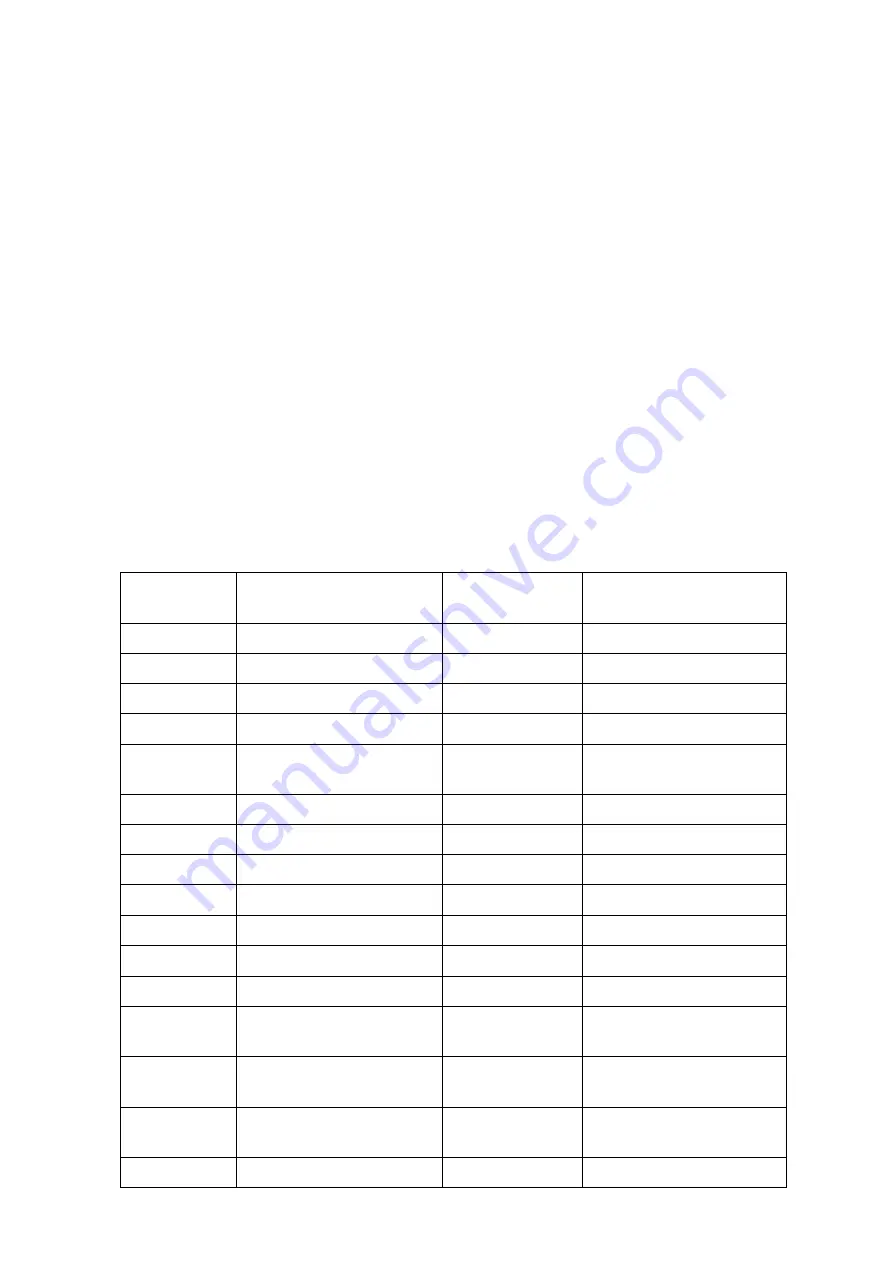
The Input and Output assignment are shown below. A Local Expansion Module
LEM01 is needed as there are 16 inputs and outputs (not all used).
Door Contact
1
Office Door
16
PIR
5
Office Left
Movement
15
PIR
5
Office Right
Movement
14
PIR
5
Outside Office
Movement
13
Unused
12
Unused
11
Current Sensor
8
Office Light 3
10
Current Sensor
8
Office Light 1
9
Current Sensor
8
Office Light 2
8
Current Sensor
8
Outside Light
7
Current Sensor
8
Store Light
6
PIR
5
Outside Office
Movement
5
Door Contact
2
Main Door
4
Current Sensor
8
Outside Aircon
3
Current Sensor
8
Office Aircon 2
2
Current Sensor
8
Office Aircon 1
1
Remarks
Zone
Type
Description
Zones
Comfort Webserver Module CWM02
54


