background image

PLAYING MP3 MUSIC FILES

More MP3 functions

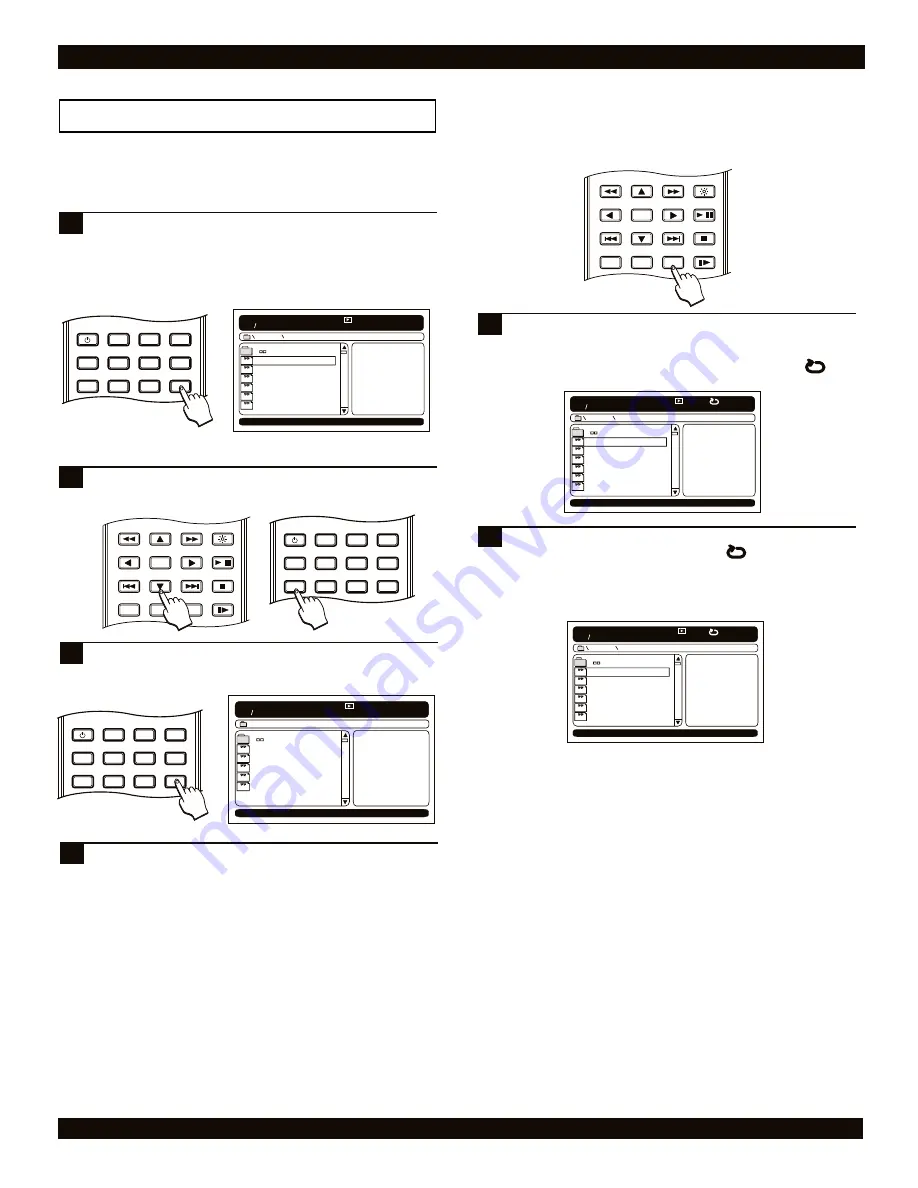
You can play your MP3 files in a variety of ways.  You can 
create a custom playlist of your favorite files or play just 
specific segments of a file.  

Insert a disc containing MP3 files. The MP3 navigator 
appears on screen. To view the MP3 files on the disc, 
press the PROGRAM button, no folder information is 
provided on this list, and all the MP3 files on the disc 
will be listed.  "Filelist" will appear in the bottom left 
hand corner for a few seconds.

1

00 : 00 00 : 00
001  025

MP3

MP3

MP3

MP3

MP3

MP3

11 0'CLOCK TICK TOCK

128

ROCK

ANOTHER DAY

MYSTERIOUS WAYS

PRIDE

BULLET THE BLUE SKY

PEACE ON EARTH

Filelist

Use the DOWN ARROW key to move to the file list. 
Press BOOKMARK to select or delete files to include in 
your playlist.

2

2

Press PROGRAM again to view your "Playlist", the list 
of MP3 files you have created for playback.  To begin 
playback of your playlist, press ENTER.

3

Press STOP to end playback.  To return to the Folder 
list, press PROGRAM.

4

00 : 00 00 : 00
001  025

MP3

MP3

MP3

MP3

MP3

BACK IN BLACK

128

ANOTHER DAY

MYSTERIOUS WAYS

LA BAMBA

HAPPY BIRTHDAY

You can also select to replay a segment of an MP3 file by using 
the REPEAT A-B button.

To select a segment, while listening to an MP3 file, 
when you arrive at the starting point that you would like 
to mark as the beginning of your repeating segment, 
press the REPEAT A-B button.  You will see the            
symbol. 

1

A

When you reach the end of the segment, simply press  
the REPEAT A-B button again.  The               symbol will 
now be displayed.  The segment will now continuously 
repeat. To resume normal playback, press the REPEAT 
A-B key again. To end playback, press the STOP  
button.

2

2

AB

32

POWER

    LCD

GOTO

PROGRAM

BOOKMARK

SUBTITLE

ANGLE

DISPLAY

MENU

TITLE

VIDEO MODE

SETUP

ENTER

RETURN

REPEAT

SLOW

BRIGHTNESS

STOP

PLAY / PAUSE

A-B

1/ALL

/

POWER

    LCD

GOTO

PROGRAM

BOOKMARK

SUBTITLE

ANGLE

DISPLAY

MENU

TITLE

VIDEO MODE

SETUP

ENTER

RETURN

REPEAT

SLOW

BRIGHTNESS

STOP

PLAY / PAUSE

A-B

1/ALL

/

Repeating a segment you define

00 : 00 00 : 00
001  025

MP3

MP3

MP3

MP3

MP3

MP3

11 0'CLOCK TICK TOCK

128

ROCK

ANOTHER DAY

MYSTERIOUS WAYS

PRIDE

BULLET THE BLUE SKY

PEACE ON EARTH

Filelist

A

00 : 00 00 : 00
001  025

MP3

MP3

MP3

MP3

MP3

MP3

11 0'CLOCK TICK TOCK

128

ROCK

ANOTHER DAY

MYSTERIOUS WAYS

PRIDE

BULLET THE BLUE SKY

PEACE ON EARTH

Filelist

AB

POWER

    LCD

GOTO

PROGRAM

BOOKMARK

SUBTITLE

ANGLE

DISPLAY

MENU

TITLE

VIDEO MODE

SETUP

Summary of Contents for CH-LDV 1010B

Page 1: ...CH LDV 1010B DVD Progressive Player Operation Guide Scan Portable TM with TM TM ...

Page 2: ... or plug is damaged liquid has been spilled objects have fallen into the apparatus the apparatus has been exposed to rain or moisture or when the unit does not operate normally or has been dropped Power cord protection To avoid any malfunctions of the unit and to protect against electric shock fire or personal injury please observe the following a Hold the plug firmly when connecting or disconnect...

Page 3: ...h of children If any electrolyte contacts with your hands or clothes wash it off thoroughly with water The battery may present a risk of fire or chemical burn if misused Charging shall be less than specified 8 4 V The battery should be charged within the specified temperature of 0 45 C Discharging In order to prevent over discharging the battery should discharge between 7 2 to 7 8 V The battery sh...

Page 4: ...l AV source 21 GETTING STARTED Powering on the unit 22 Inserting a disc 22 DVD PLAYER OPERATION Using a disc root menu 23 Basic disc playback 23 Fast forward and reverse 24 Slow motion playback 24 GOTO Menu 24 Zoom function 25 Multi angle function 26 Using subtitles 26 Changing the audio track 26 Displaying playback information 26 Bookmark function 28 Program function 28 Display modes LCD 29 Adjus...

Page 5: ... scratch or damage the disc surface To prevent discs from becoming bent or deformed they should be vertically kept in the disc storage case To prevent damage avoid leaving discs in your car where they may be subject to direct sunlight and high temperature Do not use any disc accessory to improve the audio quality disc protective solutions or lens cleaner These products may damage the disc surface ...

Page 6: ...ing accessories Check the contents of the package carefully as some items may be located under the packing foam 6 Composite S Video Video cable Stereo Audio Cable Analog Stereo Remote control Remote Control Battery Power cord This operation manual and warranty card AC Power Converter TM TM Earphones Car Adapter External battery ...

Page 7: ... 7 2 Battery To use the remote control To replace the remote control s battery the battery holder must be removed Be sure to take note of the polarity marking on the battery The side must face the bottom of the remote the side without any buttons To access the Battery remove the Battery Holder from the remote control To remove the battery holder use your thumbnail to squeeze the Release Clip in to...

Page 8: ...ode you wish includes full zoom wide normal or off TITLE Accesses Menus on DVD Discs MENU PBC Accesses the Title menu on DVD Discs With VCD discs turns the PBC function On Off BOOKMARK Press to store the current point on the disc as a bookmark that can be accessed quickly without searching ANGLE Selects between the multiple angle views on supported DVD s FAST REVERSE Scan in fast reverse on DVD s ...

Page 9: ...CD BUTTON With optical discs press to return to the Closing the LCD screen activates the button previous chapter or track to turn off the LCD display VOLUME MONITOR Use the or buttons to control the Change the Audio Video Input Output volume level during playback mode ENTER MENU PBC Use to select options in menus Accesses the root menu on discs ARROW BUTTONS FUNCTION Use to navigate disc menus on ...

Page 10: ... panel of the unit to access the on screen Function Menu The Function menu will automatically disappear from the screen after 10 seconds of inactivity 1 FUNCTION Use the Arrow Keys on the front panel of the unit or the remote control to navigate the Function Menu The available options include 2 Function Menu Battery status Setup Menu Brightness Level Adjustment Display Menu FRONT PANEL FUNCTIONS L...

Page 11: ... IN 9V power jack as shown below 3 Fully Charged Three Fourth Charge Reminding Almost out of Power Remaining Charge is getting low 100 70 50 20 DC IN 9V BATTERY Press the Display key on the remote control to check the battery pack status 4 POWER LCD GOTO PROGRAM BOOKMARK SUBTITLE ANGLE DISPLAY MENU TITLE MONITOR SETUP OR FUNCTION MENU Press the RIGHT ARROW button then press the ENTER button to con...

Page 12: ... in this position 1 Gently slide the battery pack towards the back of the unit Lift the battery pack from your unit 2 EXTERNAL BATTERY PACK 12 Lift battery pack upwards and away from the unit Recharge your battery pack when the battery status is less than 25 Do not charge the battery pack when connected to the DVD Player unit Unnecessary charging will reduce the battery pack service lifetime When ...

Page 13: ...ss the back end of the battery pack downwards 2 Installing the Internal battery pack This battery must be charged before installation Turn the DVD player upside down as shown below To remove the battery door press down and slide downwards on the tab to disengage the lock Slide the battery door downward 1 1 Insert the internal battery into the charger as shown below The CHARGING LED will glow red i...

Page 14: ...ab to disengage the lock Slide the battery door downward and off 1 1 Gently lift up the back end of the battery pack Remove the battery pack from your unit Replace the battery compartment cover back onto the unit 2 INTERNAL BATTERY PACK Recharge your battery pack when the battery status is less than 25 Unnecessary charging will reduce the battery pack service lifetime Important Lift End Pull Out 2...

Page 15: ...AL IN OUT REMOTE CONTROL RECEIVER Use the provided analog stereo INPUT OUTPUT cable to The remote control receiver for the unit Keep the receiver make a connection between the unit and an audio output free from obstructions to allow for proper operation device The most common connection made is to a TV You STATUS LED can also use a mini optical cable not included to connect The Status LED will cha...

Page 16: ...ect the appropriate end into an electrical wall outlet as depicted below and the other end into the unit s DC IN 9V connector 1 Once power is applied with the POWER button set to ON the unit will be in STANDBY Mode Do not charge battery pack and play disc concurrently Disconnect AC power adapter from wall when not in use Important Using the earphones The DVD player comes complete with earphones wh...

Page 17: ... you wish to hear sound through the TV connect the included red and white analog stereo cable 1 4 On your TV select the video input This is normally done by selecting Video 1 or Video Input with the remote control On some TVs this is done by selecting a particular channel 6 You should now see the DVD players splash screen on the TV V TV with Composite Video Input Typical Connection VIDEO INPUT R S...

Page 18: ...put to your TV The unit s splash screen will now appear 1 S Video Cable Connect the Composite S Video cable to the unit s Video Out connector and the black S Video connector to the corresponding S Video input on your TV 2 Turn on the DVD Player 1 3 On your TV select the S Video input This is normally done by selecting Video 2 or AV2 with the remote control On some TVs this is done by selecting a p...

Page 19: ...onfirm this change Press the LEFT ARROW key once to select Enter and then press the ENTER key on the remote control to confirm 18 Video Setup Page Video Setup Page Incorrectly setting this item can corrupt the picture If the picture becomes distorted or unusable wait a few seconds and the setting will be restored to its previous value Press Enter to continue Enter Cancel YUV Warning Video Setup Pa...

Page 20: ...Or you can use the digital optical audio output to send an encoded digital bit stream to a receiver suitable for receivers with Dolby Digital decoding capability This output requires a special mini optical digital cable not included OPTICAL DIGITAL AUDIO IN R STEREO AUDIO IN TV receiver or recording equipment with stereo audio in L 20 EXAMPLE OF AN OPTICAL DIGITAL CABLE WITH A MINI OPTICAL ADAPTER...

Page 21: ...nput connector 3 Turn on the output device then the DVD player and select output on the Camcorder 1 Next connect the stereo analog audio outputs of the external device to the audio input plug of the player 2 2 21 CH DVD 402 POWER ON OFF VIDEO IN STEREO AUDIO IN R RED L WHITE VIDEO IN STEREO AUDIO IN R RED L WHITE VIDEO IN STEREO AUDIO IN R RED L WHITE VIDEO OUT STEREO AUDIO OUT R RED L WHITE V 1 1...

Page 22: ...PEN button on the front panel to open the disc door 1 Inserting a disc Labeling Side Surface 2 Close the disc tray door and the unit will automatically start playback of the disc 22 GETTING STARTED POWER LCD GOTO PROGRAM BOOKMARK SUBTITLE ANGLE DISPLAY MENU TITLE MONITOR SETUP To power off the unit press the POWER key on the remote control or the OFF key on the front panel of the unit The unit is ...

Page 23: ...enus with many layers 1 Using the RETURN key 23 PLAY PAUSE To begin playback of a disc press the PLAY PAUSE key To freeze playback on a single frame press this key again To resume normal playback press the PLAY PAUSE key again 1 Basic disc playback Starting pausing and stopping disc play STOP To stop playback of a disc press STOP The first time STOP is pressed the location where disc play was halt...

Page 24: ... step through all options for slow playback With DVDs you can choose from 1 4 1 8 or 1 16 speeds in forward or reverse 1 DVD PLAYER OPERATION ENTER RETURN REPEAT SLOW BRIGHTNESS STOP PLAY PAUSE A B 1 ALL 2 1 ENTER RETURN REPEAT SLOW BRIGHTNESS STOP PLAY PAUSE A B 1 ALL 1 2 Jumping to a specific chapter or track You can jump directly to any chapter on DVD discs with the GOTO key You can also jump t...

Page 25: ...r a time you wish to jump to within the current track SELECT TRACK Use the number keys to enter a track you wish to jump to 68 08 Disc Time Track Time 68 08 Select track 01 2 With VCD discs it may require the PBC function to be disabled To disable PBC press the PBC button The GOTO Menu options for VCD s are shown below 3 For Music discs the GOTO Menu options are similar to VCD s DISC TIME Use the ...

Page 26: ...ewing angles for certain scenes When you are viewing a disc that supports this feature you can choose among the available angles on the disc with the ANGLE key POWER LCD GOTO PROGRAM BOOKMARK SUBTITLE ANGLE DISPLAY MENU TITLE MONITOR SETUP Most discs with multi angle will display an indicator or angle mark that alerts the viewer that multiple angles are available for the current scene When this ma...

Page 27: ...ys the total track time for the track currently playing CH TIME Displays the total time for the chapter currently playing REPEAT Use the arrow keys to select a repeat option for repeat playback TIME DISP Use the arrow keys to select a time display option such as Time Remaining or current Playback Time 1 2 3 4 5 6 7 8 9 8 2 3 4 5 TRACK Use the number buttons to enter a title selection from disc DIS...

Page 28: ...add a bookmark before accessing the Bookmark Menu 1 Use the ARROW keys to select an available bookmark location 1 to 12 In this example we ll choose the first one which is already highlighted Press the ENTER key to confirm your selection 3 Bookmark Press Enter key to mark Press Bookmark key to exit Use the ARROW keys to navigate through the available program locations 1 10 to go to the NEXT page o...

Page 29: ...h video mode you would like to use during playback There are three different modes to choose from 1 Normal disc playback to the LCD screen 2 Audio Video output to external monitor speaker 3 Audio Video input from external device 1 POWER LCD GOTO PROGRAM BOOKMARK SUBTITLE ANGLE DISPLAY MENU TITLE MONITOR SETUP AV OUTPUT TO EXTERNAL Press the MONITOR key on the remote control or front panel one time...

Page 30: ... the remote control to enter the on screen Brightness menu 1 1 FUNCTION MENU If the remote control is not handy press the FUNCTION button on the front panel of the player to bring up the FUNCTION MENU OR Press the ENTER button repeatedly to adjust the brightness level on the LCD screen 12 Brightness With the remote control press the BRIGHTNESS key on the remote control repeatedly to adjust the bri...

Page 31: ... ISO 9660 Mode 1 Closed Session format for best compatibility MP3 notes 00 00 00 00 Dir 001 ROCK CLASSICAL JAZZ 00 00 00 00 001 025 MP3 MP3 MP3 MP3 MP3 MP3 11 0 CLOCK TICK TOCK 128 ROCK ANOTHER DAY MYSTERIOUS WAYS PRIDE BULLET THE BLUE SKY PEACE ON EARTH 00 00 00 00 Dir 001 MP3 MP3 MP3 MP3 MP3 MP3 11 0 CLOCK TICK TOCK 128 ROCK ANOTHER DAY MYSTERIOUS WAYS PRIDE BULLET THE BLUE SKY PEACE ON EARTH 00...

Page 32: ...RTHDAY You can also select to replay a segment of an MP3 file by using the REPEAT A B button To select a segment while listening to an MP3 file when you arrive at the starting point that you would like to mark as the beginning of your repeating segment press the REPEAT A B button You will see the symbol 1 A When you reach the end of the segment simply press the REPEAT A B button again The symbol w...

Page 33: ...s To select a play mode press the REPEAT 1 ALL button repeatedly until you reach your desired setting The current play mode is shown in the lower left corner of the Navigator for a few seconds 1 Use the UP DOWN ARROW keys to select a file Press ENTER to begin playing a slide show of all the files on the disc starting with the selected file The selected file will appear in the preview box on the ri...

Page 34: ...ormal viewing press the ZOOM button To return to the thumbnails preview screen press STOP 3 ZOOM 50 To rotate an image in the clockwise direction press the RIGHT ARROW key 1 Rotating and flipping JPG images While a JPG is displayed you can rotate the image or flip it horizontally or vertically To flip the image horizontally press the DOWN ARROW key 2 99 99 9 9 9 9 Press the LEFT ARROW to rotate th...

Page 35: ... AUDIO VIDEO LANGUAGE SECURITY EXIT OR Video Setup Page Go to language setup page Language Setup Page Subtitle Disc Menu Audio OSD Language ENG ENG Off ENG Video Setup Page Go to language setup page Language Setup Page Subtitle Disc Menu Audio OSD Language ENG ENG Off ENG 5 For this example we select the LANGUAGE SETUP page to set the default subtitle language to SPANISH 6 Use the DOWN ARROW key t...

Page 36: ...sed in the USA Canada Japan and many other countries The PAL TV system is used in Europe Africa and the Middle East among other places Refer to your TV s documentation to make sure which model you have VIDEO OUTPUT Default setting S VI After pressing the monitor key to output audio and video to an external source this setup option can be changed S VIDEO The S Video setting is used with composite a...

Page 37: ... own audio setup Post DRC Default setting Off Select Auto or ON or stay with the default setting of Off This setting controls the difference between the maximum and minimum acceptable signal level SPEAKER SETUP SPDIF OUTPUT Default setting On SPDIF Sony Philips Digital InterFace refers to the digital audio format used by most consumer electronics equipment If you are using the Stereo Audio Outputs...

Page 38: ...eo while the L MONO and R MONO will send the mono output to only one speaker MIX MONO will send the same mono output to both speakers DYNAMIC Default setting OFF Dynamic Range Compression makes watching a movie at low volumes more enjoyable by boosting the quieter sounds while suppressing the louder sounds This reduction in the difference between the low and high audio levels is known as compressi...

Page 39: ... Page Go to General Setup Page PBC Version Default Off CAPTIONS Default setting Off Setting CAPTIONS to On will display captions when Close Caption supporting discs are used If you don t wish to automatically enable Captions set this option to Off SCREEN SAVER Default setting Off Protect your TV s cathode ray tube from screen burn that could result from a static image being displayed for a prolong...

Page 40: ...the disc Make sure the disc is not upside down The region code of the disc may not match that of the player In this case the disc cannot be used Disc may not be industry standard No Sound from TV or Speakers Disc is Dirty or Damaged Clean the Disc or change to another one Volume Control is set to Minimum Raise up the Volume Headphones are connected Disconnect the Headphones If you are using a Digi...

Page 41: ... p 75 Ohm Analog Audio In Out Two Pin Jacks 2 0VRMS 470 Ohm Operating Conditions 5 C to 35 C 41 F to95 F AC Adapter AC 100V 240V 60Hz 1A Power Supply DC 9V 3A Power Consumption Normal 14 5W Standby 0 72W Dimensions 6 88 W x 10 12 H x 1 81 D 175mm x 257mm x 30mm Weight 2 475 lb 1100g Specifications subject to change without notice Part 1010Bd EXTERNAL BATTERY 2 pieces cell with 4500mAh in 2S config...

Page 42: ...te video 15 17 preparing 7 8 connections buttons 8 audio outputs 15 20 using 7 TV 17 18 19 repeat playback 25 contents package 6 reset SETUP Factory Defaults 39 discs 5 video output 19 36 display function 26 27 rf modulator 17 earphone 16 safety instructions 2 enter button 8 screen saver 23 39 external battery pack 11 12 setup menu 35 39 external AV source 21 skip ahead back 24 slow motion 24 fast...

Reviews: