background image

Ed. 0121 -  70702533 REV01     Donatello Oven - Quick Guide

39

Эксплуатация

Benutzung

Use

Uso

Utilisation

Utilizzo

EN

Knowing your oven

Your oven can be used only to bake pizzas or similar dishes, such 
as bread or focaccia and to grill vegetables. The temperature in 
the chamber is controlled by boards that switch the heating ele-
ments on and off to keep the set temperature constant.
The oven can manage separately the powers:
•  of the bottom part of the oven chamber;
•  of the top part of the oven chamber.

Preparing to use the oven

Clean the oven and any accessories accurately, both externally 
and internally, following the instructions in the dedicated chapter 
rigorously.

Oven cleaning


-  pag. 

56

.

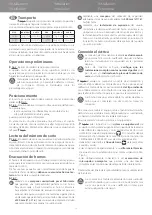
On the first use,

 we recommend you set the temperature at a 

value of 

150°C - 302°F

 for model “

D

” top percentage 80% bot-

tom 20%, for model “

CD

” set Max at the top and Min at the bot-

tom, 

for at least 8 hours, without any food inside.

 During 

this time, keep the bleed valve open. If a hood is fitted, we rec-
ommend it is kept ON. In this first phase, because of the humidity 
evaporating from the insulating materials, the oven will give out 
unpleasant smells and fumes that will gradually disappear during 
the following operating cycles.

Some parts of the equipment can reach high tempera-
tures. We advise you to avoid touching surfaces and not 
to get materials either flammable or sensitive to heat near 
the appliance.
Do not rest objects on the oven, above all if built in ma-

terial sensitive to heat. Take care and use personal protection 
equipment (i.e. gloves) when putting food into the cooking 
chamber or getting it out.
 

CD MODELS

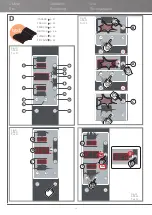
Knowing the control panel 


Fig.10.

Main display

: Displays alternatively:

•  the current temperature in the chamber
•  the set temperature
•  the intervention time of the end-of-cooking sound warning 
•  the countdown time (time to the oven switching on if pro-

grammed switch-on is used)

Keys + and -

 : Allow increasing or decreasing:

•  the temperature values in the chamber, 
•  the intervention time of the end-of-cooking sound warning 
•  the countdown time (time to the oven switching on if pro-

grammed switch-on is used)

Element LED

: with the oven running, if on, this indicates that the 

elements are heating; with the oven off, if flashing, it indicates a 
countdown (timed switch-on) 

Top power check

: Allows checking the power of the ele-

ments in the top, offering three adjustments:
•  OFF
•  MIN = 33%
•  MAX = 100%

4A 

top LEDs: 

highlight the selection made

Bottom power check

: Allows checking the power of the el-

ements in the bottom, offering three adjustments:
•  OFF,

•  MIN = 33% 
•  MAX = 100%

5A 

bottom LEDs: 

highlight the selection made

ON/OFF switch

: Switches the display on and off

Light key

: Switches the light in the cooking chamber on and 

off

Clock key


With the oven on: activates an end-of-cooking acoustic signal 


With the oven off: sets the programmed switch-on

9  Valve for opening and closing the steam outlets of the co-

oking chamber

Use guided procedure 

The oven can be switched on:
• 

manually

: switching the oven on when it must be used it is 

necessary to wait at least an hour for the oven to preheat and 
get the right temperature   Check the following use procedure 
(points A, B, C, D, etc.)

• 

programming it

: setting the number of hours missing to the 

next switch-on the oven will switch on automatically   See 
page 

40 

cap. “

Programmed switch-on”


•   

automatically

: using a clock or SMS (with external modules 

not supplied by the Manufacturer). 

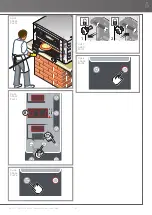
A - Turning the oven on manually


Fig.11. 

Pressing the ON/OFF key, the display lights up and 

shows the current temperature of the cooking chamber (e.g. 
25°C - 77°F).

B - Setting the preheating

Pre-heating must have the same cooking parameters as the 
recipe to be used. It must be carried out without products in the 
cooking chamber and takes about an hour for the oven to be 
ready for cooking.

During preheating, the flue gas discharge valve must 

al-

ways be kept closed

 to prevent heat escaping from the 

chamber and the heating elements being turned on with 

the consequent overheating of the refractory surfaces which 
would cause the products to burn. 


Fig.12. 

Set the

 pre-heating temperature

 using the “+” o “-” 

keys, until the desired value is displayed.


Fig.13. 

Set the 

top

 and 

bottom power

 acting on the keys 

shown in the figure. After setting these three parameters, the 
oven starts heating straight away.


The “heating element” LED will 

switch off after about an hour: this means the oven has reached 
the temperature set for pre-heating and is ready to cook.

C - Starting cooking


Fig.14. 

Once preheating is complete, you can start cooking 

and bake the products using personal protection equipment 
(e.g. gloves) and tools suitable for contact with food and made of 
material resistant to high temperatures (e.g. steel). 

For optimal results, always adhere to the oven capacity 
declared by the Manufacturer and position the products 
to be cooked evenly in the cooking chamber.

During cooking, it is always possible to change any value by act-
ing as usual.

During cooking, the


heating element


LED may switch back 

on; this means the elements have come back on to keep the 
set temperature constant.

Summary of Contents for Donatello

Page 1: ...Quick Guide Donatello ПЕЧЬ HORNO OFEN FOUR OVEN FORNO ...

Page 2: ...von 48 Stunden nach der Installation durchgeführt werden muss www cuppone com de garantie ES REGÍSTRESE AHORA PARA ACTIVAR LA GARANTÍA DE SU PRODUCTO CUPPONE Recordamos que el procedimiento debe realizarse dentro de las 48 horas siguientes a la instalación www cuppone com es garantia RU ЗАРЕГИСТРИРУЙТЕСЬ СЕЙЧАС ЧТОБЫ ЗАДЕЙСТВОВАТЬ ГАРАНТИЮ НА ВАШ ТОВАР CUPPONE Напоминаем что процедура должна быть ...

Page 3: ...halt der vorliegenden Anleitung lesen und für Auskünfte an den Hersteller wenden falls etwas nicht klar sein sollte FR Cher installateur cher utilisateur nous vous remercions d avoir choisi un produit conçu et réalisé avec des technologies à l avant garde Avant la livraison au client l appareil est contrôlée et testée dans les ateliers du constructeur La feuille de contrôle du processus de product...

Page 4: ... quelle indicate nel libretto possono provocare danni lesioni o incidenti mortali Durante il montaggio dell apparecchiatura non è permesso il transito o la permanenza di persone Avvertenze per l installatore Avvertenze di sicurezza IT non addette all installazione nei pressi dell area di lavoro La targhetta matricola fornisce importanti informazioni tecniche Esse risultano indispensabili in caso d...

Page 5: ...in acciaio ecc getti d acqua a vapore o a pressione Il personale che utilizza l apparecchiatura deve essere professionalmente preparato e va periodicamente addestrato sul suo utilizzo e sulle norme di sicurezza e prevenzione degli incidenti I bambini devono essere sorvegliati per assicurarsi che non giochino con l apparecchiatura o con parti di essa Utilizzare sempre utensili resistenti al calore ...

Page 6: ...quindi essere toccate con attenzione Tensione pericolosa Il simbolo identifica i terminali che collegati tra di loro portano le varie parti di un apparecchiatura o di un si stema allo stesso potenziale non necessariamente il potenziale di terra Indica che è necessario leggere attentamente il para grafo contrassegnato da questo simbolo prima dell in stallazione uso e manutenzione dell apparecchiatu...

Page 7: ...s through or stand in the work area during appliance assembly The serial plate provides important technical information This is vital in case of a request for maintenance or repair of the equipment please do not remove damage or modify it Failure to follow these regulations may cause damage or even fatal injury subsequently invalidating the guarantee and relieving the Manufacturer of all liability...

Page 8: ...t a Service Centre authorized by the Manufacturer Demand original spare parts or the Warranty will be null and void Place the emergency phone numbers in a visible location WARNING it is forbidden to place flammable solids or liquids spirits for instance in the cooking chamber during the operation Monitor the appliance during its entire operation do not leave dishes in the oven unattended Failure t...

Page 9: ...sage ou la permanence de personnes non chargées de Avertissements pour l installateur Consignes de sécurité l installation ne sont pas autorisés à proximité de la zone de travail La plaque signalétique fournit d importante informations techniques Elles sont indispensables en cas de demande d intervention pour un entretien ou une réparation de l appareil il est par conséquent interdit de la retirer...

Page 10: ... de prévention des accidents Les enfants doivent être surveillés afin qu ils ne jouent pas avec l appareil ou avec des parties de celui ci Utilisez toujours des outils résistants à la chaleur ex en acier Des outils de cuisine en plastique ou similaires pourraient ne pas résister aux températures élevées du four Contrôlezpériodiquementl efficacitédesconduits d extraction des fumées Ne boucher en au...

Page 11: ...ension dangereuse Le symbole identifie les bornes qui reliées entre elles amènent les différentes parties d un appareil ou d un système au même potentiel pas nécessairement le potentiel de la terre Indique qu il est nécessaire de lire attentivement le pa ragraphe marqué par ce symbole avant l installation l utilisation et l entretien de l appareil Consignes de sécurité L entreprise dégage toute re...

Page 12: ...weise für den Installateur DE Sicherheitshinweise Personal in der Arbeitszone verboten Auf dem Typenschild sind wichtige technische Daten enthalten Diese sind grundlegend bei einer Anfrage hinsichtlich eines Wartungs oder Reparatureingriffs des Geräts Das Schild daher nicht entfernen beschädigen oder verändern Wenn diese Normen nicht beachtet werden kann es zu Schäden Verletzungen oder auch zu Tod...

Page 13: ... Gerät oder Bauteilen desselben spielen Stets hitzebeständige Werkzeuge z B aus Stahl verwenden Küchengeräte aus Kunststoff oder ähnlichen Materialien können den hohen Temperaturendes Ofens nicht standhalten Periodisch die Effizienz der Abluftleitungen über prüfen Die Leitung aus keinem Grund verstopfen BRANDGEFAHR Die Umgebung des Geräts frei von brennbaren Materialien lassen Keine entflammbaren ...

Page 14: ...e Spannung Das Symbol kennzeichnet mit einander verbunden Kontakte die die verschiedenen Bauteile eines Gerätes oder eines Systems auf das gleiche Potential bringen nicht notwendigerweise das Erdungspotential Weist darauf hin dass der mit diesem Symbol gekenn zeichnete Abschnitt vor der Installation Benutzung und Wartung des Gerätes sorgfältig gelesen werden muss Die Firma haftet nicht für eventue...

Page 15: ...si se Advertencias para el instalador ES Advertencias de seguridad dejan desatendidos podrían ser potencialmente peligrosos para niños y animales Atención peligro de interponerse en el camino Los embalajes si se dejan desatendidos podrían obstaculizar los vehículos e instaladores durante las operaciones de montaj Advertencias para el usuario Antes de utilizar y mantener el equipo lea atentamente e...

Page 16: ...ricante Solicite repuestos originales de lo contrario la garantía quedará anulada Coloque los números de teléfono de emergencia en un lugar visible ATENCIÓN está prohibido introducir líquidos sólidos o inflamables por ejemplo alcohol en la cámara de cocción durante el funcionamiento Supervise el equipo durante su funcionamiento no deje alimentos en el horno sin una funda Símbolos utilizados en el ...

Page 17: ...жные технические сведения Они необходимы в случае запроса на техобслуживание или ремонт оборудования поэтому рекомендуется не снимать не повреждать и не вносить в нее изменений Несоблюдение указанных норм может привести к повреждениямитравмам втомчислесосмертельным исходом к аннулированию гарантии и освобождает Изготовителя от всякой ответственности Внимание опасность удушения Упаковка оставленная...

Page 18: ...иях с риском взрыва ВНИМАНИЕ всегда выключать электрический рубильник по завершении использования оборудования особенно на время операций по чистке или в случае продолжительного простоя В случае обнаружения любых неисправностей например поврежденного кабеля питания и т д неправильного функционирования или поломки не использовать оборудование и обратиться в Символы используемые в руководстве и на у...

Page 19: ......

Page 20: ...lb Fig 4 Abb 4 Pис 4 РУССКИЙ p 29 Установка ТОЛЬКО ДЛЯ ИСПОЛНЕНИЙ ДЛЯ США Instalación SOLO MODELOS DE EE UU DEUTSCH p 27 Installation NURFÜR USA VERSIONEN FRANÇAIS p 26 ESPAÑOL p 28 Installation UNIQUEMENT POUR LES VERSIONS USA ENGLISH p 25 Installation FOR USA VERSIONS ONLY ITALIANO p 24 Installazione SOLO PER MODELLO AMERICANO ...

Page 21: ...r rechten Seite einzuhalten um den Zugang zur elektrischen Anlage zu vereinfachen Falls dies nicht möglich ist muss der Ofen bei Eingriffen mit geeigneten Systemen aus seinem Fach entfernt werden Baujahr Spannung Modell Seriennummer Stromaufnahme Installation La distance latérale minimale est de 50 mm 1 97 in Il est toutefois conseillé de laisser un espace libre de 500 mm 19 7 in du côté droit pou...

Page 22: ...а вытяжная система прерыватель тяги Instalación instalación de aspiración interruptor de tiro Installation Absauganlage Schalter Zug Installation système d aspiration interrupteur de tirage Installation extraction system draught switch Installazione impianto di aspirazione interruttore di tiraggio ...

Page 23: ...400 AC 230 AC 208 N R S T L N N R S T N L L1 L2 L3 L1 L2 L3 IN OUT AC 3 230 R S T R S T IN OUT IN OUT IN OUT T S R N D A N R S T L Fig 9 Abb 9 Pис 9 заземление фазы нейтраль tierra fase neutro Erde Phasen Nullleiter terre phase neutre earth phases neutral terra fasi neutro ...

Page 24: ... e avere un dia metro che consenta il passaggio di un tubo di evacuazione di ø150 mm Ø 5 91 in che corrisponde al diametro del tubo da montare sulla cappa non fornito B mediante una cappa dell utilizzatore di portata adeguata posta a circa 300 mm Ø 11 81 in dal forno C mediante un adeguato impianto di aspirazione dell utiliz zatore collegato allo scarico fumi del forno in questo caso interporre ob...

Page 25: ... use of the appliance comply with current regulations and have a diameter that allows the passage of a ø150 mm Ø 5 91 in evacuation pipe which corresponds to the diameter of the tube to be fitted on the hood not supplied B through a hood belonging to the user of suitable capacity placed at about 300 mm Ø 11 81 in from the oven C through an adequate extraction system supplied by the user connected ...

Page 26: ... et avoir un diamètre minimum qui permet de passage d un tuyau d évacuation de ø150 mm Ø 5 91 in qui correspond au diamètre du tuyau à monter sur la hotte non fourni B à travers une hotte de l utilisateur de débit adéquat situé à environ 300 mm Ø 11 81 in du four C à travers un système d aspiration adéquat de l utilisateur raccordé à l évacuation des fumées du four dans ce cas il faut interposer o...

Page 27: ...men entsprechen und einen Durchmesser aufweisen der den Durchgang eine Evakuierungsrohrers von ø150 mm Ø 5 91 in gestattet der dem Durchmesser des an der Haube zu montierenden Rohres nicht mitgeliefert entspricht B von einer Haube des Benutzers mit angemessenem Durch satz ca 300 mm Ø 11 81 in vom Ofen entfernt C mit einer angemessenen Absauganlage des Benutzers In diesem Fall muss ein Abzugschalte...

Page 28: ...bo de evacuación de ø150 mm Ø 5 91 in que corresponde al diámetro del tubo que se montará en la campana no suministrado B mediante una campana del utilizador de capacidad adecuada colocada a aproximadamente 300 mm Ø 11 81 in del horno C mediante una instalación de aspiración del usuario conectada a la descarga de humo del horno en este caso es obligatorio colocar un interruptor de tiro entre el ex...

Page 29: ...тяжку не поставляется B посредством вытяжки пользователя соответствующей мощности установленной на расстоянии ок 300 мм Ø 11 81 in от печи C посредством специального вытяжного устройства пользователя подсоединенного к выпуску для удаления дымов печи в данном случае обязательно установить между вытяжным устройством и дымоходом прерыватель тяги вытяжной вентилятор прерыватель тяги и труба не поставл...

Page 30: ...la hotte est présente il est conseillé de la garder allumée Durant cette première phase l évaporation de l humidité des matériaux isolants produira des fumées et des odeurs désagréables qui disparaîtront progressivement dans les cycles de fonctionnement successifs Installation EN Pre testing and final inspection The oven is checked and tested in the Manufacturer s plant before being delivered to t...

Page 31: ...аги из изолирующих материалов производит дым и неприятные запахи которые постепенно будут исчезать во время следующих циклов работы Instalación ES Pre pruebas y pruebas Antes de la entrega al cliente el horno se revisa y prueba en los talleres del Fabricante La hoja de verificación del proceso de producción que se adjunta garantiza que cada paso del proceso de producción del ensamblaje al embalaje...

Page 32: ...Fig 11 Abb 11 Pис 11 Fig 12 Abb 12 Pис 12 Fig 13 Abb 13 Pис 13 Fig 14 Abb 14 Pис 14 Fig 15 Abb 15 Pис 15 Fig 16 Abb 16 Pис 16 9 Эксплуатация РУССКИЙ p 51 Benutzung Use DEUTSCH p 42 Uso FRANÇAIS p 42 ESPAÑOL p 48 Utilisation ENGLISH p 39 Utilizzo ITALIANO p 36 ...

Page 33: ...Ed 0121 70702533 REV01 Donatello Oven Quick Guide 33 2 sec Fig 17 Abb 17 Pис 17 Fig 18 Abb 18 Pис 18 Fig 19 Abb 19 Pис 19 ...

Page 34: ... A B 1 1 2 A C 1 A B C 1 1 2 2 1 1 2 A C A C B 3 x2 1 2 D Fig 20 Abb 20 Pис 20 Fig 21 Abb 21 Pис 21 Fig 22 Abb 22 Pис 22 Fig 23 Abb 23 Pис 23 Эксплуатация РУССКИЙ p 52 Benutzung Use DEUTSCH p 46 Uso FRANÇAIS p 43 ESPAÑOL p 49 Utilisation ENGLISH p 40 Utilizzo ITALIANO p 37 ...

Page 35: ...Ed 0121 70702533 REV01 Donatello Oven Quick Guide 35 B 1 2 Fig 24 Abb 24 Pис 24 Fig 25 Abb 25 Pис 25 Fig 26 Abb 26 Pис 26 Fig 27 Abb 27 Pис 27 Fig 28 Abb 28 Pис 28 2 1 ...

Page 36: ...rmette di controllare la poten za delle resistenze della platea offrendo tre regolazioni spento OFF minimo MIN 33 massimo MAX 100 5A LEDs platea evidenziano la selezione effettuata 6 Interruttore ON OFF accende e spegne il display 7 Tasto luce accende e spegne la luce all interno della camera di cottura 8 Tasto orologio A forno acceso attiva un segnale acustico di fine cottura A forno spento impos...

Page 37: ...ndo il tasto orologio accendere il forno con il tasto ON OFF impostare una cottura con i parametri desiderati spegnere il forno con il tasto ON OFF impostare l accensione programmata come spiegato precedentemente Per uscire dalla funzione ed eliminare l accensione programmata toccare nuovamente il tasto orologio MODELLI D Conoscere il pannello comandi Fig 20 1 Set cielo Permette di entrare e uscir...

Page 38: ...vi di protezione personale es guanti e degli utensili adeguati al contatto con alimenti e costruiti in materiale resistente alle alte temperature es acciaio Se il led resistenze è acceso sta ad indicare che le resistenze sono attive per portare il forno in temperatura Se il led resistenze è spento significa che il forno ha raggiunto la temperatura impostata ed è pronto per la cottura Per risultati...

Page 39: ...tom power check Allows checking the power of the el ements in the bottom offering three adjustments OFF MIN 33 MAX 100 5A bottom LEDs highlight the selection made 6 ON OFF switch Switches the display on and off 7 Light key Switches the light in the cooking chamber on and off 8 Clock key With the oven on activates an end of cooking acoustic signal With the oven off sets the programmed switch on 9 V...

Page 40: ...med switch on as explained above To exit the function and cancel programmed switch on touch the clock key again D MODELS Knowing the control panel Fig 20 1 Top setting Allows entering and exiting the top elements percentage setting 2 Setting the chamber Pressing it once allows entering the chamber temperature setting pressing it a second time if done within two seconds of the first allows entering...

Page 41: ...tures e g steel If the heating elements LED is on the heating elements are active to bring the oven up to temperature Ifthe heatingelements LEDisoff theovenhasreachedthesettemperature and is ready for cooking For optimal results always adhere to the oven capacity declared by the Manufacturer and position the products to be cooked evenly in the cooking chamber D Activating an end of cooking signal ...

Page 42: ...ce des résistances de la voûte en offrant trois ré glages éteint OFF minimum MIN 33 maximum MAX 100 4A LEDS voûte elles indiquent la sélection effectuée 5 Contrôle de la puissance de la sole Permet de contrôler la puissance des résistances de la sole en offrant trois réglages éteint OFF minimum MIN 33 maximum MAX 100 5A LEDS sole elles indiquent la sélection effectuée 6 Interrupteur ON OFF Allume ...

Page 43: ...age programmé en appuyant sur la touche horloge allumez le four avec la touche ON OFF programmez une cuisson avec les paramètres souhaités éteignez le four avec la touche ON OFF programmez l allumage programmé comme il a été précédemment expliqué Pour sortir de la fonction et éliminer l allumage programmé pressez à nouveau la touche horloge MODÈLES D Connaître le panneau de commandes Fig 20 1 Régl...

Page 44: ...ex gants et des usten siles spécifiques pour le contact avec des aliments et fabriqués en matériau résistant aux hautes températures ex acier Si la led résistances est allumée elle indique que les résistances sont activées pour amener le four à la température souhaitée Si la led résistances est éteinte cela signifie que le four a atteint la température réglée et est prêt pour la cuisson Pour d exc...

Page 45: ...N 33 max MAX 100 4A LEDs Oberhitze zeigen die vorgenommene Auswahl an 5 Leistungskontrolle Unterhitze Gestattet die Kontrolle der Leis tung der Widerstände der Unterhitze und bietet drei Einstellungen aus OFF min MIN 33 max MAX 100 5A LEDs Unterhitze zeigen die vorgenommene Auswahl an 6 Schalter ON OFF schaltet das Display ein und aus 7 Taste Beleuchtung schaltet die Innenbeleuchtung der Backkam m...

Page 46: ...einen Backvorgang mit den gewünschten Parametern einstellen den Ofen mit derTaste ON OFF ausschalten die programmierte Einschaltung einstellen die vorausgehend beschrieben Zum verlassen der Funktion und zum Eliminierung der programmierten Einschaltung erneut die Uhr Taste berühren MODELLE D Das Bedienfeld kennenlernen Abb 20 1 Set Oberhitze Gestattet das Aufrufen und das verlassen des Staus der pr...

Page 47: ...itteln geeignet und hitzebeständig sind z B Stahl in den Ofen einzuführen Das Aufleuchten der LED Widerstände zeigt an dass die Widerstände aktiv sindunddenOfenaufTemperaturbringen Wenn die LED Widerstände aus ist zeigt dies an dass der Ofen die eingestelltenTemperaturerreichthatundfürdasBackenbereitist Zur Erzielung optimaler Resultate immer vom Hersteller der Ofens angegebene Fassungsvermögen ei...

Page 48: ...resis tenciasdelasoleraalofrecertresajustes apagado OFF mínimo MÍN 33 máximo MÁX 100 5A LEDssolera destacanlaselecciónrealizada 6 InterruptorON OFF Enciendeyapagalapantalla 7 Botónluz Enciendeyapagalaluzdentrodelacámaradecocción 8 Botónreloj Cuandoelhornoestáencendido activaunaseñalacústicaalfinaldelacocción Cuandoelhornoestáapagado ajustaelencendidoprogramado 9 Válvula de apertura y cierre de las...

Page 49: ...enda el horno con el botón ON OFF ajuste una cocción con los parámetros deseados apague el horno con el botón ON OFF ajuste el encendido programado como se explicó anterior mente Para salir de la función y eliminar el encendido programado vuel va a tocar el botón reloj MODELOS D Conocer el panel de mandos Fig 20 1 Set techo Permite entrar y salir del estado de ajuste de porcentaje de resistencias ...

Page 50: ...arámetros ingresados no se pueden almacenar por lo que debe restablecerlos cada vez Fig 23 comenzando una receta programa ya en la memoria previamente guardada por el usurario para obtener más explicaciones sobre cómo crear una receta consulte el manual digital ampliado Después del ajuste el horno comienza a calentarse inmediata mente según los parámetros establecidos Durante el precalentamiento l...

Page 51: ... активно 4 Регулятор мощности верхней части камеры обеспечивает управление мощностью резисторов верхней части камеры с помо щью трех регулировок выключено ВЫКЛ минимум МИН 33 максимум МАКС 100 4A Светодиоды в верхней части камеры указывают на сделанный выбор 5 Регулятор мощности дна обеспечивает управление мощностью резисторов дна с помощью трех регулировок выключено ВЫКЛ минимум МИН 33 максимум М...

Page 52: ... с параметрами температуры и мощности использованными при последнемприготовлении Если необходимо их изменить выйтииззапрограммированноговключения нажимаяклавишу часы включить печь с помощью клавиши ВКЛ ВЫКЛ задать приготовление с необходимыми параметрами выключить печь с помощью клавиши ВКЛ ВЫКЛ установить программное включение как описано выше Для выхода из функции и отключения программного включ...

Page 53: ...рументы предназначенные для контакта с пищевыми продуктами и изготовленные из материала устой чивого к высоким температурам например из стали Если индикатор резисторы включен это означает что резисторы активныдлядоведенияпечидонужнойтемпературы Если индикатор резисторы выключен это означает что печь достиглазаданнойтемпературыиготовакприготовлениюпищи Длядостиженияоптимальныхрезультатоввсегдасоблю...

Page 54: ... 31 Abb 31 Pис 31 Fig 32 Abb 32 Pис 32 CD D Техническое обслуживание Техническое обслуживание РУССКИЙ p 60 Wartung Wartung Maintenance Maintenance DEUTSCH p 58 Mantenimiento Mantenimiento FRANÇAIS p 57 ESPAÑOL p 59 Entretien Entretien ENGLISH p 56 Manutenzione Manutenzione ITALIANO p 55 CUPPONE ...

Page 55: ...ergenti troppo aggressivi che potrebbero rovinare il materiale di costruzione policarbonato Fig 30 Pulizia piano refrattario Sui refrattari si trovano normalmente dei residui alimentari es grasso residui di alimenti ecc che devono essere frequentemente rimossi per questioni igieniche e di sicurezza Eliminare con una spazzola in fibra naturale i residui alimentari più grossolani successivamente se ...

Page 56: ...ractory surface there are normally some food residues e g fat food residues etc that must be removed frequently for health and safety reasons Remove the coarser food residues with a natural fibre brush then if necessary remove the refractory bricks of the cooking surface as shown in the figure and suck the carbonized residues accumulated under them on the bottom of the oven with an ash extraction ...

Page 57: ... plan réfractaire Surlesplansréfractairessetrouventnormalementdesrésidus alimentaires ex graisse résidus d aliments etc qui doivent être fréquemment éliminer pour des raisons d hygiène et de sécurité Éliminer les résidus alimentaires plus grossiers avec une brosse en fibres naturelles puis si nécessaire retirer les briques réfractaires du plan de cuisson comme indiqué sur la figure et aspirer les ...

Page 58: ...neausfeuerfestemMaterial Auf den feuerfesten Ziegeln befinden sich normalerweise Rückstände von Lebensmitteln z B Fett Rückstände von Lebensmittelnusw dieausHygiene undSicherheitsgründen häufig entfernt werden müssen Mit einer Naturfaserbürste größere Lebensmittelreste entfernen Anschließend sofern notwendig die feuerfesten Steine der Backplatte wie in der Abbildung entnehmen und die sich darunter...

Page 59: ...ficie refractaria Los residuos de alimentos se encuentran normalmente en los elementos refractarios por ejemplo grasas residuos de alimentos etc que deben eliminarse con frecuencia por razones de higiene y seguridad Retire los residuos de alimentos más gruesos con un cepillo de fibra natural luego si es necesario retire los ladrillos refractarios de la encimera como se muestra en la figura y aspir...

Page 60: ...редств так как они могут повредить материал конструкции поликарбонат Pис 30 Чистка огнеупорных поверхностей На огнеупорах как правило имеются остатки пищевых продуктов например жир остатки продуктов и т д которые необходимо регулярно удалять для поддержания гигиены и безопасности Удалить щеткой с натуральной щетиной самые крупные пищевые остатки затем при необходимости снять огнеупорные кирпичи ва...

Page 61: ...Ed 0121 70702533 REV01 Donatello Oven Quick Guide 61 ...

Page 62: ...vironnement et en améliorant l efficacité d utilisation des ressources en appliquant les principes de pollueurs payeurs prévention préparation pour la réutilisation recyclage et récupération Ne pas oublier que l élimination abusive du produit comporte l application des sanctions prévues par la réglementation législative en vigueur Entretien EN Disposal at end of life To avoid any unauthorised use ...

Page 63: ...аконная или неправильная утилизация продукта влечет за собой применение санкций предусмотренных действующим законодательством Wartung ES Eliminación al final de la vida útil Para evitar un posible uso no autorizado y los riesgos que conlleva antes de desechar el aparato asegúrese de que ya no sea posible utilizarlo para ello corte o desenchufe el cable de alimentación con el aparato desconectado d...

Page 64: ...CUPPONE 1963 Cuppone F lli S r l Via Sile 36 31057 Silea TV ITALY T 39 0422 361143 F 39 0422 360993 info cuppone com www cuppone com ...

Reviews: