background image


Manual No.  4801- 2997 Rev 1-15 

Secondary Sensing System 

7 of 42 

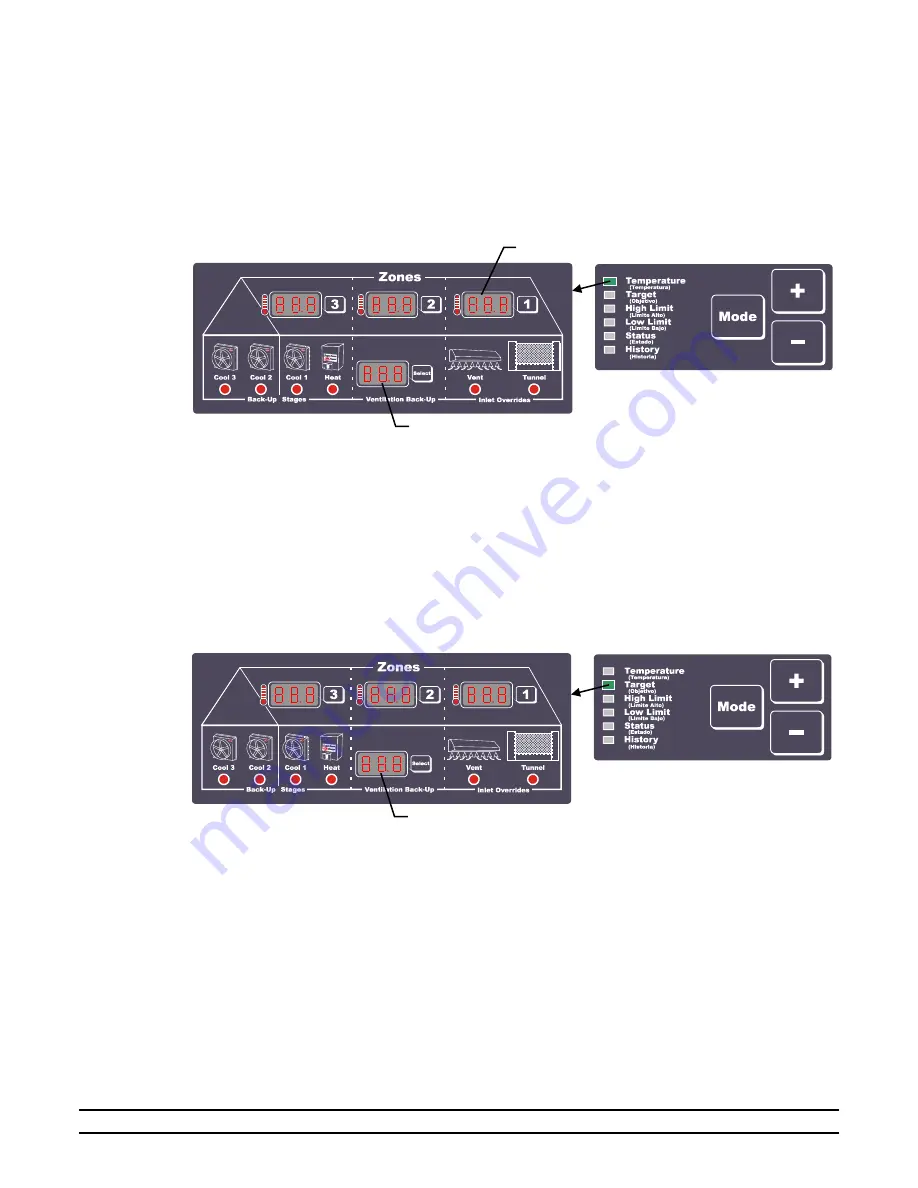
4.1.1  Temperature 

The specific 

Zone Temperature

 (Zone 1, 2, or 3) lists the individual sensor temperature for each zone. 

The Ventilation Back-Up Temperature shown will be the average of the enabled sensors (Zone 1, 2, and/or 
3).  In the Zone Temperature Section, a reading of 

“--.-“

 indicates the sensor is 

disconnected

 or in 

error

.  

Also, if the display is flashing 

“OFF”,

 it means the sensor is disabled.  Therefore, it will not cause the 

alarm to sound or be included in the Back-Up System’s average temperature.  The Ventilation Back-Up 
Temperature displays the average of the enabled Zone Temperature Sensors. 


4.1.2  Target 

The 

Target mode

 displays the target temperature used for Zone Alarm Limits and Back-Up Limits.  The 

Zone Alarm Limits and the Back-Up Limits are referenced to the target much like that of a stage on point 
in a controller.  Therefore, once initially set, the user will only adjust the target which will automatically 
adjust the high and low limits appropriately.  The Target temperature can be changed (0.5° increments) 
using the Plus (+) or Minus (–) buttons.  Example:  If the Target Temperature is set to 80.0° F;  The High 
Zone Limit temperature is set to 92.0° F;  The Back-Up High Limit temperature set to 90.0° F;  When the 
Target is dropped to 70.0° F, the High Zone Limits will change to 82.0° F and the Back-Up High Limit 
temperature will change to 80.0° F. 


Ventilation Back-Up Temperature 

Specific Zone Temperatures 

Target Temperature 

Summary of Contents for Evolution S3

Page 1: ...01 2997 Rev 1 15 Owners Manual Secondary Sensing System CUMBERLAND Assumption IL 62510 Phone 217 226 4421 Fax 217 226 4420 Secondary Sensing System Owners Manual Cumberland 1004 E Illinois St Assumpti...

Page 2: ...m Mode 14 5 1 General Parameters 14 5 2 PC Compatible Cumberland Network Parameters 16 5 3 Alarm Function Parameters 16 5 4 Sensor Calibration Parameters 16 6 General Operation 17 6 1 Alarm Inputs 17...

Page 3: ...ernal Electrical Wiring 27 11 2 S3 Circuit Board Layout 28 11 3 Connecting AC Power to the S3 29 11 4 Connecting Sensors to the S3 30 11 5 S3 PowerTrak Override Settings and Wiring 31 11 6 S3 Relay Ca...

Page 4: ...the risk of overheating controller Warning Do not perform modifications or wiring with voltage applied Keep high voltage or AC separate from low voltage wires Warning When this controller is used in...

Page 5: ...s unit Therefore as with the Evolution Back Up System it is capable of driving up to 32 of the Evolution 3000 3001 relay outputs it can override the vent or tunnel inlets based on the level of Back Up...

Page 6: ...button is used to navigate thru settings and conditions When the Mode button is momentarily pressed the green LED Indicators changes to the next reading By pressing and holding the Mode button for at...

Page 7: ...ture Sensors 4 1 2 Target The Target mode displays the target temperature used for Zone Alarm Limits and Back Up Limits The Zone Alarm Limits and the Back Up Limits are referenced to the target much l...

Page 8: ...meter P2 See Section 5 4 1 4 Low Limit The Low Alarm Temperature is the low temperature at which the controller will indicate an alarm condition The Low Alarm Temperature is displayed and can be chang...

Page 9: ...ON as well as any alarm conditions which have occurred since the last reset The History Reset function is displayed after pressing the Mode Button once after the Low Temp is displayed The Zone 1 disp...

Page 10: ...lost AC power or the F1 fuse is blown Refer to Section 8 4 for fuse replacement information 4 2 3 Low Battery When the Low Battery RED LED indicator turns ON during loss of AC power the battery level...

Page 11: ...re highlights these indicators The CONTROL SYSTEM alarm can be enabled or disabled by using the circuit board jumpers Refer to the Circuit Board Layout in Section 11 2 If the jumper is installed the C...

Page 12: ...with Cool 1 Tunnel inlets operate with Cool 3 4 3 2 Ventilation Back Up Display and Selection Switch The Ventilation Back Up Display and Selection Switch are used to select and change the back up sett...

Page 13: ...t Acknowledge Alarm indicator This allows the user the ability to manually test his alarm siren and or alarm dialer As long as the button is depressed it will activate the alarm relay irregardless of...

Page 14: ...ameters by using the and buttons as needed When you have finished with the current setting press the Mode button to move to the next parameter 5 1 General Parameters General parameters are associated...

Page 15: ...his determines the number of seconds that the S3 will wait before turning Stages ON during power loss 10 to 60 seconds This feature is designed to help with generator start up P5 Fail Safe Vent Inlets...

Page 16: ...oring device and must be connected to Control Aux This setting changes the operation of the control system auxiliary alarm Contrary to its normal operation where an open signal would trigger an alarm...

Page 17: ...wer present at the electrical outlet and the Power Alarm is ON at the S3 the 3 Amp slow blow fuse located on the S3 circuit board Fuse F1 should be checked for a blown fuse To replace a fuse disconnec...

Page 18: ...6 2 2 Dry Contact N O and N C Contacts The S3 provides a set of dry contacts that can be used to trigger a modem auto dialer or other auxiliary equipment Both normally open N O and normally closed N...

Page 19: ...Operation the S3 always maintains the temperature between its high and low limits It accomplishes this by using its temperature sensors and its four stage outputs If the temperature drops below the Lo...

Page 20: ...the system still maintains the temperature as it does in Normal Operation In addition it receives commands from the master controller to turn on certain stages of heating or cooling There are many dif...

Page 21: ...aced based on the operation of stage equipment and should be the same as assigned in the EV 3000 Controller Jumpers are placed according the following table Type of Stage Operation Jumper Assignment C...

Page 22: ...ck Up Operation During Normal Operation the S3 always maintains the temperature between its high and low limits It accomplishes this by using its temperature sensors and its four stage outputs If the...

Page 23: ...u do not assign a relay output to Cool1 you will not have back up protection for minimum ventilation It is also important to choose the correct fans to back up For example choose a fan that is not you...

Page 24: ...the power has been out for more than one minute The other situation could be caused by the 120VAC 3 amp fuse blown If the Power Out alarm condition is active and you find that there is power present a...

Page 25: ...accurate Place this thermometer next to the temperature sensor for at least 10 minutes Insure that there are no strong breezes or winds blowing on the thermometer and the sensor being calibrated Note...

Page 26: ...ms in Section 11 7 for locations of terminals 9 If necessary connect the S3 to the Cumberland Farm Manager Network See the connections in Section 11 10 of this manual 10 Connect the AUX and CONTROL AU...

Page 27: ...at least once per quarter You will need to have two people one at the sensor with a trusted thermometer and one at the controller to calibrate the sensor 11 Wiring Diagrams Schematics etc The followin...

Page 28: ...Manual No 4801 2997 Rev 1 15 Secondary Sensing System 28 of 42 11 2 S3 Circuit Board Layout...

Page 29: ...Manual No 4801 2997 Rev 1 15 Secondary Sensing System 29 of 42 11 3 Connecting AC Power to the S3 Secondary Sensing System Inset A Inset A...

Page 30: ...g System 30 of 42 11 4 Connecting Sensors to the S3 White Shield Sen 3 Black Black Sen 2 White Shield White Shield Sen 1 Black Inset A SENSOR SENSOR SENSOR White Shield White Shield White Shield Black...

Page 31: ...DE Vent Override Cool 1 Tunnel Override Cool 3 Vents Tunnel Will Wire The Same NOTE If curtain is setup to pull curtain up to open then reverse wires connected to Open and Close terminals Inset B Tunn...

Page 32: ...inals NOTE Ensure the Relay Card connector and the PCB header are properly aligned during stand off and Relay Card installation NOTE The Relay Card is necessary on Stand Alone systems ONLY If S3 is us...

Page 33: ...ng System 33 of 42 11 7 Connecting an Alarm or Siren to the S3 Inset A White Red NO NC Com Alarm Out Siren Internal Switch Non alarm position Connect to alarm modem auto dialer etc as desired White Re...

Page 34: ...ev 1 15 Secondary Sensing System 34 of 42 11 8 Connecting Auxiliary Inputs to the S3 Inset B Inset A NOTE The jumper across J6 J8 and or J10 must be removed if an external alarm input is connected Sec...

Page 35: ...ry alarm outputs to the S3 auxiliary inputs The alarm activates when the connection is broken between the OUT and IN terminals NOTE 1 As long as a path for current flow is present the Secondary Sensin...

Page 36: ...1 10 Connecting Local Network Connections to the S3 Warning Tape Shield To Prevent Damage NOTE Harness to connect Local Network and Secondary Sensing system together are connected included in the Seco...

Page 37: ...Manual No 4801 2997 Rev 1 15 Secondary Sensing System 37 of 42 11 11 Connecting the S3 to the HH Net Inset B Inset A Secondary Sensing System...

Page 38: ...rminal Block 4 pos 3006 5079 CONN Terminal Block 5 pos 3006 5092 CONN Terminal Block 6 pos 3540 0149 DIGITAL_IC LTC1483CN8 Network Chips 3010 2991 FUSE 3 AMP 5mmX20mm slowblow F1 F2 3701 6066 PIC S3 P...

Page 39: ...413 42 4 5 8 12 493 68 20 6 836 93 33 9 24 055 43 6 1 12 325 68 5 20 3 6 779 93 4 34 1 23 82 43 3 6 3 12 215 68 9 20 5 6 695 93 9 34 4 23 472 43 9 6 6 12 051 69 4 20 8 6 612 94 5 34 7 23 13 44 4 6 9...

Page 40: ...3 Error Code Description Explanation LnE Local Network Error The Back Up has lost Communications with the Master Controller NOTE During this condition the Back Up will run Cool 1 on a 5 minute timer L...

Page 41: ...nditions and Limitations THERE ARE NO WARRANTIES THAT EXTEND BEYOND THE LIMITED WARRANTY DESCRIPTION SET FORTH ABOVE SPECIFICALLY GSI MAKES NO FURTHER WARRANTY OF ANY KIND EXPRESS OR IMPLIED INCLUDING...

Page 42: ...Manual No 4801 2997 Rev 1 15 Secondary Sensing System 42 of 42...

Reviews: