Crytec QTP500B Operator'S Manual Download Page 6

MINI TRACKED DUMPER

6

GB

On soft ground, drive at the first forward/
reverse gear. Do not rapidly accelerate, turn 
sharply or stop.

Pay the utmost attention when working on 
frozen ground, as the machine may tend to 
skid.

Do not operate the machine in confined areas 
where there may be a risk of crushing the 
operator between the machine and another 
object.

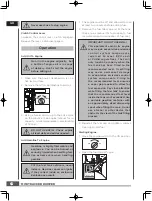
Never operate the machine on slopes where 
angle is over 20°.

When operating on a slope, whether moving 
forward or in reverse, always make certain that 
the weight is evenly balanced. Always operate 
the machine straight up or down slopes, never 
drive sideways or across the slope. Do not 
shift gears on slopes.

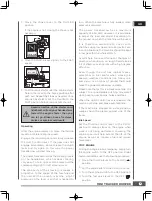
When dumping the contents of the hopper, 
the center of gravity will change continuously 
and the ground conditions will be essential for 
the stability of the machine. Use extra caution 
and control when dumping the hopper on 
unstable ground, such as wet clay or soil.

Specific Safety Rules 

Thoroughly inspect the area to be worked. 
Keep the working area clean and free of debris 
to prevent tripping. Operate on flat, level 
ground.

Never place any part of your body where 
it would be in danger if movement should 
occur during assembly, installation, operation, 
maintenance, repair, or relocation.

Keep all bystanders, children, and pets at least 
23m away. If you are approached, stop the 
unit immediately.

Do not mount anything on the hopper and 
never carry passengers.

Never park the machine in a place with 
u n s t a b l e   g r o u n d   t h a t   c o u l d   g i v e   w a y , 
particularly when it is full.

Disengage clutch lever before starting the 
engine.

Start the engine carefully according to 
instructions and with feet  away from the 
moving parts.

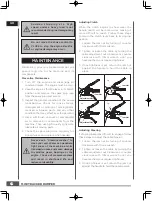
Never leave the operating position when the 
engine is running.

Always hold the unit with both hands when 
operating. Keep a firm grip on the handlebars. 
Be aware that the machine may unexpectedly 
bounce upward or jump forward if the 
machine should strike buried obstacles such 
as large rocks or roots.

Walk, never run with the machine.

Do not overload the machine capacity. 
Always drive at a safe speed, and adjust the 
speed to the slope of the land, the surface 
conditions of the road, and the weight of the 
load.

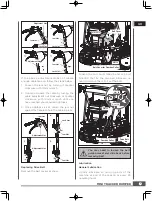
Use extreme caution when in reverse or 
pulling the machine towards you.

Exercise extreme caution when operating on 
or crossing gravel drives, walks, or roads. Stay 
alert for hidden hazards or traffic.

Summary of Contents for QTP500B

Page 1: ...d Dumper Operator s Manual MODEL NUMBER QTP500B SERIAL NUMBER Both model number and serial number may be found on the main label You should record both of them in a safe place for future use FOR YOUR...

Page 2: ...them as waste All tools hoses and packaging should be resorted taken to the local recycling center and disposed of in an environment friendly safe way The four speed gearbox three forward and one rev...

Page 3: ...es No smoking sparks or flames Do not touch parts that are hot from operation Serious burns may result Keep your hands clear from all rotating parts Never start or run the engine inside a closed area...

Page 4: ...ersonal injury Avoid accidental starting Be sure the engine s switch is off before transporting the machine or performing any maintenance or service Understand Your Machine Read this manual and labels...

Page 5: ...do not smoke and stay away from sparks open flames or other sources of ignition near the area of operation Never fill the fuel tank indoors To avoid sparking or arcing keep grounded conductive objects...

Page 6: ...ever place any part of your body where it would be in danger if movement should occur during assembly installation operation maintenance repair or relocation Keep all bystanders children and pets at l...

Page 7: ...locks Remove all the plywood plates and remove all the loose parts on the bottom pallets 1 2 3 4 QTY 1 GW 264 0 kg NW 228 0 kg Carton Size 143 0 X 82 5 X 88 0 cm MADE IN CHINA MiniTrackedDumper QTP500...

Page 8: ...8 Panel Bottom 9 Gas Spring Optional 10 Tools for Spark Plug Assembly 11 Operator s Manual Engine Manual 12 Hardware Bag Including M10 X 20 X 4 A M8 X 25 X 2 21 X 307 X 1 B 4 X 35 X 2 M8 X 35 X 2 C M...

Page 9: ...acket Align the holes with the mounting bracket Insert a long pin through holes and secure each side with a flat washer and cotter pin Tipping Handle Engine Guard M8 X 35 X 2 C M8 X 30 X 2 Place the e...

Page 10: ...rea Gas Spring Guide Bracket Plow Blade Optional 1 Mount the mounting bracket to the blade using M8 30 hex bolts washers and nuts M8 30 4 Mounting Bracket M8 30 4 a M20 95 1 Pivot Bracket M20 95 1 b 2...

Page 11: ...h control lever to the guide tube Line up holes and fasten with M8 35 bolt washers and nut 5 Insert the handle grip into the holder 6 Securethesupportbracketintothecontrol lever with pin 10 60 and bri...

Page 12: ...12 GB KNOW YOUR MACHINE Features and Controls Throttle Control Engine Switch Right Steering Lever Clutch Control Lever Left Steering Lever Hopper Track Tipping Handle Gearbox Gear Selection Lever Gas...

Page 13: ...ip shift the machine into a lower gear If the front of the machine rides up shift the machine into a lower gear If the front continues to ride up lift up on the handles Operate the lever to turn left...

Page 14: ...for fuel expansion Pay close attention while filling the fuel tank to ensure that the recommended fuel level inside the tank is not exceeded Use a portable gasoline container with an appropriately siz...

Page 15: ...ins full of sharp uneven points with a high degree of friction Even though the unit has rubber tracks remember to be careful when working in adverse weather conditions ice heavy rain and snow or on ty...

Page 16: ...disengage all command levers The engine must be cool Keep the engine s throttle lever in its SLOW position and remove the spark plug wire from the spark plug and secure Inspect the general condition o...

Page 17: ...k Nut Lock Nut 2 Adjustment Nut 3 Jam Nut Adjustment Nut Lock Nut If the above adjustment does not create enough cable tension follow the steps below Replacing Drive Belt Remove the belt covers as sho...

Page 18: ...alt or pavement Lift the machine and set it on blocks or supports rated for the weight of the machine so that the tracks are approximately 4 off the ground Oil Filler Oil Outlet 10cm 15cm Adjusting Bo...

Page 19: ...oward the engine then track will be loosen Replacing Tracks Check the condition of the tracks periodically If any track is cracked or frayed it should be replaced as soon as convenient 1 Lift up the h...

Page 20: ...damage While the engine is still warm drain the oil from the engine Refill with fresh oil of the grade recommended in the Engine Manual Use clean cloths to clean off the outside of the machine and to...

Page 21: ...Dirty air cleaner 7 Improper carburetor adjustment 1 Connect and tighten spark plug wire 2 Move choke lever to OFF 3 Clean fuel line Fill tank with clean fresh gasoline 4 Clear vent 5 Drain fuel tank...

Page 22: ...MINI TRACKED DUMPER 22 GB PARTS SCHEDULE 97 50...

Page 23: ...MINI TRACKED DUMPER 23 GB Gearbox 50...

Page 24: ...MINI TRACKED DUMPER 24 GB Box 97...

Page 25: ...33 Baseplate R 1 34 Small Pulley Cover 1 35 Engine 6 5HP 1 36 Key 5x35 1 37 Fixing bracket 1 38 Tensioner Pulley Bracket 1 No Description Q ty 39 Washer 8 2 40 Belt Plate 1 41 Sleeve Washer 1 42 Smal...

Page 26: ...108 Seal FB17X40X7 2 109 Spline Shaft I 1 110 Duplex Slip Gear 1 111 Gear 1 112 Bearing 6302 1 113 Gearshift Fork Guide Pin 1 114 Small spring 1 No Description Q ty 115 Steel Ball 6 1 116 Gearshift Fo...

Page 27: ...174 Joint Bush 2 175 Spring Gasket 4 176 Circlip 25 2 177 Seal FB25x42x7 2 178 Screw M8x25 12 179 Washer 8 10 No Description Q ty 180 Outpush Shaft Bush 2 181 Output Shaft Composite Bushing 4 182 Han...

Page 28: ...r 12 2 16 Washer 12 3 17 Washer 10 4 18 Washer 10 4 19 Pin 10 60 1 20 Curved Support Bracket Weldment 1 No Description Q ty 21 Bolt M8 50 1 22 Active Connecting Weldment 1 23 Nut M12 2 24 Bolt M10 25...

Reviews: