11
Calibration, Seed Rates and Sprocket Box
Calibration/Drilling Rates
Planting the right rate can be frustrating.
Sometimes the end result is not what the rate
chart indicates. Seeding rate is affected by
seed size, seed treatments, foreign material,
test weight, and tire air pressure.
1. Always plant clean seed.
2. Check tire air pressure.
3. Seed treatments vary by type and time of
application.
Some seeds are treated at the processor. Drill
box treatments are common methods of appli-
cation. Each of these can "gum" up the wobble
slot cup halves and reduce final seeding rate.
Treated seed often flows differently than non-
treated seed.
A general method for checking quantities drilled
is as follows:
1. Set drill for desired seeding rate.
2. Fill the box level; then pull drill for a short
distance to settle seed. Refill box exactly
level full.
3. Drill a calculated one acre.
4. Carefully weigh the seed required to refill
the box level full.
5. Compare the amount used versus that
stated on the rate chart.
6. Adjust seeding rate by changing the
sprocket combination or wobble slot width.
One method involves catching seed from one
or more seed cups and utilizing a density scale
to determine actual rates. These scales are
commercially available, inexpensive and very
easy to use. Information can be obtained from
CrustBuster®/Speed King, Inc.
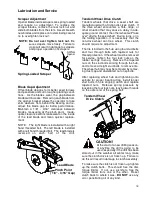
Sprocket Box Operation
The sprocket box design will enable the opera-
tor to set a wobble slot width once for a given
seed size and change rates by changing the
speed of the seed shaft. Choose a range of
seeding rates that you wish to operate in, set
the slot width as indicated by the chart and
simply change knob position with the slide
handle to effect seed rate. A narrow slot width
will produce more even distribution and spacing
in the row.
When changing derailleur, be sure openers
are rotated out of ground.
To change position, move throw-out lever
toward the rear to disengage the chain from the
lower sprocket. Pull the spring loaded collar
outward with two fingers and slide side to side
to the desired gear position. Pull throw-out
lever forward to re-engage the chain.
Sprocket Box
Summary of Contents for 4600 Series
Page 1: ...4600 SERIES ALL PLANT DRILL 09 03 605717 ...
Page 6: ...4 Safety Instructions ...
Page 7: ...5 Safety Instructions ...
Page 19: ...17 Sprocket Locations ...
Page 20: ...18 ...
Page 34: ...32 Grain Box 10 ...
Page 36: ...34 Grain Box 15 20 ...
Page 44: ...42 All Plant Opener Assembly ...
Page 46: ...44 Gear Box Assembly 10 ...
Page 48: ...46 Gear Box Assembly 15 20 ...
Page 61: ...58 a Harrow Layouts 10 Drill 7 Spacing 10 Drill 10 Spacing ...
Page 62: ...58 b ...
Page 63: ...59 15 Drill 8 Spacing 15 Drill 7 Spacing Harrow Layouts ...
Page 64: ...60 15 Drill 10 Spacing 20 Drill 7 Spacing Harrow Layouts ...
Page 65: ...61 20 Drill 8 Spacing 20 Drill 10 Spacing Harrow Layouts ...
Page 66: ...62 15 Legume ...
Page 68: ...64 20 Legume ...
Page 71: ...67 Light System ...
Page 72: ......
Page 73: ...69 Fertilizer Unit ...
Page 76: ...72 4615 Sprocket Locations Fertilizer Unit ...
Page 78: ...74 4615 Drive Assembly Fertilizer Unit ...
Page 80: ...76 4615 Gear Box Fertilizer Unit ...
Page 82: ...78 4615 Box Bottom Assembly Fertilizer Unit ...
Page 84: ...80 4600 All Plant Feed Tubes Fertilizer Unit ...
Page 86: ...P O Box 1438 Dodge City Kansas 67801 620 227 7106 ...


