Page: 2
1. Pre-Installation Steps
1.1 ToughTech Duo Accessories
Check the accessories with your ToughTech Duo or ToughTech Duo-
3SR. Please contact CRU if any parts are missing or damaged. The
box should contain the following items:
1.2 Identifying Parts
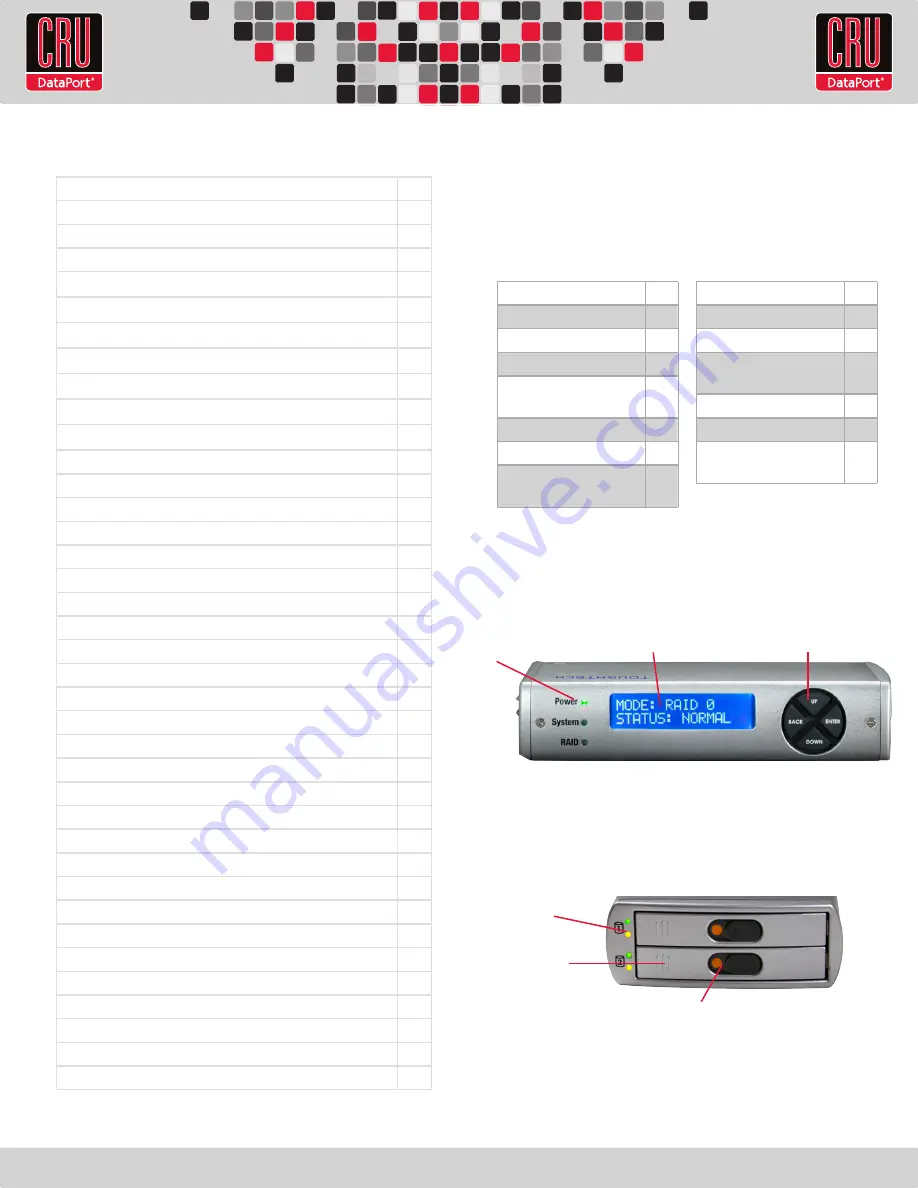
Take a moment to familiarize yourself with the parts of the ToughTech
Duo. This will help you to better understand the remaining
instructions.
1. Unit Power, System, RAID LEDs
2. LCD Screen
3. Navigation Buttons
1
2
3
1. Drive Power and Drive Activity LEDs
2. Drive Sled Ejection Button
3. Slide Locks
1
2
3
Table of Contents
1. Pre-Installation Steps
2
1.1 Accessories
2
1.2 Identifying Parts
2
1.3 Consider your RAID Configuration
3
1.3.1 RAID 0
3
1.3.2 RAID 1
3
1.3.3 Single Disk Mode
3
2. Hardware Setup
3
2.1 Installing Hard Drives
3
2.2 Connecting and Powering ToughTech Duo
4
3. LED Behavior
4
4. LCD Menu Screens
4
5. Setting up the RAID
4
5.1 Creating a new RAID
4
5.2 Changing the RAID Type
5
6. Adding a New Disk
5
6.1 RAID 1
5
6.2 RAID 0
5
6.3 Single Disk Mode
5
7. Buzzer and Temperature Configuration
5
RAID is not a Backup
5
7.1 Configuration PIN
6
7.2 Buzzers
6
7.3 System Warning Buzzer
6
7.4 System Alarm Buzzer
6
7.5 RAID Warning Buzzer
6
7.6 RAID Alarm Buzzer
6
7.7 Temperature Sliders
6
8. Usage with Mac and Windows Operating Systems
6
8.1 Usage with Macintosh Computers
6
8.1.1 Compatibility
6
8.1.2 Mounting and Ejecting Volumes
6
8.1.3 Booting to the ToughTech
7
8.2 Usage with Windows Operating System
7
8.2.1 Compatibility
7
8.2.2 Mounting and Ejecting Volumes
7
9. Frequently Asked Questions
7
10. Technical Specifications
8
ToughTech Duo unit
1
Power adapter
1
eSATA cable
1
FW800 cable
1
USB 2.0 type A to A
cable
1
FW800 to FW400 cable
1
Screw kit
1
Quick Start Guide and
Warranty Information
1
ToughTech Duo -3SR unit
1
Power adapter
1
eSATA cable
1
USB 2.0 type A to A
cable
1
USB 3.0 cable
1
Screw kit
1
Quick Start Guide and
Warranty Information
1


