background image

Crestron 

TPMC-4SMD


4.3” Designer Touch Screen


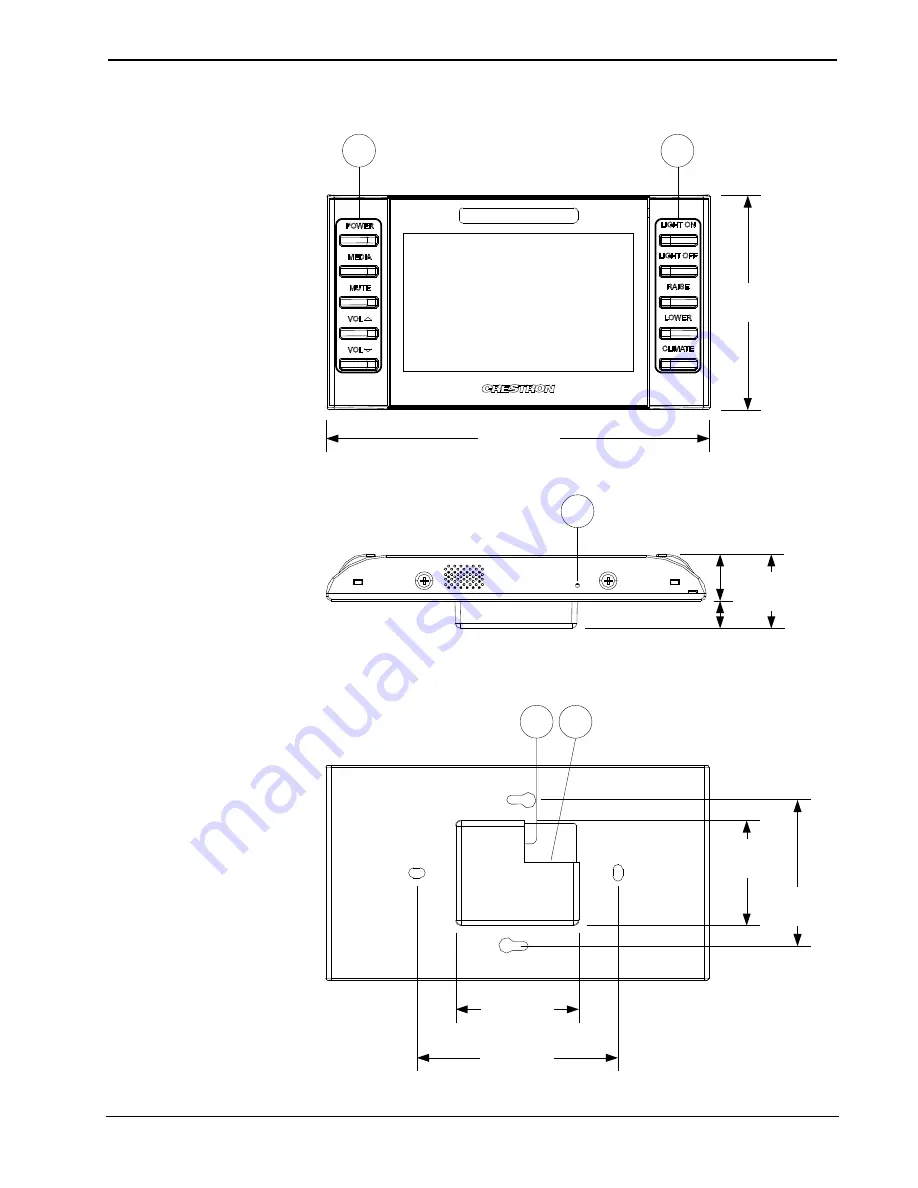
TPMC-4SMD Overall Dimensions (Front, Bottom and Rear Views) 

2.00 in

(51 mm)

3.25 in

(83 mm)

1.70 in

(44 mm)

2.36 in

(60 mm)

4

3

0.46 in

(12 mm)

0.75 in

(19 mm)

2

1.21 in

(31 mm)


1

6.20 in

(158 mm)

3.47 in

(89 mm)

1


Operations & Installation Guide – DOC. 7027E 

4.3” Designer Touch Screen: TPMC-4SMD  

  9 

Summary of Contents for TPMC-4SMD

Page 1: ...Crestron TPMC 4SMD 4 3 DesignerTouchScreen Operations Installation Guide...

Page 2: ...tween the equipment and receiver Connect the equipment into an outlet on a circuit different from that to which the receiver is connected Consult the dealer or an experienced radio TV technician for h...

Page 3: ...ring 11 Identity Code 11 Configuring the Touch Screen 11 Changing the Button Inserts 22 Installation 23 Hardware Hookup 27 Recommended Cleaning 27 Uploading and Upgrading 28 Establishing Communication...

Page 4: ......

Page 5: ...to install An incredibly thin profile and small footprint allow the TPMC 4SMD to be installed in places other touch screens just cannot go providing the choice of mounting to a standard electrical bo...

Page 6: ...lly rich user interfaces with incredible efficiency and unparalleled functionality Using Smart Graphics programmers can swiftly integrate fluid gesture driven controls animated feedback metadata embed...

Page 7: ...twork right on the touch screen Native support for H 264 and MJPEG formats allows the TPMC 4SMD to display live video images from IP cameras and servers such as the Crestron CEN NVS200 Network Video S...

Page 8: ...g the optional WMKU 4SM Universal Mounting Kit1 which can also be used without an electrical box for a low profile surface mount solution 2 For impenetrable surfaces such as decorative glass granite m...

Page 9: ...4 3 Designer Touch Screen Applications The following diagram shows a TPMC 4SMD in a typical application TPMC 4SMD in a Typical Application Operations Installation Guide DOC 7027E 4 3 Designer Touch S...

Page 10: ...B Maximum Project Size 60 MB Graphics Engine Supports Smart Graphics or traditional GUI projects Communications Ethernet 10 100 Mbps auto switching auto negotiating auto discovery full half duplex DHC...

Page 11: ...ailable Models TPMC 4SMD B S 4 3 Designer Touch Screen Black Smooth TPMC 4SMD W S 4 3 Designer Touch Screen White Smooth Available Accessories 4SM BTNO B W S Engravable Button Covers set of two specif...

Page 12: ...PMC 4SMD Physical Description This section provides information on the connections controls and indicators available on the TPMC 4SMD TPMC 4SMD Physical View 8 4 3 Designer Touch Screen TPMC 4SMD Oper...

Page 13: ...rall Dimensions Front Bottom and Rear Views 2 00 in 51 mm 3 25 in 83 mm 1 70 in 44 mm 2 36 in 60 mm 4 3 0 46 in 12 mm 0 75 in 19 mm 2 1 21 in 31 mm 1 6 20 in 158 mm 3 47 in 89 mm 1 Operations Installa...

Page 14: ...rt Power over Ethernet compliant Green and yellow LEDs indicate Ethernet port status PIN SIGNAL PIN SIGNAL 1 TX 5 N C 2 TX 6 RX 3 RX 7 N C 4 N C 8 N C 4 Occupancy Sensor Input 4 Captive screw terminal...

Page 15: ...be downloaded from the Crestron Web site www crestron com software The IP ID is set within the TPMC 4SMD s IP table using Crestron Toolbox For information on setting an IP table refer to the Crestron...

Page 16: ...functions provided by each button are detailed in subsequent paragraphs Panel Setup Options Menu Ethernet Setup Touch Ethernet Setup to display information about the Link Status Control Connection MA...

Page 17: ...ble slots as well as Add IP Edit IP and Remove IP buttons to facilitate editing entries The Auto Discover button toggles between Enabled and Disabled Control System Interface Menu To add an IP entry t...

Page 18: ...d shown in the illustration that follows Hex Keypad Touch CLEAR to remove any previous entry Then enter the ID required Touch OK to accept the entry or CANCEL to cancel the entry This hides the hex ke...

Page 19: ...he Edit IP Address Settings screen Touch Back to return to the Panel Setup Options menu Edit IP Address Settings Screen Touch the Enabled Disabled button to toggle between DHCP enabled and disabled Th...

Page 20: ...on below Display Settings Menu The Display Settings menu provides controls to adjust Key LED Brightness and LCD Brightness in addition to providing buttons to enter the Key LED Options and LCD Wake Op...

Page 21: ...in the illustration below LCD Wake Options Screen The LCD Wake Options screen provides controls for turning the Proximity Sensor Wakes LCD and Hard Key Wakes LCD functions ON or OFF Touch Back to ret...

Page 22: ...he Panel Setup Options menu touch Standby Setup to display the Standby Timeouts screen shown in the illustration below Standby Timeouts Screen The Standby Timeouts screen provides controls to adjust S...

Page 23: ...Diagnostics Keypad Test screen Use this screen to test the function of the hard key push buttons on either side of the screen When a button is pressed its corresponding button lights on the screen Tou...

Page 24: ...ics Sensor Tests screen shown in the illustration below Diagnostics Sensor Tests Screen If contact sensors are connected to the TPMC 4SMD the respective indicator changes from Inactive to Active as ap...

Page 25: ...tern and Display Test Pattern Touch Back to return to the Diagnostics menu From the Diagnostics menu touch Back to return to the Panel Setup Options menu About On the Panel Setup Options menu the Abou...

Page 26: ...e following illustration Insertion Points for Button Cover Release Insert screwdriver to release covers 2 With the bottom of the cover released gently remove it from the TPMC 4SMD 3 If removing the bu...

Page 27: ...cal box Mounting in a US Electrical Box NOTE When mounting the TPMC 4SMD into an electrical box the box must be installed horizontally To mount the TPMC 4SMD into an electrical box use the following p...

Page 28: ...electrical box Mounting the TPMC 4SMD into an Electrical Box 3 Carefully position the front of the TPMC 4SMD over the back panel and gently snap it into place as shown in the following illustration Sn...

Page 29: ...ons use the security type Torx screws 2025311 or 2025312 along with the included Torx screwdriver bit 2025915 NOTE Parts 2007152 and 2025311 come with black models Parts 2007160 and 2025312 come with...

Page 30: ...attachment to the electrical box Mounting the TPMC 4SMD into a European Electrical Box Screws 2 4B x 3 4 2019088 3 Carefully position the front of the TPMC 4SMD over the back panel and gently snap it...

Page 31: ...nded Cleaning Keep the surface of the touch screen free of dirt dust or other materials that could degrade optical properties Long term contact with abrasive materials can scratch the surface which ma...

Page 32: ...and any files on the Web site are for authorized Crestron dealers and Crestron Service Providers CSPs only New users must register to obtain access to certain areas of the site including the FTP site...

Page 33: ...Pro e or Crestron Toolbox Firmware Check the Crestron Web site to find the latest firmware New users must register to obtain access to certain areas of the site including the FTP site Upgrade TPMC 4S...

Page 34: ...much power is needed for the system TPMC 4SMD is not responding No IP address configured obtained Use the internal setup menu refer to Ethernet Setup on page 12 or Crestron Toolbox to create verify Et...

Page 35: ...te www crestron com onlinehelp First time users must establish a user account to fully benefit from all available features Future Updates As Crestron improves functions adds new features and extends t...

Page 36: ...on Electronics Inc Operations Installation Guide DOC 7027E 15 Volvo Drive Rockleigh NJ 07647 2028205 Tel 888 CRESTRON 02 15 Fax 201 767 7576 Specifications subject to www crestron com change without n...

Reviews: