background image

Crestron 

ST-1700CIR


IR Wireless Touchpanel


KEY CLICK SETUP SCREEN 


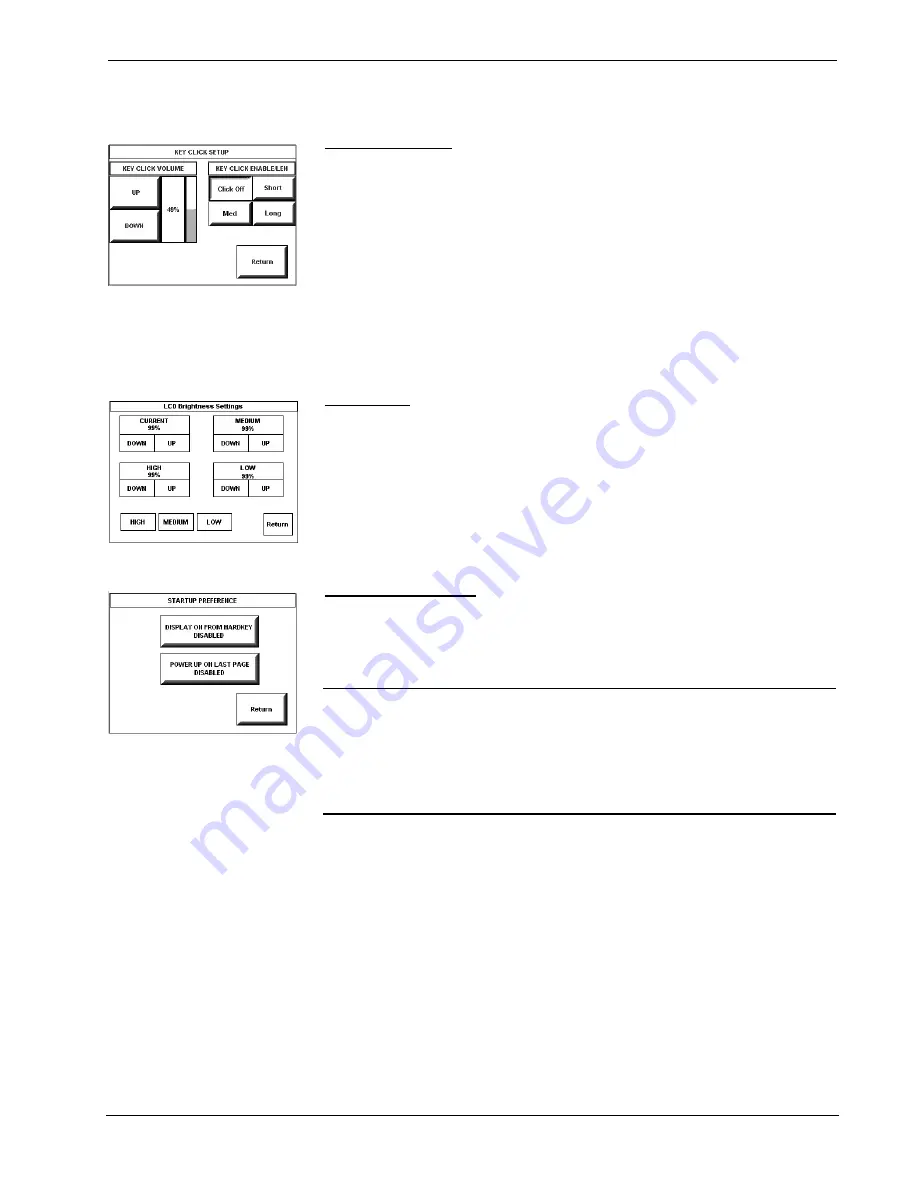
Key Click Setup 

From the SETUP MENU, press the

 Key Click Enabled

 button to open the KEY 

CLICK SETUP screen. (If the function is currently disabled, the button legend is 

Key Click Disabled

.”) To enable an audible tone (beep) when the touchpanel 

buttons are pressed, select among the 

Short, Med, 

or 

Long 

KEY CLICK 

ENABLE/LEN buttons to set the duration of the tone. The touchpanel responds with 
a corresponding signal. To disable the feature, select 

Click Off

Use the KEY CLICK VOLUME 

UP

 and 

DOWN

 buttons to increase and decrease 

the volume of the signal. The display to the right of the buttons shows the relative 
volume from 0% to 100%, both as a numeric value and, for a quick visual reference, 
as an analog bar.  

Select the 

Return

 button to return to the SETUP MENU. 

SCREEN SETTINGS - 
BRIGHTNESS 


Brightness 

From the SETUP MENU, press the 

Brightness 

button to open the LCD Brightness 

Settings screen. The screen permits changes to the “current” screen brightness level, 
or setup of preset values for low, medium, and high brightness settings. “Joins” 
assigned to the 

HIGH

MEDIUM

, and 

LOW

 buttons at the lower left make it 

possible to select these presets from buttons on a program page. The 

UP

 and 

DOWN

buttons increase and decrease screen brightness, respectively, for each level. 

Select the 

Return

 button to return to the SETUP MENU. 

 
STARTUP PREFERENCE 


Startup Preference 

The Startup Preference feature allows (when the touchpanel is off or in standby) the 
display to come on or stay off when a “quick” pushbutton is pressed. From the 
SETUP MENU, press the 

Startup Preferences 

button to open the STARTUP 

PREFERENCE screen.  

NOTE:

  The “Display On From Hardkey” feature applies only to units with the 

1700C-BTNB-BEZEL or 1700C-BTNB-BEZEL-BLANK option installed. These 
options provide for installation of a new bezel and ten “quick” pushbuttons, five on 
each side of the LCD screen. You can use these buttons to access any frequently used 
commands. For detailed information, refer to the latest version of the 1700C Button 
Bezel Kit Operations and Installation Guide supplied with the options (Doc. 6224), 
available from the Crestron website (http://www.crestron.com/manuals)


When pressed, the 

DISPLAY ON FROM HARDKEY

 button toggles between 

ENABLED and DISABLED. With ENABLED selected, the display comes on when 
one of the “quick” pushbuttons is pressed. With DISABLED selected, the display 
stays off when a “quick” pushbutton is pressed (if touchpanel was off, it goes to 
standby).  The default is DISABLED. 

The 

POWER UP ON LAST PAGE

 button also toggles between ENABLED and 

DISABLED. Enabling this option causes the unit to “remember” the last page and 
which “joins” were active when the unit was last powered down, and return to that 
state when next powered on. If the option is disabled, the unit will always go to the 
first page of the project and all “joins” are cleared.  

Select the 

Return

 button to return to the SETUP MENU. 

Operations Guide – DOC. 6469 

SmarTouch™ IR Wireless Touchpanel: ST-1700CIR  

  9 

Summary of Contents for SmarTouch ST-1700CIR

Page 1: ...Crestron ST 1700CIR SmarTouch IR Wireless Touchpanel Operations Guide...

Page 2: ...by the Technical Documentation department at Crestron Electronics Inc 15 Volvo Drive Rockleigh NJ 07647 1 888 CRESTRON All brand names product names and trademarks are the property of their respectiv...

Page 3: ...quirements for the PC 12 Programming with Crestron SystemBuilder 12 Programming with SIMPL Windows 12 Programming with VisionTools Pro e 14 Virtual Feedback 15 Example Program 20 Uploading and Upgradi...

Page 4: ......

Page 5: ...true one touch control over a broad range of complex devices and systems IR Wireless Affords an operational range of up to 50 feet line of sight The unit is compatible with any Crestron control syste...

Page 6: ...onal bezel two 5 button switch actuators and ten black pushbuttons blank five for each side of the LCD screen You can use these buttons to access any frequently used commands Refer to Appendix Install...

Page 7: ...g Station Charger STI DSN included Power Supply PWI 1215 included 18 Watts 1 5 Amps 12 Volts DC 18 Watts 1 5 Amps 12 Volts DC 230 Volts AC 50Hz Included Accessories ST I DSN ST BTBN PW I 1215 1700C BT...

Page 8: ...it non palette graphics The electronic hardware is housed in a black and silver molded plastic enclosure shown below Connectors to power the unit and upload touchscreen projects are located on the sid...

Page 9: ...rain or expose it to unnecessary moisture Industry Compliance As of the date of manufacture this unit has been tested and found to comply with specifications for CE marking and standards per EMC and...

Page 10: ...er the touchpanel Identity Codes The ST 1700CIR touchpanel uses two distinct types of identity codes Cresnet identity Net ID or Cresnet ID and IR ID These codes are assigned to the touchpanel from an...

Page 11: ...ION MENU shown to the left The CALIBRATION MENU offers the choice to initiate calibration with the Perform Calibration button or return to the previous screen with the Return button Choose an option b...

Page 12: ...ect the Interface button on the SETUP MENU to display the SELECT INTERFACE screen shown to the left Then select either the CRESNET or the IR button to display the CRESNET INTERFACE MENU or the SELECT...

Page 13: ...Preference The Startup Preference feature allows when the touchpanel is off or in standby the display to come on or stay off when a quick pushbutton is pressed From the SETUP MENU press the Startup P...

Page 14: ...ears depending on the setting of the Power Up On Last Page option on the STARTUP PREFERENCE screen The specified time is displayed in minutes The default POWER DOWN timeout is 30 minutes NOTE Power Do...

Page 15: ...ng term contact with abrasive materials can scratch the surface that may detrimentally affect image quality For best cleaning results use a clean damp non abrasive cloth with any commercially availabl...

Page 16: ...or later Also requires Crestron Database version 17 6 0 or later Upload program and firmware Crestron Toolbox 1 01 06 or later Create labels for front panel buttons Crestron Engraver 2 4 1 2 or later...

Page 17: ...ntrol system The MC2W requires a CNXRMIRD connected to its IR input port Drag the ST 1700CIR IR ID 00 10 Only symbol from the Touchpanels Touchpanels Wireless One Way folder of the Device Library to t...

Page 18: ...in Number Assignment If the optional ten hard pushbuttons are installed you can use these buttons to access any frequently used commands refer to Appendix Installation of Optional Pushbuttons on page...

Page 19: ...yte characters it is essential that the operating system understand the language Windows XP is available in many international languages and add on software is available for other versions of Windows...

Page 20: ...nd view their various feedback properties Interlock An interlock consists of a number of assigned buttons grouped together so that button selection is mutually exclusive within the group This is an im...

Page 21: ...ish to modify an existing group In either case the Create Interlock window appears Create Interlock Window For new interlock groups move the cursor over each button to be added and left click to selec...

Page 22: ...o durations are included in the group This is an important feature when one wishes to guarantee that a single selection can activate a number of functions For example one can unify the following funct...

Page 23: ...s high even after the button is released until the button is pressed again Because there is no way to communicate the state of the toggle button between the panel and the control system by using that...

Page 24: ...to the control system is the join number of the button that specifies the sequence On the touchpanel if timing is specified in the sequence the button that specifies the sequence will appear active fo...

Page 25: ...version of the 2 Series Control Systems Reference Guide Doc 6256 Programs Projects and Firmware Display the network device tree Tools Network Device Tree to show all network devices connected to the...

Page 26: ...during upload Refer to Select Interface in this Operations Guide Problem with cable between control system and touchpanel Check the cable for errors or poor connections Wrong screens appear on touchpa...

Page 27: ...ck PWI 1215 International External Power Pack Further Inquiries If you cannot locate specific information or have questions after reviewing this guide please take advantage of Crestron s award winning...

Page 28: ...bezel from the base 3 Assemble the supplied membrane switches to the pushbutton sets Notice that the pushbutton sets fit snugly on the membrane switches Refer to the following Notes 4 Put the assembl...

Page 29: ...data or instructions from or to another computer b for local campus or wide area network internet or web hosting services or c pursuant to any rental sharing or service bureau arrangement The Software...

Page 30: ...90 days from the date of receipt and b that any hardware accompanying the Software will be subject to its own limited warranty as stated in its accompanying written material Crestron shall at its opt...

Page 31: ...90 days batteries and incandescent lamps are not covered This warranty extends to products purchased directly from CRESTRON or an authorized CRESTRON dealer Purchasers should inquire of the dealer reg...

Page 32: ...Crestron Electronics Inc Operations Guide DOC 6469 15 Volvo Drive Rockleigh NJ 07647 2014709 Tel 888 CRESTRON 08 06 Fax 201 767 7576 Specifications subject to www crestron com change without notice...

Reviews: