4
Installing and Activating Your mini box
Follow these steps to connect and activate your new mini box.
ConneCting your mini box
Connect the mini box to the cable outlet by disconnecting the cable from the back of the TV
and connecting it to the back of the mini box.
Connect the mini box to your TV.
If you have a Standard Definition TV:
• Use the coaxial cable in your installation kit. Connect one end of the cable to back of the
mini box and the other end to the “Cable In/RF In” input on the back of your TV.
If you have a High-Definition TV:
• Use the HDMI cable in your installation kit. Connect one end of the HDMI cable to the back of
the mini box and the other end to the HDMI port on the back of your TV.
Plug in your mini box.
• Connect the power cord to the back of your mini box and then plug the other end into a
power outlet or surge protector.
Turn on your TV.
If you have a Standard Definition TV:
• Turn on your TV and tune it to channel 3 or 4.
If you have a High-Definition TV:
• Turn on your TV and make sure your TV’s input is set to HDMI
Complete the mini box Activation Process.
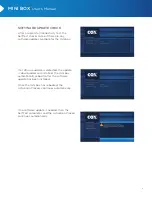
• The mini box Activation Process will begin automatically with a self-check of the mini box.
You will not need to take action during the Activation Process unless troubleshooting is
needed. This is a good time to put batteries in your remote control.
2
CHAPTER
1
2
4
5
3


