rings should be replaced, measure the radial thickness
and compare it to the chart in Appendix B.
4.4 Piston Replacement
1. To replace the pistons, depressurize the compressor
and purge if necessary.
2. Remove the compressor cylinder cap, head and
cylinder (see section 4.2).
3. Remove the piston cap by loosening and removing the
socket head bolts holding the piston cap to the piston
(see figure 4.3).
4. Next, remove the lock nut and lift the piston off the end
of the piston rod.
5. Check the thrust washer and shims for damage and
replace if necessary.
6. Before installing the new piston, measure the thickness
of the existing shims.
7. Replace the cylinder.
8. Install the piston with the same thickness of shims as
before, and with new piston rings and expanders.
9. Now remove a lower valve and measure dimension
“Y” at the bottom of the piston shown in Appendix E—
Piston Assembly Details. If this measurement does not
fall within the tolerances listed in the piston assembly
details (Appendix E), remove the piston, adjust the
shims as necessary and remeasure the “Y” dimension.
10. When the piston is properly shimmed, tighten the lock
nut as shown in Appendix B.
11. Replace the piston cap with the same thickness of
shims as before.
12. Reinstall the piston cap and cylinder head.
13. Now remove an upper valve and measure dimension
“X” at the top of the piston shown in Appendix E—
Piston Assembly Details. If this measurement does
not fall within the tolerances in Appendix E, remove
the cylinder head and piston cap and adjust the shims
as necessary. Repeat the steps and measure the “X”
dimension again.
14. When the piston cap is properly shimmed, tighten the
socket head bolts in an alternating sequence. Torque
socket head bolt to the values listed in Appendix B.
15. Replace the previously removed valves. Best results
will be obtained if new valve gaskets are used.
16. Follow standard startup procedures.
4.2 Heads
A compressor cylinder cap and head very seldom requires
replacement if the compressor is properly maintained.
The primary cause of damage to a cylinder cap or head
is corrosion and the entry of solid debris or liquid into the
compression chamber. Improper storage can also result
in corrosion damage to the cylinder cap and heads (for
proper storage instructions see chapter 5).
Many compressor repair operations require removal of
the cylinder cap and heads. While the compressor is
disassembled, special care should be taken to avoid
damage or corrosion. If the compressor is to be left open
for more than a few hours, bare metal surfaces should be
coated with rust preventative.
When reassembling the compressor, make sure the
bolts are retightened per the torque values listed in
Appendix B.
4.3 Piston Rings and Piston
Ring Expanders
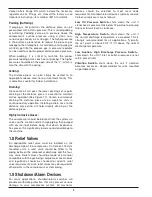
Figure 4.3: Piston cap removal
Piston ring life will vary considerably from application to
application. Ring life will improve dramatically at lower
speeds and temperatures.
1. To replace the piston rings, depressurize the
compressor and purge if necessary.
2. Remove the cylinder cap and heads to gain access to
the compressor cylinder.
3. Loosen the piston cap bolts and remove the piston
cap as shown in figure 4.3 by pinching two loose
bolts together.
4. Remove the lock nut and lift the piston off the end of
the piston rod.
5. Piston rings and expanders may then be easily
removed and replaced. Corken recommends replacing
expanders whenever rings are replaced. To determine if
13


