CAUTION: Always relieve pressure in the unit before
attempting any repairs. After repair, the unit should
be pressure tested and checked for leaks at all joints
and gasket surfaces.
If routine maintenance is performed as listed in chapter
3, repair service on your Corken gas compressor is
generally limited to replacing valves or piston rings.
When it comes time to order replacement parts, be sure
to consult the part details appendix in the back of this
Installation, Operation & Maintenance (IOM) manual for a
complete list of part numbers and descriptions.
4.1 Valves
Test the compressor valves by closing the inlet piping valves
while the unit is running; however, do not allow the machine
to operate in this way very long. If the inlet pressure gauge
does not drop to zero almost immediately, one or more
of the valves is probably damaged or dirty. However, it is
possible for the pressure gauge itself to be faulty.
In most cases, if a valve or gasket is leaking, it will create
more heat. On a single-stage compressor, you may be
able to compare the operating temperatures of the two
suction or discharge valves and cover plates to each
other. If a valve or gasket is leaking, it will have a higher
operating temperature. NOTE: This method will not be
suitable for two-stage compressors if each stage does
not have more than one valve.
Each suction and/or discharge valve assembly is easily
removed as a unit for inspection. If any part of the
valve assembly is broken, the valve assembly should be
replaced. See valve assembly parts details in the Appendix
E for a complete list of part numbers and descriptions.
If a valve is leaking due to dirt or any other foreign
material that keeps the valve plate and seat from sealing,
the valve may be cleaned and reused. New valve gaskets
and O-rings should be used to assure a good seal.
The valve holddown assemblies and valve assemblies
on the following pages show the various specifications
used on models 791 and 891 compressors. Since more
than one suction valve arrangement is available for
each model of compressor, it is necessary to know your
complete model number so you can identify the valve
type specification number (see example listed below).
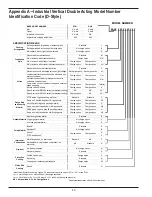
Model number D891AM 4 FBANSNN
Valve type = spec 4
Chapter 4—Routine Service and Repair Procedures
Valve Inspection and/or Replacement
Before removing and inspecting the valves, begin by
depressurizing and purging (if necessary) the unit.
Disassembly
1. Unscrew the valve cap and remove the O-ring.
2. Remove the valve cover plate, O-ring and holddown
screw by removing each of the four bolts. The holddown
screw is easily removed with the special wrench
supplied with your compressor.
3. After the cover plate and O-ring have been removed,
the valve cage, valve assembly and valve gasket can
be lifted out.
4. Inspect valves for breakage, corrosion, debris and
scratches on the valve plate. In many cases, valves
may simply be cleaned and reinstalled. If the valves
show any damage, they should be repaired or replaced.
Replacement is usually preferable although repair parts
are available. If valve plates are replaced, seats should
also be lapped until they are perfectly smooth. If more
than .005 of an inch must be removed to achieve a
smooth surface, the valve should be discarded. If
plates are replaced without relapping the seat, rapid
wear and leakage may occur.
Assembly
1. Insert metal valve gasket into the suction and/or
discharge opening of the head. The metal valve
gasket should always be replaced when the valve
is reinstalled.
2. Insert cleaned or new valve assembly. Make sure the
suction and discharge valves are in the proper suction
and discharge opening in the head.
3. Insert the valve cage.
4. Replace the O-ring and valve cover plate. Torque the
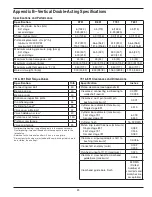
bolts to the value listed in Appendix B. CAUTION: Be
sure the holddown screw has been removed.
5. To ensure the valve gasket is properly seated, insert
the holddown screw and tighten to the value listed
in Appendix B. NOTE: Gaskets and O-rings are not
normally reusable.
6. Replace the O-ring and valve cap and tighten to the
value listed in Appendix B.
7. Check bolts and valve holddown screws after first week
of operation. Re-torque if necessary. See Appendix B
for torque values.
12


