Cool-Icam CIC-300 User Manual Download Page 5

5

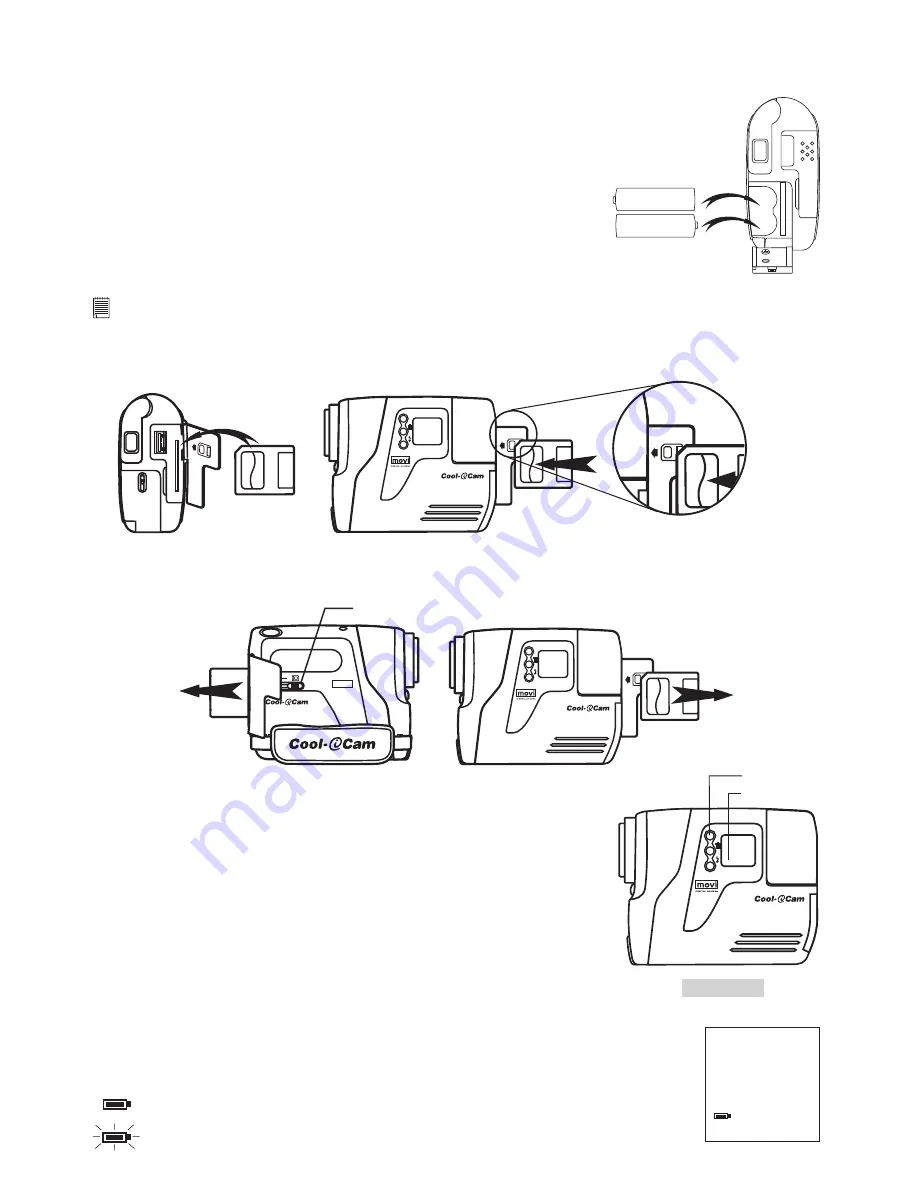
• Installing the batteries

4 x AAA Alkaline batteries are supplied with the product (2 for the camera and 2 for the flashlight) The 

flashlight is covered in a future section.

1. Open the camera battery door by sliding the lock downwards.

2. Insert the batteries as shown, ensuring you follow the +/- signs correctly.

3. Close the battery door.

AAA

+

-

AAA

+

-

• Installing the SmartMedia™ memory card

 IMPORTANT! The SmartMedia™ Card (SMC) holds all the Pictures, Video and Audio you take in its memory. You will not be able to 

take any Pictures, Video or Audio without the SMC being properly installed into the camera.

1. Open the flap on the rear of the camera as illustrated.

2. Insert the SMC ensuring the card is inserted the correct way round as illustrated below.

M

3. To remove the SMC open the flap on the rear of the camera and gently slide the release button in the 

direction of the arrow as illustrated.

M

DIGITAL CAMERA

movi

SmartMedia™ Card 

Release Button

• Turning the Camera On and Off

To turn the camera on, firmly press the Mode button 

M

.  The LCD display 

will come on after a few moments. To turn the camera off, press and hold 

down  the  Mode  button.  The  camera  will  bleep  and  the  LCD  display  will 

switch off.


Right View

M

Mode Button

LCD Display

• Checking the battery level 

Check  the  battery  power  level  before  taking  pictures.    For  guidelines  on  battery  usage,  see  Using  Your 

Batteries. 

HIGH

1. Turn the camera on.

2. Check the battery status level that appears on the camera LCD screen


batteries have adequate power.

   batteries need to be replaced.

Summary of Contents for CIC-300

Page 1: ...TM User s Manual Movi M ...

Page 2: ...nder open position 5 LCD Display 6 Mode Button 7 Delete Button 8 Flash Button 1 Viewfinder closed position 2 USB SmartMedia Card Door 3 Battery Door 4 Shutter Button 5 SmartMedia Card Release Button 6 Hand Strap DIGITAL CAMERA movi 1 2 3 4 5 6 2 1 3 4 M 5 6 7 8 ...

Page 3: ...ra 8 Setting the flash mode 8 Using the test button 9 5 Installing the Software onto a Computer 9 Window 98SE users 9 Install the software 9 Software included with your camera 9 Computer system requirements 13 6 Transferring Pictures Movie Clips Audio To Your Computer 14 Before you transfer pictures 14 Connecting to your computer 14 Transferring viewing the Pictures on a computer 14 Transferring p...

Page 4: ...anual Flash Light Optional Pouch Please take a moment to fill out and return this Registrat ion Card Your valuable input will help us to serve you better Product Registration Card 3 First Name Mr Middle Initial Last Name Address Ms Mrs Miss Please provide any commen ts you have regarding this product Registration Card No Town County Post Code Telephone No E mail Address Date of purchase Day Month ...

Page 5: ...he SMC ensuring the card is inserted the correct way round as illustrated below M 3 To remove the SMC open the flap on the rear of the camera and gently slide the release button in the direction of the arrow as illustrated M DIGITAL CAMERA movi SmartMedia Card Release Button Turning the Camera On and Off To turn the camera on firmly press the Mode button M The LCD display will come on after a few ...

Page 6: ...io Recording Mode Self Timer Mode Movie Mode Auto Flash Mode On Minutes Display Second Display SMC not inserted SMC write protected 2 Taking Pictures Taking a Picture 1 Switch the camera ON The camera LCD will be set to take Normal resolution pictures 2 Rotate the viewfinder out and upwards Back View Viewfinder 3 Frame your subject using the camera viewfinder 4 Press the Shutter button to take an ...

Page 7: ...Recording a Movie The camera can take Movie clips in both Normal and Low resolution mode which can be played back using the Arcsoft Software on a computer Movie clips are accompanied with audio to record all the sounds happening in and around your movie To increase the length of movie or audio clip increase the memory size of the SmartMedia Card SmartMedia Cards are available at all good camera an...

Page 8: ...shlight which is used with the camera picture mode Your camera is designed with Auto flash which means that the flash will operate when insufficient light is available to take a good picture Install the batteries 1 Open the flashlight battery compartment door 2 Insert the 2 x AAA batteries as shown ensuring to follow the signs correctly 3 Close the battery door AAA AAA Power connection plug Connec...

Page 9: ... automatically When the Windows software appears to have finished the operation close the Windows screen Remove the Windows CD and store safely 1 Before you begin close all other software applications open on your computer 2 Insert the CD supplied into the computer CD Rom Drive Open Close 3 The CD User Interface Screen will automatically launch 4 With the mouse click on each software interface but...

Page 10: ...ansfer When you have finish click on Cancel to go back to window 4 For further help on how to use PhotoStudio 4 0 go to Help to access the Help Topics Visit http www arcsoft com for all your FAQ s tips and technical support See Section 9 for more details ArcSoft Funhouse 1 0 Picture Editing Software ArcSoft Funhouse is an image entertainment application that enables users to create photo fantasies...

Page 11: ...wing steps 9 Go to Get Template to select the template and then press OK to confirm Important Make sure the My Camera CD ROM is in the CD ROM Drive 10 Go to Get Photo and then click the Live Video Mode icon and the Live icon will flash to indicate that it is in live mode Click the Capture icon to take a live snapshot Press OK to confirm 11 For further help on how to use ArcSoft Funhouse 1 0 go to ...

Page 12: ...will be shown on the chosen template Click Print when finish placing the images Print 6 For further help on how to use ArcSoft PhotoPrinter 2000 click the on the top right hand corner to access the Help Topics Visit http www arcsoft com for all your FAQ s tips and technical support See Section 9 for more details ArcSoft VideoImpression 1 6 Movie Making Software ArcSoft VideoImpression is an easy t...

Page 13: ...your file and then press save Video impression will ask you where you want to place your video Select video template Step 9 Select the album icon and your video clip you have just produced will appear in the video templates Double click on your video your video will now drop into the storyboard Running the video Step 10 Select the play movie icon which will assemble your video together Press the p...

Page 14: ...d select the Transfer button Adding into a particular Album 8 Select File Add to Album Save as dialog box will then be displayed Rename the file name Save Select Album if New Album is selected a dialog box will appear on your desktop for you to type in new album name OK Viewing the pictures 9 All the pictures selected have now been transferred into the PhotoStudio Album you have chosen 10 The pict...

Page 15: ... take a picture from the live video 6 Close the Photo taken The computer will ask you whether to save the photo 7 A dialogue box will appear Select a location on your computer hard drive and type a file name for your photo clip Now click on the Save button 8 The computer will now process the photo clip into the file location described in 7 9 The movie clip has now been stored on your computer 7 Us...

Page 16: ... image is too dark even though I used the Flash Unit I receive a message no image to download when I try to upload to my computer Connection failure Check all cables connections are secured Conflict with another camera driver capture device If you have any other camera installed on your computer remove the camera and it s driver completely from your system to avoid conflict with another camera or ...

Page 17: ... free number E mail china arcsoft com Fax 1 510 440 1270 E mail support arcsoft com For Oceania For Europe Middle East Africa Rest ArcSoft Australian Support Center of the World Baulkham Hills New South Wales ArcSoft Europe Support Center Ireland Tel 61 2 9899 5888 Tel 353 0 61 702087 Fax 61 2 9899 5728 Fax 353 0 61 702001 E mail support supportgroup com au E mail europe arcsoft com Visit www arcs...

Page 18: ...d from your Movi without fear of losing the data you have stored and additional cards can be then be inserted This is especially advantageous when you are away from your PC for prolonged periods of time like holidays where you don t have the facility to upload the images daily to your computer Important Note Before deciding the size of the SmartMedia memory card you may want to purchase it is advi...

Page 19: ...are not to be short circuited Do not mix alkaline standard carbon zinc or rechargeable nickel cadmium batteries Do not dispose the batteries in fire Batteries are to be removed from the camera when not in use Do not use rechargeable batteries These instructions should be retained for future reference Tips Your Safety Maintenance Your Camera should only be operated within the following environmenta...

Page 20: ...p exe and then plug the camera into your USB port Notes Uninstalling your My Camera Driver does not delete your album folders and therefore all images transferred into your default or created albums will be preserved Regulatory Information FCC Notice This device complies with Part 15 of FCC Rules Operation is subject to the following two conditions 1 This device may not cause harmful interference ...

Reviews: