c) Installation
1. Before installation ensure that the battery box is attached.
2. Attach the camera to a tree or another fixed object at a height of approximately 1 to 2 m with the fastening
strap (9) included, or on a tripod with the tripod socket (7). The camera should be pointed slightly toward
the ground. When setting up the camera, make sure that the lock screw (8) is fastened to prevent the
bottom cover (5) from opening. The fastening strap is fed through the openings on the battery box and
then attached to the object (e.g. a tree.)
3. Attach the game camera in such a way that the bottom cover is located at the bottom so that no water
can enter.
4. We recommend attaching the camera in a north or south direction. Avoid setting up the camera facing
east or west. The rising or setting of the sun may trigger the camera at unwanted times and the images
may also be overexposed.
5. Remove branches and bushes in front of the camera that might negatively affect the images taken. Also
remember that wind may cause foliage to enter the detection area and high temperatures may negatively
affect image quality.
6. Test the batteries before activating the camera to take shots.
7. Make sure an SD card is installed before turning on the camera.
8. Make sure that the camera is in camera operating mode ON and not in test mode, before leaving the
shooting area.
9. Make sure that the time and date are set correctly.
10. Fasten the bottom cover with the lock screw (8) before using the camera. Make sure that the housing is
closed correctly to prevent water from entering it.
Do not attach the camera near to heat sources or moving objects (e.g shrubbery or branches,
since unwanted pictures can be taken by this.
A moving lens might be recognizable inside the camera opening. This acts as an IR filter and
it is automatically controlled by the game camera. If the filter is swung forward, a quiet click
might be audible.
d) Recording mode
1. Set the IR LED switch 19 /40 (25) to 19 or 40 IR LEDs, depending on the lighting conditions. 19 IR
LEDs (1) are located on the top and 21 LEDs (4) near the bottom of the camera.
2. Switch the OFF / ON switch (22) to ON. You now have approx. 10 seconds to leave the detection range.
The red LED in the middle of the IR LED field (1) starts flashing for approx. 10 seconds. The camera is
now activated using the settings made in the menu.
3. There is no further indication in recording mode through the LED, to not drive away the animal or draw
the attention of a hiker to the device.
4. Please note that photos or videos are in principle made in black & white through the IR light. The IR light
is switched on automatically if the brightness sensor integrated into the game camera detects an ambient
brightness which is too low. The brightness sensor is located in the upper LED field near the red LED.
5. Photos are stamped with the temperature in C (Celsius) and F (Fahrenheit) near the bottom of the
image. The temperature shown is the camera temperature. However, this temperature differs from the
surrounding temperature only rarely. The temperature is not shown in videos.
e) Delete files
1. Files can be deleted in playback mode. To do so, set the ON / OFF switch to ON and then press the OK
button. Press the ▲ button to switch to playback mode.
2. Press the M button to delete a file (photo or video) or to format the SD card. The LC display shows
>Delete< and >Formatting<. Press the ▲ or ▼ buttons to select >Delete<. Press the OK button to
confirm the selection. Press the OK button to confirm the selection.
3. The LC display shows >This< and >All<. Press the ▲ or ▼ buttons to select >This< if you only wish to
delete one file. Press the OK button to confirm the selection.
4. The LC display shows >Delete this file?< and >No< and >Yes<. Press the ▲ or ▼ buttons to select
>No< or >Yes<. Press the OK button to confirm the selection and delete the file. After the file is deleted,
you have the opportunity to delete the next file. Press the M button if you do not wish to delete any further
files and return to the previous menu. Press the ▲ button to exit to playback mode.
f) Computer and TV connection
1. You can transfer the data to a PC to play videos by using a suitable video playback software there.
2. The game camera can be connected to a computer via the mini USB connection (33) to read and copy
the data of the memory card like from a card reader. Before connecting the game camera to a TV or
computer, first switch the OFF / ON switch to OFF. Connect the mini USB plug of the included USB
cable (11) to the mini USB connection of the camera and the USB A plug to a free USB connection on
your computer.
3. You can view recorded photos and videos on a TV or monitor by connecting the camera via the TV
connection (34). A corresponding video cable is included in the scope of delivery. The display picture on
the TV is the same as on the LCD and the menu is navigated on the camera.
Normally it is advisable to take the memory card out of the game camera, to be able to read
it with a conventional memory card reader. The transmission speed is also higher here for the
most part.
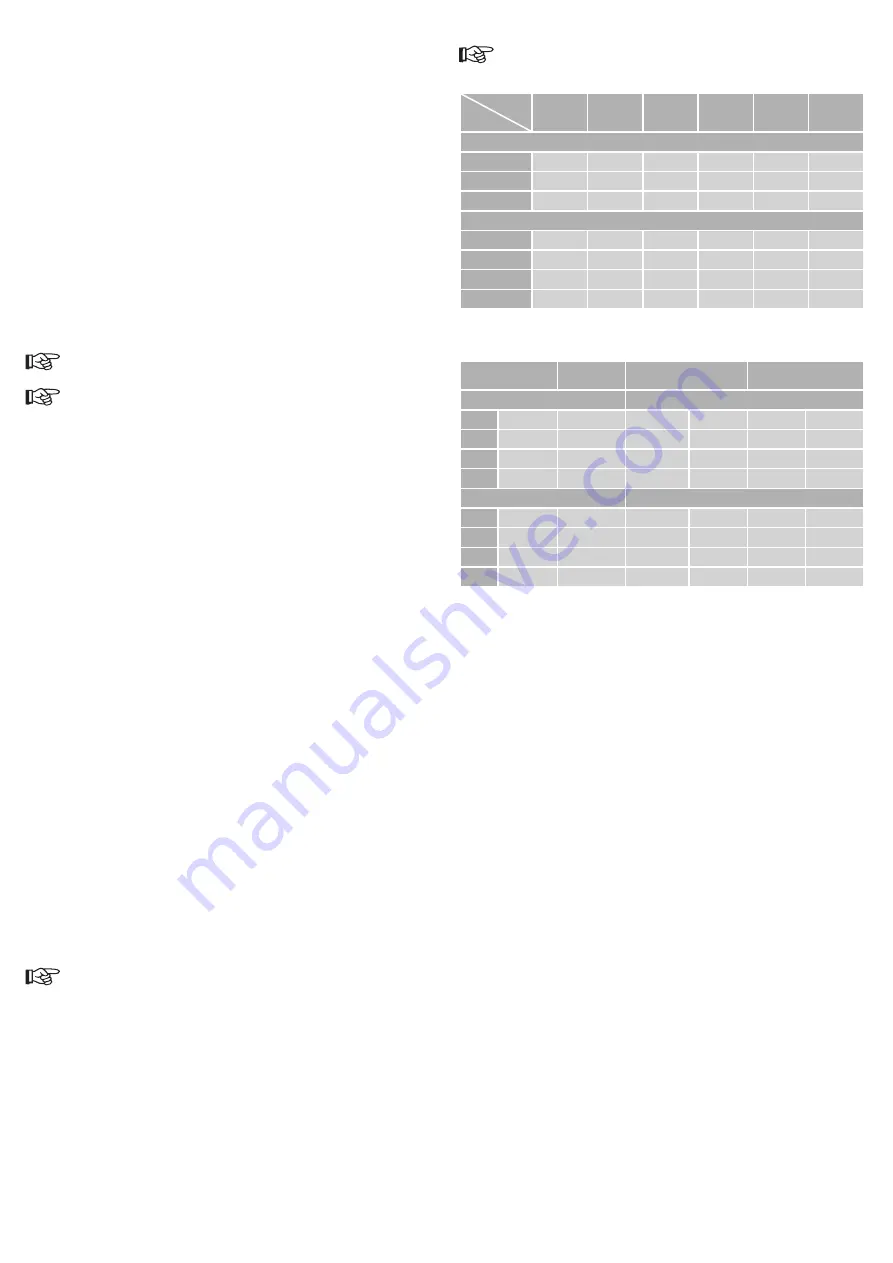
Usage information
The information provided here is intended for information purposes only and may differ during
use of the camera.
Approximate number of photos and videos in relation to the capacity of various SD card sizes.
SD card
Resolution
1 GB
2 GB
4GB
8 GB
16 GB
32 GB
Number of photos
5 MP
705
1373
2823
5517
11141
244962
8 MP
452
882
1813
3544
7157
14241
12 MP
201
392
806
1575
3181
6326
Length of videos (hours:minutes)
1080p HD
00:07
00:15
00:30
01:04
02:09
04:14
720p HD
00:09
00:18
00:38
01:14
02:31
04:53
640x480
00:26
00:50
01:44
03:24
06:52
13:09
320x160
01:14
02:24
04:57
09:40
19;32
39:15
Approximate battery life — using 8 AA alkaline batteries
(LC display off, device on, PIR sensor activated).
Photos per day
Operating
time
Videos per day
Operating time
IR LEDs on
IR LEDs on
5 MP
100 photos
51 days
320x240
10 s
10 videos
43 days
8 MP
100 photos
49 days
640x480
10 s
10 videos
42 days
12 MP
100 photos
45 days
1280x720
10 s
10 videos
40 days
1920x1080
10 s
10 videos
31 days
IR LEDs off
IR LEDs off
5 MP
100 photos
59 days
320x240
10 s
20 videos
119 days
8 MP
100 photos
55 days
640x480
10 s
20 videos
113 days
12 MP
100 photos
51 days
1280x720
10 s
20 videos
101 days
1920x1080
10 s
20 videos
159 days
Troubleshooting
Problem: Photos do not capture the desired object.
Recommended solutions
1. Check the sensor resolution. In warm regions, set the sensor to >High<. In colder regions, set the sensor
to >Low<.
2. Set up the camera at a location where no heat source may affect the camera’s field of view.
3. In rare cases, the camera may trigger when set up in the vicinity of water such as lakes or rivers. Always
point the camera at an area which is as still as possible.
4. Mount the camera to a fixed object (e.g. a tree).
5. At night, the PIR sensor detects objects which may be outside the range of the IR lighting. Reduce the
distance by setting the sensor resolution to a lower setting.
6. The rising or setting sun may affect the PIR sensor and trigger an image. Readjust the camera’s position.
7. If a person or animal moves too quickly, it may leave the detection range before the image is taken.
Mount the camera further back or readjust its position.
Problem: The camera stops and no photos are taken.
Recommended solutions
1. Make sure that the SD card is not full. In the menu, set the photo delete function to >ON< so that the
camera keeps taking images even once the SD card is full. The oldest files on the SD card will be deleted
to make space for new ones.
2. Make sure that the inserted batteries supply sufficient power.
3. Make sure that the camera is on. Set the ON / OFF switch (22) to ON.
4. Use the camera to format the SD card if no photos are taken.