background image


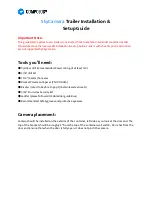
Attaching the camera:  

Once you've identified the location to install the camera, then:  

1. Drill the turret hole using the hole saw. This should go all the way through the Duraplate 

leaving a clean through-hole. 

2. Insert the Bracket Placement Spacer into the hole. It should seat comfortably flat on the 

trailer surface. 

3. Peel the cover layer pieces off the double-stick tape on the back side of the bracket, and 

taking care to keep the bracket vertically oriented, press the bracket firmly against the trailer 

to set the tape. 

4. Using the 3/16” drill bit, drill out the 8 rivet holes. 

5. Using the rivet tool, set the 8 rivets in the holes. 

6.

CRITICAL:

 Before installing the camera in the bracket, write down/record the device ID. This is 

located on the front transparent housing, just above the camera turret. The ID should start 

with “SKYCAM”. This ID will be needed for the BLE pairing to the Hub/Gateway. 

7. Place the camera in the bracket and attach the 4 security screws using the 5/32" Pin-in-Hex 

Security Bit.   


Summary of Contents for SkyCamera

Page 1: ... 3 16 drill bit 1 3 4 44mm hole saw Bracket Placement Spacer PN 190 0035 Riveter rated to be able to pop 3 16 stainless steel rivets 5 32 Pin in Hex Security Bit Ladder please follow all OSHA ladder guidelines Recommended Safety gloves and protective eyewear Camera placement Camera should be installed on the exterior of the container left side as you look at the door end The top of the bracket sho...

Page 2: ...acket and taking care to keep the bracket vertically oriented press the bracket firmly against the trailer to set the tape 4 Using the 3 16 drill bit drill out the 8 rivet holes 5 Using the rivet tool set the 8 rivets in the holes 6 CRITICAL Before installing the camera in the bracket write down record the device ID This is located on the front transparent housing just above the camera turret The ...

Page 3: ...wipe to the right of the LED status indicator The magnet should be held in place for 3 seconds at which point the LED should rapidly flash yellow orange Once rebooted the device will blink blue for 20 seconds at which point it will either blink green indicating the hardware checks are okay or red indicating a hardware fault If green try BLE pairing a second time If red replace it with a new camera...

Page 4: ... limits are designed to provide reasonable protection against harmful interference in a residential installation This equipment generates uses and can radiate radio frequency energy and if not installed and used in accordance with the instructions may cause harmful interference to radio communications However there is no guarantee that interference will not occur in a particular installation If th...

Reviews: