

Set up Guide
Thank you for purchasing a Gardenature camera
kit
Gardenature nest box camera systems have won many awards
and are one of the best available on the market today!
Our unique nest box is designed to attract the widest range of
garden birds.
We use high quality Western Red Cedar (from renewable
sources). Cedar has its own natural oils and does not require
treatment, but if you wish to coat it in a water based preservative
then this will help to protect it against the harshest weather
conditions over the longer term. The camera is safely housed
inside a sliding drawer within the roof of the nest box; this will
provide excellent top-down views of the nesting chamber.
Getting Started….
Slide out the drawer in the roof of the nest box to reveal the mini
video camera mounted on the quick release bracket inside.
Note how the cable connections are tucked neatly inside the
sliding drawer, exiting to the right side. Turn over the camera
drawer to reveal the camera lens protruding through the plastic.
Carefully remove the lens cap by gently pulling.
DO NOT TWIST!
The camera is pre-focused to approx 50mm from the base of the
nest box to allow for the height of the nest, so when you look at the
empty nest box on screen for the first time it may appear very
slightly out of focus. THIS IS FINE! Do not be tempted to adjust the
focus to get a crisp image of the base of the nest box. If you do it is
highly probable that the images of the nesting birds will be out of
focus. However, if you need to adjust the focus at any time simply
place a small item inside the nest box (approx 50-70mm from the
base) then with a small screw driver you can release the lens by
turning the lock screw anticlockwise. You will then be able to turn
the lens and re-adjust the focus manually by gently turning the
camera lens left or right, re-tighten the lock screw.
The angle of the camera can be pivot adjusted to ensure view is
centralised.
This Sony Effio Camera is fitted with a light sensor which will turn
on the IR (infrared) LED’s when there is insufficient natural light.
This may occur if you are testing the camera indoors and so the
image that you see may be in black & white, this is quite normal.
There are windows in the side of the nest box, these will let in
sufficient light to provide a good colour image outdoors. It is
important that you keep these windows from being covered by
plants otherwise the IR’s will try to compensate for loss of light on
dull days; this will cause loss of image colour.
The camera also has a built in microphone so you can hear as well
as see what’s going on!
Note:
This camera is NOT waterproof
so always keep it
sheltered in the supplied nest box or feeding device.
Connect the colour-coded
connectors on the end of the
cable (yellow = video, white =
Audio) to a spare AV socket
on your TV or video/DVD
recorder (use supplied Scart
adaptor if required) and the
black socket to the supplied
12v mains adaptor. Select the
appropriate AV channel using
your TV remote control. You
will normally find a button on your remote that is labelled AV,
INPUT or AUX. Or you may need to go into the TV menu to find
the available AV channels. Keep surfing through until images from
inside the nest box appear on screen. If you are planning to record
images via your video/DVD recorder then you will need to connect
through that equipment, then select the auxiliary channel input on
the video/DVD recorder to view the camera on your TV.
Please Note:
Make sure the yellow, white and black cable
connectors are placed inside the sliding drawer of the nest
box as these are not waterproof connections. Always switch
off power at the mains before swapping cameras between
boxes to eliminate any electrical surge or shock hazards!
This camera system can be connected to a PC, laptop or
interactive whiteboard using an appropriate capture/TV card. If you
do not have this type of connection you can purchase one of our
`
Video
– USB Adaptors’ available from the Gardenature
website
. Once connected your Gardenature camera will appear as
any other live video source (just like a web cam for example) and
as such can be used with most web cam software or any other
software that can accept a live video input. Please visit our website
and click on the
PC
Connectivity
section in the menu for further
product accessory details.
2. Where to site the nest box
When choosing a position for your nest box it is important that you
do not face the hole towards the prevailing wind as this will almost
certainly mean that rain will get into the box during wet and windy
weather. Traditionally, this means boxes are positioned facing
between north and east. Try to avoid direct or prolonged exposure
to sunlight on the box since over-heating can sometimes result in
heat stress to the young birds inside. Nest boxes fitted with a
colour camera have small plastic windows in the sides to allow just
enough light into the box for good colour images. Experiment with
the position of the nest box to give you the best results. Remember
to allow for excessive leaf cover later if you are erecting the nest
box during the winter.
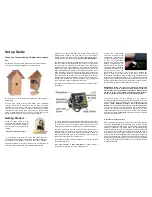
Actual Camera view inside
nest box.
Follow the guide below to help
ensure the best possible chance of
attracting any number of different
birds in front of your Gardenature
camera.
1. Before venturing outside….
It is advisable to connect the kit up and check that you
understand how everything works before installing; Cables are
not covered under warranty once they have been installed!
camera is functioning correctly (has not been damaged in
transit).