Compal FL90 User Manual Download Page 134

7  The Power System (Vista)


7-5


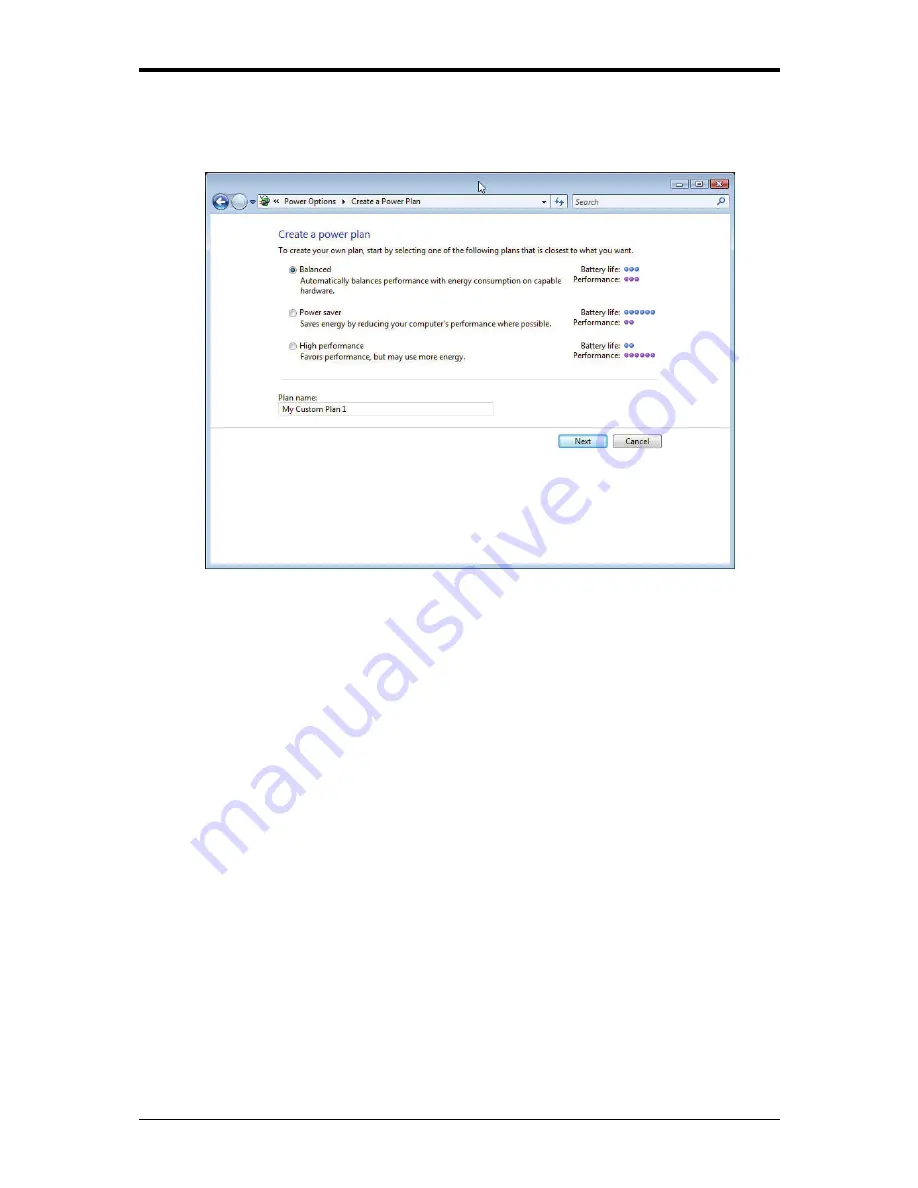
You can also individually alter and save each of these settings and schemes if desired. 
Choose from the following three power plans that best describes the desired relationship 
between power and performance. 


Windows Vista automatically chooses the SpeedStep mode to find the most appropriate 
speed for your processor according to the type of plan you choose and your current system 
demands. 

Summary of Contents for FL90

Page 1: ...the manual from the beginning to end Simply find your way to the section that interests you using the table of contents or browse through the manual You will come across the following icons in this ma...

Page 2: ...Communication Switch 1 5 1 1 12 Device Status Indicators Power Status 1 5 1 2 Right Side 1 6 1 2 1 Optical Media Drive 1 7 1 2 2 USB Port 1 7 1 2 3 RF in Connector 1 7 1 2 4 S Video in Port 1 7 1 2 5...

Page 3: ...2 10 2 3 1 Numeric Keypad 2 11 2 3 2 Keyboard Shortcuts 2 11 2 3 3 Windows Logo Key Functions 2 12 2 3 4 StickyKeys 2 13 2 3 5 Touch Pad 2 15 2 3 6 Customizing the Touch Pad 2 15 2 3 7 Finger Printer...

Page 4: ...k On 3 2 3 1 2 Turning Your Notebook Off 3 2 3 1 3 Logging Off 3 2 3 1 4 Adding User Accounts 3 3 3 1 5 Sleep Mode 3 3 3 2 Tips for Using Windows 3 4 3 2 1 Microsoft Windows Vista Help 3 5 3 2 2 Windo...

Page 5: ...g Files 3 29 3 8 7 Emptying the Recycle Bin 3 29 3 8 8 Retrieving Files From the Recycle Bin 3 30 3 9 Playing CDs and Movies 3 31 3 9 1 Inserting Discs 3 32 3 9 2 Adjusting the Volume 3 32 3 9 3 Adjus...

Page 6: ...6 2 6 Removing the Battery 6 9 6 2 7 Installing a Battery 6 10 6 2 8 Storing a Battery 6 10 6 2 9 Working With Extra Battery Packs 6 10 6 2 10 Maximizing Battery Life 6 10 Chapter 7 The Power System...

Page 7: ...up Program 8 2 8 2 1 Accessing the BIOS Setup Program 8 3 8 2 2 Launching Submenus 8 4 8 2 3 Saving Changes and Exiting the Setup Program 8 4 8 3 The Main Menu 8 5 8 4 The Advanced Menu 8 7 8 5 The Se...

Page 8: ...Do not operate the computer near water for example near a bathtub kitchen sink or laundry tub in a wet basement by a swimming pool or in the rain Do not connect or disconnect any cables or perform mai...

Page 9: ...your power cord make sure to position it around objects so it will not be cut or punctured When you disconnect a cable pull on its connector on its strain relief loop not on the cable itself As you pu...

Page 10: ...Replace only with the same or equivalent type battery recommended by the manufacturer Do not dispose of batteries in a fire They may explode Check with local authorities for disposal instructions Do n...

Page 11: ...eing hazardous to the environment Internal Modem Warnings CAUTION When using your telephone equipment basic safety precautions should always be followed to reduce the risk of fire electric shock and i...

Page 12: ...company may make changes to facilities equipment operations or procedures that could affect the proper functioning of your equipment If they do you will be notified in advance to give you an opportun...

Page 13: ...7 Do not allow anything to rest on the power cord Do not locate this product where people will step on the cord 8 If an extension cord is used with this product make sure that the total ampere rating...

Page 14: ...cy energy and if not installed and used in accordance with the instructions may cause harmful interference to radio communications However there is no guarantee that interference will not occur in a p...

Page 15: ...isolated from the protective earth The Norwegian text is that M kun tilkoples kabel TV nett via galvanisk isolator CE Notice European Union EU Declaration of Conformity BSMI Notice Taiwan Only Most C...

Page 16: ...ms of certain U S patents and other intellectual rights owned by Macrovision Corporation and other rights owners Use of this copyright protection technology must be authorized by Macrovision Corporati...

Page 17: ...1GB 2GB modules Upgradable to 4GB memory by two SO DIMM Easy install from bottom side Display Supports 15 4 WXGA 1280 x 800 TFT color LCD Supports 15 4 WXGA 1440 x 900 TFT color LCD Supports 15 4 WSXG...

Page 18: ...in jack x 1 Headphone out jack x 1 VGA port 15 pins x 1 TV out S Video port 7 pins x 1 DC in jack x 1 RJ 45 jack x 1 RJ 11 jack for 56Kbps V 92 Modem US Canada UK Germany French optional RF in connect...

Page 19: ...sk mode by time out or by hot key HDD Local Standby mode by time out LCD Local Standby mode by time out Low battery alarm beep Auto backlight off when LCD cover closed Full ACPI 2 0 supported LCD Auto...

Page 20: ...Specifications xiii Options 256MB 512MB 1GB 2GB SO DIMM DDR II modules Li ION Battery Pack PCI E Wireless module...

Page 21: ...1 Chapter 1 Introducing Your Notebook...

Page 22: ...in Camera 9 Finger Printer 2 Built in Microphone 10 Touch Pad 3 Display 11 Touch Pad Buttons 4 Power Button 12 Consumer Infrared Receiver optional 5 Easy Buttons 13 Wireless Communication Switch 6 St...

Page 23: ...tings see 6 1 Power Management XP or 7 1 Power Management Vista Windows XP or Vista which comes preinstalled goes into the shutdown sequence automatically if you press the power button while on In Win...

Page 24: ...keyboard includes a numeric keypad and the Microsoft Windows logo key See 2 3 Keyboard and Touch Pad XP or 3 3 Keyboard and Touch Pad Vista for details on using keyboard shortcuts 1 1 7 Finger Printe...

Page 25: ...ouch Pad Buttons The left and right touch pad buttons perform the same functions as the left right buttons of a standard mouse 1 1 10 CIR Optional The CIR is an infrared receiver which allows your not...

Page 26: ...tivated 1 1 12 Device Status Indicators Power Status The LEDs on the front of notebook indicate the device and power status 1 Power On Blue 2 Battery Charge Blue Amber 3 Bluetooth Amber Wireless Blue...

Page 27: ...1 Introducing Your Notebook 1 6 1 2 Right Side The following picture shows the right side of the notebook 1 Optical Media Drive 2 USB Ports 3 RF in Connector 4 S Video in Port 5 AC Adapter Connector...

Page 28: ...rnal keyboard or printer to the computer USB is a peripheral expansion standard that supports data transfer rates up to 480 Mbps USB peripherals have a single standard for cables and connectors You ca...

Page 29: ...nect an AC adapter when your notebook is switched on or off While the AC adapter works with electrical outlets worldwide power connectors and power strips vary by country Ensure you use a compatible c...

Page 30: ...lowing picture shows the left side of the notebook 1 VGA Port 2 LAN Jack Green Amber 3 Modem Jack 4 S Video out Port 5 High Power USB Ports 6 IEEE 1394 Port 7 New Card Slot 8 Multiple Digital Media Sl...

Page 31: ...vice like a TV set or device which has S video port to the notebook 1 3 5 High Power USB Port High power USB ports can provide power for devices that draw more than 100mA from the bus line such as cam...

Page 32: ...ucing Your Notebook 1 11 1 3 9 Audio Ports You can connect a headphone or an external speaker to the port and a microphone to the port The built in speakers are disabled when a device is connected to...

Page 33: ...1 Introducing Your Notebook 1 12 1 4 Rear Side The following picture shows the rear side of the notebook...

Page 34: ...ing Your Notebook 1 13 1 5 Bottom Side The following picture shows the bottom side of the notebook 1 Battery Pack 2 Battery Release Latch 3 HDD Cover 4 Battery Lock Switch 5 Thermal Cover 6 Memory Mod...

Page 35: ...e 6 2 Battery XP or 7 2 Battery Vista To remove the Battery Pack 1 Move the Battery Lock Switch to the right Unlock position 2 Slide the Battery Release Latch to the left and gently pry the Battery Pa...

Page 36: ......

Page 37: ...2 Chapter 2 Operating Your Notebook XP...

Page 38: ...2 Operating Your Notebook XP 2 1 2 1 Turning Your Notebook On and Off Turning Your Notebook On Turning Your Notebook Off Logging Off Adding User Accounts Standby Mode...

Page 39: ...process is finished You can configure Windows XP to shut down or go into sleep mode by pressing the power button Open the Control Panel Power Options Advanced dialog box to do this 2 1 3 Logging Off W...

Page 40: ...ck a task click Create a new account 3 Under Name the new account enter the name of the new user Click Next 4 Under Pick an account type choose one of the following options Computer administrator User...

Page 41: ...ting Your Notebook XP 2 4 2 2 Tips for Using Windows Microsoft Windows XP Help Windows Desktop Desktop Cleanup Wizard Start Button Taskbar Notification Area System Tray Recycle Bin Control Panel My Co...

Page 42: ...2 Operating Your Notebook XP 2 5 2 2 1 Microsoft Windows XP Help For Microsoft Windows XP help click the Start menu then click the Help and Support icon The Help and Support Center dialog box opens...

Page 43: ...ating Your Notebook XP 2 6 2 2 2 Windows Desktop Depending on your notebook setup and software your desktop may have different or additional shortcuts See 2 4 Personalizing Your Desktop for more infor...

Page 44: ...can be run any time by clicking Clean Desktop Now under Desktop cleanup 2 2 4 Start Button The Start button allows easy access to your notebook s programs The Start menu is designed to show the progr...

Page 45: ...mpty spot on the taskbar and select Toolbars choose the toolbar you want to add 2 2 6 Notification Area System Tray The icons in this area allow quick access to programs and computer functions includi...

Page 46: ...n the next window 2 2 9 My Computer My Computer allows you to see the disk drives and other external devices connected to your notebook The My Computer icon appears on your Desktop To see the contents...

Page 47: ...2 Operating Your Notebook XP 2 10 2 3 Keyboard and Touch Pad Numeric Keypad Keyboard Shortcuts Windows Logo Key Functions StickyKeys Touch Pad Customizing the Touch Pad Finger Printer...

Page 48: ...ain To use the primary function of a dual function key when the numeric keypad is enabled press and the desired key 2 3 2 Keyboard Shortcuts Sleep Wireless Bluetooth On Off To enable this function you...

Page 49: ...s Windows Explorer Opens the Run dialog box Opens the Search Results dialog box Opens the Search Results Computers dialog box when your notebook is connected to a network Opens the System Properties d...

Page 50: ...ndows logo key referred to as modifier keys in conjunction with other keys by pressing one key at a time instead of simultaneously To activate StickyKeys mode press the Shift key five times and then c...

Page 51: ...press the modifier key again each time Check Turn StickyKeys off if two keys are pressed at once to have StickyKeys automatically disable whenever any two keys are pressed simultaneously If Make soun...

Page 52: ...erforms a variety of other functions depending on the software To select an object first move the pointer over the object you want to select and then press the left button one time and release it The...

Page 53: ...fingerprint recognition problems follow these guidelines when using the finger printer Do not scratch or poke the finger printer with your nails or any hard or sharp objects Do not press the finger pr...

Page 54: ...te the fingerprint data do the following 1 Click Start All Programs Protector Suite QL Control 2 The Protector Suite Software screen is displayed 3 Click Fingerprints Delete 4 Click Settings Fingerpri...

Page 55: ...2 Operating Your Notebook XP 2 18 2 4 Personalizing Your Desktop Choosing a Wallpaper Choosing a Screen Saver Choosing a Desktop Theme Creating a Shortcut on the Desktop...

Page 56: ...the Screen saver pull down menu or choose None if you prefer not to activate a screen saver You can customize your screen saver by choosing Settings To check your selections click Preview To accept t...

Page 57: ...2 Operating Your Notebook XP 2 20 2 5 Display Adjusting the Brightness Using an External Monitor or Television Setting the Display Resolution...

Page 58: ...ernal device simultaneously or the external device only 2 5 3 Setting the Display Resolution To view a program at a specific resolution both the video controller and the display must support the progr...

Page 59: ...to the LAN or WAN consult your systems administrator If you are working at home or while traveling you need a dial up connection Ask your system administrator for the telephone number of the network T...

Page 60: ...2 Operating Your Notebook XP 2 23 2 7 Managing Programs Running Programs Adding Software Removing Software...

Page 61: ...already installed on your computer click Start All Programs If a program is listed in the All Programs menu or the Start menu the software is already installed Before installing software check the so...

Page 62: ...your operating system Start Control Panel Add or Remove Programs Change or Remove Programs Select the program that you want to remove and click the Change Remove button Instructions for removing prog...

Page 63: ...aging Files Updating Antivirus Software Backing Up Files Finding Files Copying a File on the Hard Drive Copying a File to a Floppy Disk Moving Files Renaming Files Deleting Files Emptying the Recycle...

Page 64: ...backed up your work you will lose your data files The most convenient way to back up your files is to a CD RW drive For smaller files you can use a floppy disk 2 8 3 Finding Files Right click on Start...

Page 65: ...ick the location where you want to move the file Click Move 2 8 7 Renaming Files Use Windows Explorer or My Computer to locate the file you want to rename and click the file to select it Click the Fil...

Page 66: ...ty Recycle Bin When the confirmation dialog box appears click Yes to delete all file s All files disappear from the Recycle Bin and are removed from your notebook 2 8 10 Retrieving Files From the Recy...

Page 67: ...2 Operating Your Notebook XP 2 30 2 9 Playing CDs and Movies Inserting Discs Adjusting the Volume Adjusting the Picture...

Page 68: ...player software 2 9 2 Adjusting the Volume If you do not hear anything when playing a CD or DVD check that the speakers are not muted Start All Programs Accessories Entertainment Volume Control In the...

Page 69: ...3 Chapter 3 Operating Your Notebook Vista...

Page 70: ...3 Operating Your Notebook Vista 3 1 3 1 Turning Your Notebook On and Off Turning Your Notebook On Turning Your Notebook Off Logging Off Adding User Accounts Sleep Mode...

Page 71: ...ton to shut down or enter sleep mode Click Start Control Panel Power Options Choose what the power button does 3 1 3 Logging Off With Microsoft Windows Vista multiple users have access to a single com...

Page 72: ...te additional user accounts 1 Click Start Control Panel User Accounts and Family Safety User Accounts Manage another account 2 When prompted click Continue 3 Click Create a new account 4 Enter the nam...

Page 73: ...3 Operating Your Notebook Vista 3 4 3 2 Tips for Using Windows Microsoft Windows Vista Help Windows Desktop Start Button Taskbar Notification Area System Tray Recycle Bin Control Panel Computer...

Page 74: ...3 Operating Your Notebook Vista 3 5 3 2 1 Microsoft Windows Vista Help For Microsoft Windows Vista help go to Start Help and Support The Windows Help and Support dialog box opens...

Page 75: ...ing Your Notebook Vista 3 6 3 2 2 Windows Desktop Depending on your notebook setup and software your desktop may have different or additional shortcuts See 3 4 Personalizing Your Desktop for more info...

Page 76: ...s you use most frequently To always keep an item on the Start menu no matter how often it s used right click the item and click Pin to Start menu puts the current session into memory and enters a low...

Page 77: ...needed Toolbars can be added to or removed from the taskbar Right click an empty spot on the taskbar and select Toolbars choose the toolbar you want to add 3 2 5 Notification Area System Tray The ico...

Page 78: ...rmanently 3 2 7 Control Panel In the Control Panel you can change how Windows looks and works Click the Start button and then Control Panel There are two interfaces you can choose either Control Panel...

Page 79: ...of a drive or folder open Computer then double click the icon of the drive or folder you want to view for example drive C You can also use Windows Explorer to see the contents of your notebook and fin...

Page 80: ...3 Operating Your Notebook Vista 3 11 3 3 Keyboard and Touch Pad Numeric Keypad Keyboard Shortcuts Windows Logo Key Functions Sticky Keys Touch Pad Customizing the Touch Pad Finger Printer...

Page 81: ...gain To use the primary function of a dual function key when the numeric keypad is enabled press and the desired key 3 3 2 Keyboard Shortcuts Sleep Wireless Bluetooth On Off To enable this function yo...

Page 82: ...s Opens Windows Explorer Opens the Run dialog box Opens the Search Results dialog box Opens the Search Results Computers dialog box when your notebook is connected to a network Opens the System Proper...

Page 83: ...referred to as modifier keys in conjunction with other keys by pressing one key at a time instead of simultaneously To activate Sticky Keys mode press the Shift key five times and then click YES Alte...

Page 84: ...y again each time Check Turn off Sticky Keys when two keys are pressed at once to have Sticky Keys automatically disable whenever any two keys are pressed simultaneously If Play a sound when keys are...

Page 85: ...s or performs a variety of other functions depending on the software To select an object first move the pointer over the object you want to select and then press the left button one time and release i...

Page 86: ...fingerprint recognition problems follow these guidelines when using the finger printer Do not scratch or poke the finger printer with your nails or any hard or sharp objects Do not press the finger p...

Page 87: ...ete the fingerprint data do the following 1 Click Start All Programs Protector Suite QL Control 2 The Protector Suite Software screen is displayed 3 Click Fingerprints Delete 4 Click Settings Fingerpr...

Page 88: ...3 Operating Your Notebook Vista 3 19 3 4 Personalizing Your Desktop Choosing a Wallpaper Choosing a Screen Saver Choosing a Desktop Theme Creating a Shortcut on the Desktop...

Page 89: ...ll down menu or click None if you prefer not to activate a screen saver You can customize your screen saver by choosing Settings To check your selections choose Preview To accept the settings click OK...

Page 90: ...3 Operating Your Notebook Vista 3 21 3 5 Display Adjusting the Brightness Using an External Monitor or Television Setting the Display Resolution...

Page 91: ...the video image to the display only the display and the external device simultaneously or the external device only 3 5 3 Setting the Display Resolution To view a program at a specific resolution both...

Page 92: ...ou are working at home or while traveling you need a dial up connection Ask your system administrator for the telephone number of the network To set up the connection go to Start Control Panel Network...

Page 93: ...3 Operating Your Notebook Vista 3 24 3 7 Managing Programs Running Programs Adding Software Removing Software...

Page 94: ...eady installed on your computer click Start All Programs If a program is listed in the All Programs menu or the Start menu the software is already installed Before installing software check the softwa...

Page 95: ...ption of your operating system Start Control Panel Programs Uninstall a program Select the program that you want to remove and click the Uninstall or Change button Instructions for removing programs w...

Page 96: ...ebook Vista 3 27 3 8 Managing Files Updating Antivirus Software Backing Up Files Finding Files Copying a File on the Hard Drive Renaming Files Deleting Files Emptying the Recycle Bin Retrieving Files...

Page 97: ...Programs can be reinstalled unless you have backed up your work you will lose your data files The most convenient way to back up your files is to a CD RW drive For smaller files you can use a floppy...

Page 98: ...ick the Organize menu and click Delete Click Yes to send the file to the Recycle Bin If you accidentally delete a file see 3 8 8 Retrieving Files From the Recycle Bin 3 8 7 Emptying the Recycle Bin Fi...

Page 99: ...etrieve it from the Recycle Bin Double click the Recycle Bin icon The Recycle Bin window will appear listing all deleted files their previous locations and the dates you deleted them Select the file y...

Page 100: ...3 Operating Your Notebook Vista 3 31 3 9 Playing CDs and Movies Inserting Discs Adjusting the Volume Adjusting the Picture...

Page 101: ...DVD player software 3 9 2 Adjusting the Volume If you do not hear anything when playing a CD or DVD check that the speakers are not muted Start All Programs Accessories Windows Mobility Center In the...

Page 102: ......

Page 103: ...4 Chapter 4 Caring for Your Notebook...

Page 104: ...ook Cleaning Your Notebook and Keyboard Cleaning the Display Cleaning the Touch Pad Cleaning the CD DVD Drive Precautions Never spray cleaning products directly onto your notebook s case or display On...

Page 105: ...devices such as a printer 2 Remove the battery pack 3 Use a slightly moistened soft lint free cloth to wipe your notebook s display Use only water or a recommended computer cleaner 4 1 3 Cleaning the...

Page 106: ...t is reading from or writing to a disk may damage the disk the drive or both Keep your notebook and disks away from objects that generate strong magnetic fields such as stereo speakers Information on...

Page 107: ...4 Caring for Your Notebook 4 4 4 2 Traveling Identifying Your Notebook Packing Your Notebook Setting a Password Travel Tips If Your Notebook is Lost or Stolen...

Page 108: ...id packing the computer with items such as shaving cream colognes perfumes or food Protect the computer the batteries and the hard drive from hazards such as extreme temperatures dirt dust liquids or...

Page 109: ...ers When traveling by air ensure that you have a charged battery available in case you are asked to turn on the computer Before you use the computer on an airplane verify that such usage is permitted...

Page 110: ......

Page 111: ...5 Chapter 5 Peripherals...

Page 112: ...5 Peripherals 5 1 5 1 PCI Express Cards PCI Express Card Types Installing a PCI Express Card Removing a PCI Express Card...

Page 113: ...ll be detected automatically when installed Usually PCI Express Cards have a mark or symbol to show which end to insert into the slot Insert the card according to the orientation symbol and slide the...

Page 114: ...5 Peripherals 5 3 5 1 3 Removing a PCI Express Card 1 Push the card all the way to in to release it 2 Pull the card out of the slot...

Page 115: ...fore removing an SD MMC MS card stop it running from the configuration utility on the taskbar Failure to do so could result in data loss Insert the SD MMC MS card into the card reader slot To remove t...

Page 116: ...the second slot matching up the notch along its connector rim with the tooth in the connection slot 5 When the module is secured press down gently until it snaps into place Depending on how much addit...

Page 117: ...6 Chapter 6 The Power System XP...

Page 118: ...6 The Power System XP 6 1 6 1 Power Management Managing Your Notebook s Power Power Management Modes Power Options Properties SpeedStep...

Page 119: ...his mode conserves power by switching off the hard drive and display after a preset period of inactivity a time out When standby mode is exited your notebook will return to the same operating state it...

Page 120: ...Power Options Properties window use one of the following methods to enter hibernate mode When you close the lid of your notebook When you press the power button When you press the sleep hot key Start...

Page 121: ...formance level Each preset power scheme has different time out settings for entering standby mode hibernate mode turning off the display and turning off the hard drive For more information on power ma...

Page 122: ...wn menu and then clicking OK Set the computer to Stand by Hibernate Do nothing when you close the laptop lid Set the computer to Ask me what to do Stand by Hibernate Shut down Do nothing when you pres...

Page 123: ...r adjustments to set the performance level Each preset power scheme has different time out settings for entering standby mode hibernate mode turning off the display and turning off the hard drive For...

Page 124: ...2 Battery Battery Performance Checking the Battery Charge Power Meter Low Battery Warning Charging the Battery Removing a Battery Installing a Battery Storing a Battery Working With Extra Battery Pac...

Page 125: ...s should never be disposed of with household waste Contact your local waste disposal or environmental agency for advice on disposing of used lithium ion batteries Only use the BATEL80L6 or BATEL80L9 b...

Page 126: ...rnal circuitry prevents the battery from overcharging Before using the battery for the first time it must be charged Connect the computer to an electrical outlet and allow the battery to fully charge...

Page 127: ...u spend a lot of time traveling working without connecting your notebook to an electrical outlet it may be a good idea to carry additional battery packs so you can quickly replace a discharged battery...

Page 128: ......

Page 129: ...7 Chapter 7 The Power System Vista...

Page 130: ...7 The Power System Vista 7 1 7 1 Power Management Managing Your Notebook s Power Power Management Modes Power Options Properties SpeedStep...

Page 131: ...ded for long periods place it in standby or hibernate mode You can exit either power management mode by pressing the power button 7 1 2 Power Management Modes 7 1 2 1 Sleep Mode This mode conserves po...

Page 132: ...bernate mode press the power button You cannot exit Hibernate mode by pressing a key or the Touch Pad For more information on Hibernate mode see 3 1 Turning Your Notebook On and Off 7 1 3 Power Option...

Page 133: ...wakes from sleep 7 1 3 3 Create a power plan Besides the three preset power plans offered in Windows Vista you can also customize your own power plan Select Create a power plan on the left pane of th...

Page 134: ...desired Choose from the following three power plans that best describes the desired relationship between power and performance Windows Vista automatically chooses the SpeedStep mode to find the most a...

Page 135: ...7 2 Battery Battery Performance Checking the Battery Charge Power Meter Low Battery Warning Charging the Battery Removing a Battery Installing a Battery Storing a Battery Working With Extra Battery P...

Page 136: ...ies should never be disposed of with household waste Contact your local waste disposal or environmental agency for advice on disposing of used lithium ion batteries Only use the BATEL80L6 or BATEL80L9...

Page 137: ...ternal circuitry prevents the battery from overcharging Before using the battery for the first time it must be charged Connect the computer to an electrical outlet and allow the battery to fully charg...

Page 138: ...ou spend a lot of time traveling working without connecting your notebook to an electrical outlet it may be a good idea to carry additional battery packs so you can quickly replace a discharged batter...

Page 139: ...8 Chapter 8 The BIOS Setup Program...

Page 140: ...ideo display options Password protection from unauthorized use Boot devices The settings made in the Setup program intimately affect how the notebook performs It is important therefore to first unders...

Page 141: ...will inform you of any errors or invalid settings and prompt you to run the Setup program to correct the problem Even if you are not prompted by a message instructing you to use the Setup program at...

Page 142: ...ersion XXXXX Language English US F1 Help Select Item F5 F6 Change Values F9 Setup Defaults Esc Exit Select Menu Enter Select 4 Sub Menu F10 Save and Exit The Menu Bar The top of the Setup screen has a...

Page 143: ...Submenus A submenu contains additional options for a field parameter To call up a submenu simply move the highlight to the desired field and press the Enter key The submenu opens If you are a first ti...

Page 144: ...KB Extended Memory 1022 MB BIOS Version XXXXX Language English US F1 Help Select Item F5 F6 Change Values F9 Setup Defaults Esc Exit Select Menu Enter Select 4 Sub Menu F10 Save and Exit System Time a...

Page 145: ...nded memory with an integer in the system but 32Bit SMI will occupy 1 MB and UMA frame buffer Integrated VGA uses only Extended Memory size Total memory size 1 MB 1 MB UMA frame buffer BIOS Version Th...

Page 146: ...512 MB Legacy USB Support Enabled Enhanced AHCI WinXP SP1 IAA driver supports AHCI mode F1 Help Select Item F5 F6 Change Values F9 Setup Defaults Esc Exit Select Menu Enter Select 4 Sub Menu F10 Save...

Page 147: ...ric characters a z 0 9 and be eight characters in length NOTE The supervisor password must be set before the user password can be set Set Supervisor Password Set User Password Phoenix TrustedCore tm S...

Page 148: ...word Confirm New Password If there is an existing password then setup will prompt with the following window instead and the current password will be required to be entered at first Set Supervisor Pass...

Page 149: ...shows the message While this field is highlighted press Enter The following message is shown Set HDD Master Password Enter New Password Confirm New Password If there is an existing password then setup...

Page 150: ...ormats of the password are as follows Length No more than 8 characters Characters Alphanumeric keys only The shift status Ctrl Shift Alt and Capital are ignored Trusted Platform Support This item will...

Page 151: ...Enable and Deactivated Change TPM State No Change F1 Help Select Item F5 F6 Change Values F9 Setup Defaults Esc Exit Select Menu Enter Select 4 Sub Menu F10 Save and Exit Security Chip State This fie...

Page 152: ...module bay Phoenix TrustedCore tm Setup Utility Main Advanced Security TPM State Boot Exit Item Specific Help HDD Hard Disk Model name CD DVD CD DVD Drive Model name FDD LAN Keys used to view or confi...

Page 153: ...xit Exit Saving Changes Allows the user to save changes to CMOS and reboot system The following message prompts the user to confirm after pressing Enter on the item Setup Confirmation Save configurati...

Page 154: ...user loads default values in CMOS Setup The following message prompts the user to confirm after pressing Enter on this item Setup Confirmation Load default configuration now Yes No Select Yes to conf...

Page 155: ...8 The BIOS Setup Program 8 16...

Reviews: