26
27
24 VDC +
–
24 VDC +
–
24 VDC +
–
24 VDC +
–
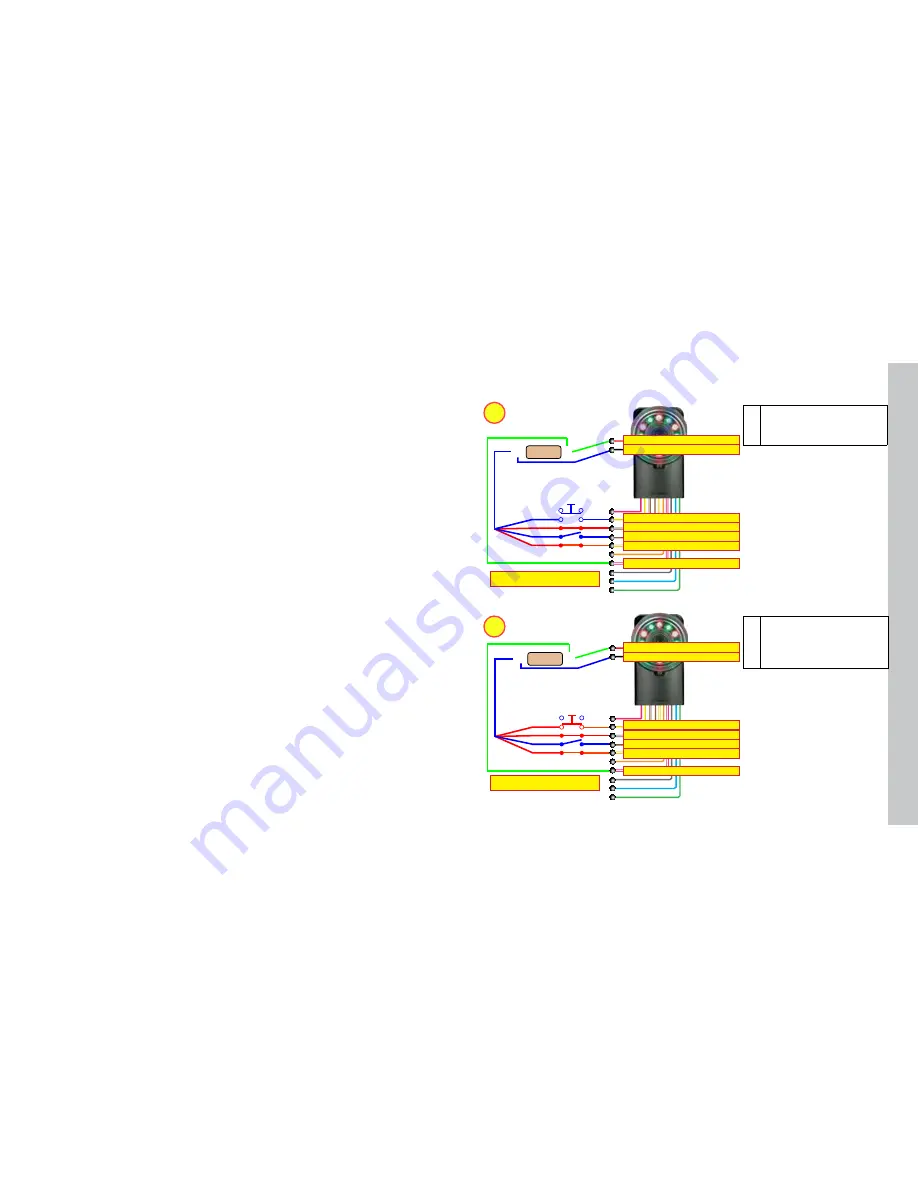
1
2
JOB CHANGE (YELLOW)
JOB CHANGE (YELLOW)
24 VDC+ POWER IN (RED)
24 VDC+ POWER IN (RED)
JOB SELECT 0 (WHITE/YELLOW)
JOB SELECT 0 (WHITE/YELLOW)
GROUND (BLACK)
GROUND (BLACK)
JOB SELECT 1 (BROWN)
JOB SELECT 1 (BROWN)
JOB SELECT 2 (WHITE/BROWN)
JOB SELECT 2 (WHITE/BROWN)
INPUT COMMON (WHITE/VIOLET)
INPUT COMMON (WHITE/VIOLET)
Checker sources current
Checker sources current
Job Control
Checker 3G has eight
Job slots
You can assign saved Checker Jobs to Job slots, then load them
while Checker is running by sending Job Select and Job Change signals to Checker through its
input lines
You can assign a Job saved on a Checker to any Job slot using the
Main Menu ►Job Control
screen on SensorView Teach Pendant or selecting
Checker->Set up Job Control
on the PC
In the
Job Control
dialog box, each Job slot, from 0 through 7, has a menu that you use to
specify the Job You can specify the same Job for multiple slots
To load a Job from a Job slot while Checker is in Run mode, you must apply +24 VDC to the four
input lines that you use to load a Job from a Job slot The JOB SELECT 0, JOB SELECT 1, and
JOB SELECT 2 lines specify the 3-bit Job slot number You use the JOB CHANGE line to load
the Job
Checker indicates that a Job Change succeeded by flashing its lights twice quickly. A failed Job
Change is indicated by three slow flashes. You can also configure a Checker output line to signal
when a Job Change succeeds or fails
The
Job Control
dialog box also lets you select the Boot Job (the Job Checker runs when it is
restarted after a power cycle in Run mode)
1 Raise JOB SELECT 0 and
JOB SELECT 2 lines (101
binary = 5 decimal)
2 Apply a pulse (minimum
15 ms) to JOB CHANGE
line to load the Job in Job
Slot 5
The example below shows how to load the Job in slot 5:
Summary of Contents for Checker 3G Series
Page 1: ...COGNEX Checker 3G Series User s Guide...
Page 25: ...COGNEX 590 7096...


