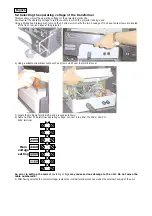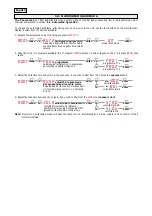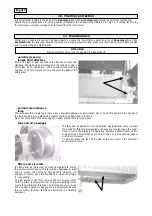
2) Locate the terminal strip marked
L
,
N
and
GND
.
3) Insert the 3 core X 2,5 mains cable into the
PG 13,5
connector and cable clamp.
Connect as in the diagram:
4) The cable clamp should be firmly tightened to ensure it seals against water.
5) Do not close/seal up the ballast until you have completed the following procedure.
7.4 Connecting the cable between ballast and body
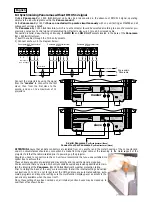
1) Using a suitable screwdriver, remove the 12 screws to allow internal access to the projector.
2) Use a suitable screwdriver to open the metal junction box by removing the 4 screws. Loosen the connection strip from its base.
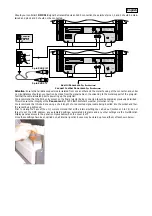
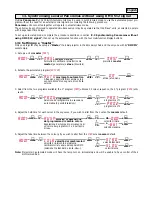
7) Locate the terminal blocks on both the projector and the ballast which are marked 1, 2, 3, 4, 5, 6 and GND.
8) Insert the multicore cable through the PG 21 connector (the larger one) and the cable clamp on both the ballast and projector
Connect as shown in the diagram.
9) The cable clamp should be firmly tightened to ensure protection against water.
10) Close up the ballast tightening the 4 bolts with an M 5 hex key.
Always stretch the cable between
ballast and projector
1
Ø min 4 mm2
2
Ø min 1,5 mm2
3
Ø min 1,5 mm2
4
Ø min 1,5 mm2
5
Ø min 4 mm2
6
Ø min 1,5 mm2
Ground (GND)
Ballast 1800
Panorama
Architectural
Panorama cyc 1800
Architectural
yellow/green
1
2
3
4
5
6
1
2
3
4
5
6
yellow/green
Phase (L)
Neutral (N)
Ground (GND)
Main
208/230/240 V
50/60 Hz
internally selectable
Ø min 2,5 mm2
Ø min 2,5 mm2
Ø min 2,5 mm2
8
9
English


