background image

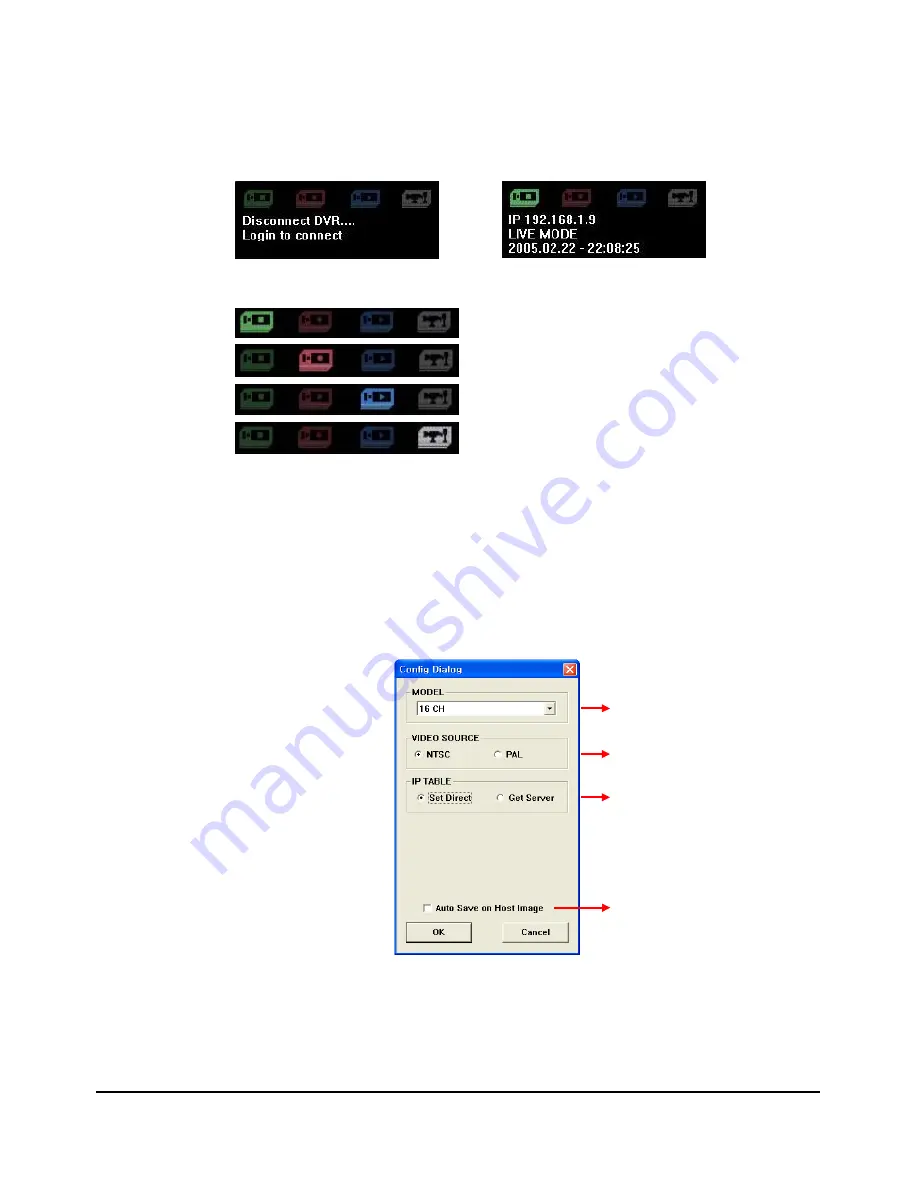
  Connection Status Indicator


 It shows the connection status of remote host software and the current mode of DVR. 


Figure 5-3: Connected


Figure 5-2: Disconnected


Figure 5-4: DVR Live Mode


Figure 5-5: DVR Record Mode


Figure 5-6: DVR Search Mode


Figure 5-7: DVR Setup Mode


 Configuration Button


 It enables you to set the remote host software. 

 When you click the Configuration button, it will show the Configuration Dialog Window. 


Figure 5-8: Configuration Dialog Window


- 67 - 

Summary of Contents for CDR-1610

Page 1: ...USER S MANUAL Stand Alone 16channel DIGITAL VIDEO RECORDER MODEL CDR1610...

Page 2: ...Graphic Symbol Explanation This symbol is intended to alert the user to the presence of important operating and maintenance servicing instructions in the literature accompanying the product This symbo...

Page 3: ...ck unless proper ventilation is provided or the manufacturer s instructions have been adhered to 10 Lightning For added protection for this product during a lightning storm or when it is left unattend...

Page 4: ...5 Time Date 40 Disk Manager 42 Camera 43 Record Configuration 45 Motion Configuration 51 Sensor Configuration 55 Network Configuration 57 Pan Tilt Configuration 59 System Information 60 Color Setting...

Page 5: ...Chapter 1 Introduction Technical Specifications Installation 5...

Page 6: ...Alarm Sensor Motion Detection Compression Technology Wavelet Compression Rate 4 1 250 1 Image Quality 1 30 Levels HDD Storage IDE 3 x Internal HDD 1 x Removable HDD SEARCH Search Options Manual Camer...

Page 7: ...time Refer to Part 7 Setup Run Factory Default menu on the SYSTEM menu Perform HDD formatting Escape from set Menu Set values for required options Network cable should be connected to the DVR unit bef...

Page 8: ...er Key 7 No 7 Channel Full Screen 5 Split Screen Right Key 8 No 8 Channel Full Screen 8 Split Screen 9 No 9 Channel Full Screen 10 Split Screen 10 No 10 Channel Full Screen 13A Split Screen Down Key 1...

Page 9: ...tput 10 Mouse P S2 11 Voltage Selector Camera Connection 1 Camera Input Connect the cameras to Video Input BNC connector on the back of the unit 2 Loop Output The Camera or video output is available f...

Page 10: ...1 5 S VHS Connector 3 VGA Monitor Connect the VGA monitor to DSUB 15 Pin Connector on the rear of the unit Figure 1 6 VGA Connector Sensor and Relay Connection 1 Sensor Alarm Input Connect the sensor...

Page 11: ...ect to the RS 485 cable up to 1 Km Figure 1 8 RS 485 connection for PTZ camera Ethernet Connection Ethernet connector is a RJ45 type The maximum cable length is 100m When you would like to use a longe...

Page 12: ...IS AC110V 50 60Hz IN POWER SELECT SWITCH PLEASE DOUBLE CHECK BEFORE YOU INPUT THE POWER INTO THE SYSTEM PAL NTSC Selection PAL or NTSC is set at the factory according to the country where the system i...

Page 13: ...Chapter 2 Operation Mode General Information Power On Off Display Screen System Status PTZ Control How to Record How to Replay How to Backup 13...

Page 14: ...the monitor The system is protected from any inadvertent pressing of any operator buttons But care should be taken when using the functions of HDD Formatting as then can lead to data loss To avoid any...

Page 15: ...2 20 0 2 25 5 4 43 3 C CA AM M 0 01 1 3 1 Figure 2 2 1 Status Icon Record Backup Motion or Freeze Sensor 2 Camera Name 3 Current Time Screen Division 4A 4D Split screen 5 Split screen 8 Split screen 9...

Page 16: ...3 Live Main Window Switching a Specific Screen By clicking one screen and drag drop to another screen you can switch a specific screen on the Live Screen This Window is always occupied this position...

Page 17: ...ve Main Window It is available to change into various SPLIT modes with buttons on the front panel To change into SPLIT mode Press the Display Key on the front panel Figure 2 5 Changing a split screen...

Page 18: ...he video display are deleted temporarily When the button is clicked again while OSD is in OFF position the system status will be the normal condition It is available to use pressing the OSD button on...

Page 19: ...SD On Off If you click the mouse left button when you are not using the PIP Window or ESC button on the front panel OSD will On Off Freeze Freeze is possible in the LIVE mode or RECORD mode This funct...

Page 20: ...k the mouse s right button or the ENTER button on the front panel To return to the LIVE MAIN Window click the mouse s right button or press the ESC button on the front panel Figure 2 11 Video enhance...

Page 21: ...how the SYSTEM STATUS Window Click the EXIT X button to return to the Live Main Window Figure 2 13 System Status button System Status Window indicates a several options such as value of MAC address IP...

Page 22: ...on on the front panel or mouse s wheel Figure 2 15 Video Loss lists Click the CLEAR LISTS button or press the ENTER button on the front panel and it show the message Window of which ask the clear or n...

Page 23: ...ess the mouse s left button or ENTER button on the front panel To complete the setting click the Full Split CH button again after select the value with mouse s wheel or UP DOWN button on the front pan...

Page 24: ...There are several recording options such as Manual Always Recording Motion or Sensor Event Recording Time Day Schedule Recording To start recording click the START RECOD button on the Live Main Windo...

Page 25: ...ong Record HDD Backup HDD or Backup USB to replay Figure 2 22 Search Path Lists Sort Select the one of the list sorted such as Emergency Manual Timer Sensor Motion To show the all list click the ALL b...

Page 26: ...Window By clicking the BAR button under the menu of searching time you can easily select the searching time from 1 to 10 stage of total recorded time Figure 2 25 Searching Time button Replay Camera S...

Page 27: ...lick the or button or use key Shuttle for rewinding and forwarding Press the or button to accelerate the speed up to 64 times Same as shuttle Frame by Frame In the pauses of the replay click the butto...

Page 28: ...ressing the OSD button on the front panel Figure 2 30 OSD OFF screen Zooming Screen Zooming screen is possible in the LIVE mode or RECORD mode This function is available in the full screen mode only I...

Page 29: ...p list on the replay lists But it can not be exceeded backup HDD space compare with total capacity of backup lists Figure 2 32 Backup list selection Backup Start End Time During replaying select the b...

Page 30: ...on the front panel Click the GO TO BACKUP button or press a direction control key on the front panel and it will show the BACKUP DIALOG screen Figure 2 34 Backup Dialog button Click the USB button and...

Page 31: ...DOWN button on the front panel set the backup disk to ENABLE Click STOP RECORD in the MAIN menu before setting the back up Figure 2 36 Backup Disk setting After you make backup disk to be enable enter...

Page 32: ...n the DISK MANAGER Window Figure 2 38 Unformatted Backup HDD Click the HDD button and it will show the check message for HDD format Click the OK button and you can see formatting process of the HDD Cl...

Page 33: ...SB LED is twinkling during the backup process Figure 2 41 Backup process icon Forced Stop Backup To stop backup forcibly go to Live Main Window and then click SEARCH button Click OK button to stop the...

Page 34: ...ter 3 Setup Mode Setup Window System Time Date Disk Manager Camera Record Configuration Motion Configuration Sensor Configuration Network Configuration Pan Tilt Configuration System Information Color...

Page 35: ...Click the SETUP button and it will show the Setup Window Click the EXIT button and it will return to the Live Main Window Figure 3 1 Setup Window 3 2 System Click the SYSTEM button it will show the Sy...

Page 36: ...ick the OK button to change to the selected language and then all of window will close and back to the Live Screen Click the CANCEL button to cancel the language setting Figure 3 4 Change Language Win...

Page 37: ...he RECORD RESOLUTION button and select the recording size by using the mouse wheel or UP DOWN key on the front panel After selection click the RECORD RESOLUTION button again for confirmation Figure 3...

Page 38: ...Remote Host Software and then insert USB device into DVR Click the USB START button and then the OK button to start firmware update During firmware updating mouse and front key will not be worked Whe...

Page 39: ...you set for ON it needs the password to control Setup Reply and Record PASSWORD Click the password button You can enter 8 digit password by using On Screen Keyboard and also you need to enter all of 8...

Page 40: ...the Time Format by using the mouse wheel or UP DOWN key on the front panel Time Format is selectable by 12 hour or 24 hour mode Figure 3 15 Time Format Time Setting Click STOP RECORD in the MAIN menu...

Page 41: ...set the Year by using the mouse wheel or UP DOWN key on the front panel After setting the Year click the Year button again for confirmation How to set the Month and Day are the same as above Figure 3...

Page 42: ...onnected Without HDD recording is not available but other functions can be used Figure 3 20 Disk Manager Window HDD Formatting Click STOP RECORD in the MAIN menu before formatting the HDDs Click the i...

Page 43: ...setting the camera on off It enables you to on off the camera input If you select OFF it will not display the video on the Live Screen You can select ON or OFF by using the mouse wheel or UP DOWN key...

Page 44: ...play On Off Setting Camera Title Click the CAMERA TITLE button on the Camera Setup Window it will show the Camera Title Setup Window Click the CAM button it will show On Screen Keyboard Enter the came...

Page 45: ...URATION IS ONLY AVAILABLE IN THE STOP RECORD MODE IF THE SYSTEM IS ON RECORDING MODE YOU SHOULD CHANGE TO STOP RECORD FOR RECORDING CONFIGURATION Emergency Record Mode Setting By pressing the Emergenc...

Page 46: ...cording frame and the recorded image quality on the Quality Setting Window The Quality Setting Window have two split windows One is the live image window and the other is after recording image window...

Page 47: ...ax Speed Allows you to set the max recording speed for all cameras 3 Total Speed Displays the total recording speed 4 Each Camera setting Allows you to set the recording speed for each camera Individu...

Page 48: ...e on the Motion Configuration Window Once this button is clicked the system begins to record automatically when the motion signal is detected Sensor Record Button To start the sensor trigger recording...

Page 49: ...e EXIT button it will return to the Record Configuration Window Figure 3 35 Weekday Saturday Sunday Schedule Setting ON OFF OFF mode represents simple monitoring without recording Schedule Time Settin...

Page 50: ...y ON OFF OFF mode represents simple monitoring without recording Schedule Time Setting It enables you to set the recording start time and ending time by Year Month Day Hour Minute with using the mouse...

Page 51: ...IF THE SYSTEM IS ON RECORDING MODE YOU SHOULD CHANGE TO STOP RECORD FOR MOTION CONFIGURATION Active It enables you to turn on off the motion detection You can select ON or OFF by using the mouse wheel...

Page 52: ...Detection Area Setting Click the MOTION AREA SET it will show the Motion Channel Selection Window It enables you to set the motion detection area and will display with yellow cell You can return to t...

Page 53: ...point until the motion detection area is the size you want to be Also you can create the multiple motion detection area for each camera Motion detection area displays by blue color and it change to ye...

Page 54: ...tion of video just posterior to motion detection The holding time is available from 1 to 10 seconds Figure 3 46 Motion Record Hold Time Setting Sensitivity It enables you to set the sensitivity of mot...

Page 55: ...TOP RECORD in the MAIN menu before setting the Active It enables you to turn on off the sensor detection You can select ON or OFF by using the mouse wheel or UP DOWN key on the front panel To set the...

Page 56: ...ick the A button Figure 3 52 Relay out On Off Setting Hold Hold Post Record means that it record a section of video just posterior to sensor activation The holding time is available from 1 to 10 secon...

Page 57: ...ck the IP MODE button and select the IP mode by mouse wheel or UP DOWN key on the front panel and click the button again to confirm If you select the DYNAMIC IP it will work after received IP address...

Page 58: ...show the Network Server Configuration Window Click the EXIT button on the Network Server Configuration Window it will return to the Network Configuration Window Figure 3 55 Network Server Configurati...

Page 59: ...n the front panel Click the PTZ company again to confirm and the MODEL setting box will show Figure 3 57 PTZ Company Selection PTZ Model Click MODEL and then select the model name of PTZ camera by mou...

Page 60: ...re 3 61 Stop Bits Selection Parity Bit There are five types of parity bit such as None Odd Even Stick and Zero Click PARITY BIT and then select the parity bit by mouse wheel or UP DOWN key on the fron...

Page 61: ...50 75 and 100 Lower level setting will increase clearance range Click the EXIT button on the Color Setting Window it will return to the Setup Window Figure 3 64 Pan Tilt Configuration Window Main Fram...

Page 62: ...TON COLOR and then select the down button color of Menu Button and clearance by mouse wheel or UP DOWN key on the front panel Click the color and clearance again to confirm Figure 3 67 Down Button Col...

Page 63: ...Chapter 4 HDD Installation General Information How to Install 63...

Page 64: ...F NOT THE SYSTEM WILL NOT RECOGNIZE THE ADDITIONAL HDD Turn off the power and then remove the cover Install the additional HDD in the space as shown in Figure 4 1 Connect the power connector flat cabl...

Page 65: ...Chapter 5 Remote Host Software Software Installation Remote Host Screen Backup Search 65...

Page 66: ...HOST icon and the Remote Monitoring Screen appears 5 2 Remote Host Screen Figure 5 1 Remote Host screen Figure 5 1 1 Connection Status Indicator 2 Configuration Button 3 Connection Button 4 Backup Sea...

Page 67: ...cted Figure 5 2 Disconnected Figure 5 4 DVR Live Mode Figure 5 5 DVR Record Mode Figure 5 6 DVR Search Mode Figure 5 7 DVR Setup Mode Configuration Button It enables you to set the remote host softwar...

Page 68: ...nd Port number of Mac Name Server from your DVR supplier not available at this time Figure 5 9 Get Server Setting Auto Save on Host Image It allows you to save the image displayed on remote screen Con...

Page 69: ...is only available on the Live mode When you click the Backup button it will show the recorded data list that is stored in DVR with the Backup Dialog Window Figure 5 12 Backup Dialog Window Lists Sort...

Page 70: ...able in a full screen Figure 5 13 Print Dialog Window Comment String It enables you to insert the comments on the printed image Image Zoom Mode Select the image size to be printed Click the OK button...

Page 71: ...ck the camera number button that you want to view with a single screen Figure 5 17 Single Screen Buttons PTZ Control Buttons When you click the PTZ Channel Switch button it will show the PTZ control b...

Page 72: ...he recorded image on DVR When you click the Play Control button it will show the Play List Window Figure 5 21 Play List Window Lists Sort Button It shows the recorded data list of each recording mode...

Page 73: ...ote host screen Replay Backup File Select the backup file and the backup image will be converted to AVI file Before converting to AVI file you should select the channel that you want to convert The co...

Page 74: ...R s USB or convert it to AVI file Click the USB Backup Files button it will show the Play List Window Figure 5 26 Play List Window Lists Sort Button It shows the recorded data list of each recording m...

Page 75: ...G 54 H 162 H 323 H 646 H 970 H 2263 H SVHS 15G 74 H 222 H 444 H 889 H 1333 H 3111 H VHS 1G 119 H 356 H 711 H 1422 H 2133 H 4978 H H Hour G Grade of Image Quality 2 Factory Default Table LANGUAGE ENGLI...

Page 76: ...P IP ADDRESS 192 168 1 128 GATEWAY 192 168 123 254 SUBNET MASK 255 255 255 0 BANDWIDTH 56 KBPS PORT 21 SERVER MODE OFF SERVER IP ADDRESS 211 149 149 117 NETWORK SERVER PORT 23 BAUD RATE 115200 DATA BI...

Page 77: ...is the DVR IP Request timed out Check IP address Reply from xxx xxx xxx xxx Check Port number Check if other user is using this Please check the Port number of DVR and PC is identical Check Port numbe...

Page 78: ...Connection Network Performance LAN 10Mbps or More 2 PC 10 100Mbps dummy Hub Half Duplex Mode DVR Network Performance xDSL Cable Network 768Kbps 256Kbps 3 PC 10 100Mbps Switch Full Duplex Mode DVR Netw...

Page 79: ...es HOW TO OBTAIN FACTORY SERVICE 1 Original purchaser must fill out a warranty card and mail to factory with model number serial number and the date of purchase 2 We will repair or replace and return...

Reviews: