background image

Palma integrated fold-down support 
arms installation

Armrest

Left Hand

Stainless

Pivot Bearing

Pivot Block

End Cap

Pivot Block

Nylon

Washer

50mm Dia. Belville 

Washer

Pivot Block 

Washer

Inserted on to 

Pivot Block

Support  

arm seal

HOLE CUTTING 

POSITION FOR 

OUTER COVER 

IS MEASURED 

TO CENTRE OF 

ARM BRACKET 

ON FRAME

M20 Bolt

Important

Bolt must not 

rotate when the

armrest is 

moved.

Important

Ensure Belville Washer is

assembled correctly with the dome towards the bolt head

Hole

diameter

76mm

minimum

78mm

maximum

Measure 367mm from 

rear of unit to centre of 

arm fixing point

Measure from 

upper side of porcelain 

pan to centre of arm 

fixing point approx. 

207mm – 210mm

How to drill holes in the cover if 
armrests are fitted

PALMA FITTED WITH FOLD DOWN SUPPORT ARMS, MUST USE ALL FOUR FIXINGS ALONG WITH THE REAR WALL FIXING

(SEE PAGE 6 FOR DETAILS). FLOOR AND WALL FIXINGS INTEGRITY ARE ESSENTIAL FOR UNIT STABILITY.

IMPORTANT NOTE:

10

Summary of Contents for Palma Vita

Page 1: ...Closomat Palma Vita installation user guide...

Page 2: ...introduced by signal words which express the extent of the hazard risk In order to prevent accidents personal injury property damage and guarantee maximum user safety follow the safety instructions w...

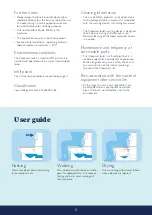
Page 3: ...ed within a typical shower toilet room Infill panel The infill panel specifications are printed on page 11 Classification Low Voltage Directive EN 60335 2 84 Cleaning information The use of bleach pro...

Page 4: ...for standard pan connection fittings D Rear wall fixing Position 25mm to RH of the centreline 810mm from the floor R Rear floor fixing 2No Standards Installations Position on the floor 102mm from the...

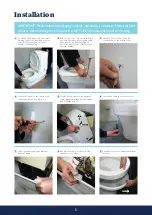
Page 5: ...er completely but do not remove it IMPORTANT Please retain all packaging until the installation is complete Protect all floor surfaces when handling the Closomat DO NOT slide the Closomat across the f...

Page 6: ...ion the Closomat and place all four anchor blocks in place 15 Secure the Closomat to the floor using all four fixing points use suitable fixing for the application Adhesives are not allowed to be used...

Page 7: ...rm to hold in this extended position arrow Run wash cycle to purge Once wash is constant remove tool and allow the douche arm to retract 2 Allow approximately 5 minutes for the water to heat in the bo...

Page 8: ...bow pads 8 Replace the seat by locating the seat pivots into the seat hulls fixed to the pan press the seat firmly to secure its position 7 Push in the seat buffer on the cistern cover 4 Replace ciste...

Page 9: ...it the side panel and screw covers on completion 1 Using the template provided locate mark and drill four holes for the plinth in the floor to best suit the intended fixings to be used for the applica...

Page 10: ...armrest is moved Important Ensure Belville Washer is assembled correctly with the dome towards the bolt head Hole diameter 76mm minimum 78mm maximum Measure 367mm from rear of unit to centre of arm fi...

Page 11: ...installation where pipe work inhibits the Closomat toilet from being located against the wall The infill panel is available in thickness sizes 25mm 50mm and 75mm The infill panel is 100mm taller than...

Page 12: ...losomat co uk closomat co uk British manufacturing British design and development British customer support We reserve the right to make modifications as a result of ongoing adjustments and further dev...

Reviews: