Installation
7
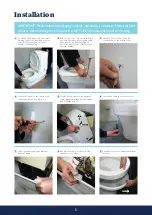
Unhook the fixing adjuster brackets
from the frame.
6
Loosen and remove the front screw.
8
Repeat unhooking on opposite side
ensuring cover is free.
5
Gently lift the cistern cover upwards
(small arrow) and then pull it forward
and off (large arrow).
3
Carefully loosen and pull out the
covering cap on the cistern cover.
4
Loosen the screw of the cistern cover
completely, but do not remove it.
IMPORTANT: Please retain all packaging until the installation is complete. Protect all floor
surfaces when handling the Closomat. DO NOT slide the Closomat across the flooring.
Pull away cover once adjuster brackets
are loose.
2
Remove the seat – Open the lid. Press
and hold the seat pivots together with
both thumbs whilst firmly gripping
the outer edges of the seat. Now pull
upwards sharply.
1
To lift the Closomat use the porcelain
flushing edge at the front and the steel
frame at rear, and lift it out of the
bottom of the packing.
➞
➞
➞
9
5


