Climax VST-2752 User Manual Download Page 44


41


Panel Selection


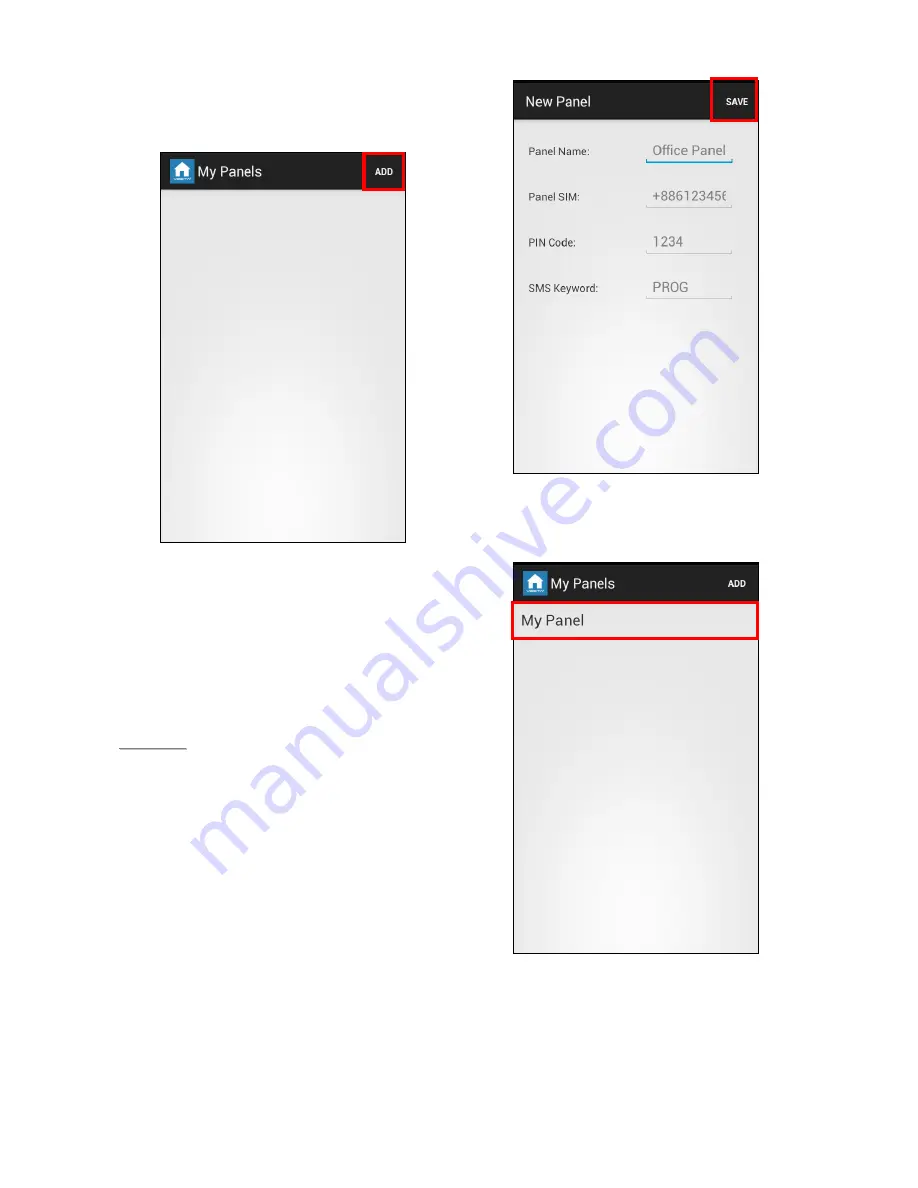
Upon starting the application, you will first enter 
Panel Selection menu 


For first time  user, you need to first enter 
your panel information, please press 


ADD

” button. 


You will see the panel information, 
including the panel name you want to use 
in the application, panel SIM card number, 
the PIN Code and SMS keyword used to 
access the panel. Press “Save” to confirm 
when finished.  

<

<

N

N

O

O

T

T

E

E

>

>


The PIN Code and SMS Keyword 
entered in Panel Information are 
included in every SMS command sent 
with the app for the Control Panel to 
verify the SMS command. 


The PIN code must be identical to a 
User PIN Code in the panel. The 
factory default PIN code in the Control 
panel is “

1234” 

for User PIN Code 1. 

You can change both SMS Keyword 
and PIN code later by editing panel 
information. 


The panel does not have a default 
SMS Keyword, you need to program a 
Keyword in your panel first to use 
Vesta EZ Home Application. Please 
refer to 

2.6. Panel Setting

 for 

Keyword programming.  


You will return to Panel Selection menu, 
the new panel you entered will be 
displayed, select the panel to proceed to 
edit SMS commands for the panel. 


Summary of Contents for VST-2752

Page 1: ...fCx Jan 06 2014...

Page 2: ...__________________________________ 6 2 5 Record Message _________________________________________________________ 6 2 6 GSM Setting_____________________________________________________________ 6 2 7 P...

Page 3: ..._____________________________________________________ 23 4 11 Tamper Protection _____________________________________________________ 23 4 12 Stop the Alarm and Alarm Display _________________________...

Page 4: ...anceling the selection aborting the current screen and returning to the previous screen etc 7 OK Key To confirm the keyed in data or confirm the selection 8 Numeric Keys 9 Away Arm Key Use this key to...

Page 5: ...n addition to the adapter there is a rechargeable battery inside the Control Panel that serves as a backup powering source in case of any power failure condition During normal operation the AC power a...

Page 6: ...sitors It has the same authorization level as the User PIN Code but will be removed after one arming and disarming action Duress Code The Duress Code is specially designed for situation when the user...

Page 7: ...SIM card in to GSM module and connect the internet cable Step 3 Apply the AC Power You will hear 2 short beep Disarm will be displayed on the first line and the system time displayed on the second lin...

Page 8: ...ws you to test learned in devices Please refer to 2 7 Device for device learning detail Step 1 Select Walk Test and press OK to confirm You will enter Walk Test mode Wa l k T e s t Step 2 Press the le...

Page 9: ...ect the event type to be reported to this report destination All All events will be reported Status Only status events will be reported Alarm Only alarm events will be reported 2 4 Test Report This fu...

Page 10: ...our service provider for information if needed Step 4 Select User and press OK to confirm U s e r N a me Step 5 Enter your log in user name and press OK to confirm Inquire your service provider for in...

Page 11: ...play current P word Enter the new keyword if you want to edit keyword press OK to confirm the change AC Fail Report This is for you to set the waiting time for the Control Panel to make report after d...

Page 12: ...ng and send High Temperature Restore report Factory default is set to Disable Step 1 Select High Temp and press OK to confirm D i s a b l e 1 0 C 0 C 5 0 C Step 2 The screen will display current High...

Page 13: ...press OK to confirm O f f O n Step 2 Select to turn On or Off the Final Door option Arm Fault Type Confirm When set to Confirm If you attempt to arm when a fault exists within the system the arming a...

Page 14: ...mi n Step 2 The screen will display current setting To change the setting select a new option and press OK to confirm Supervision Set the supervision timer for accessory devices if no supervision sign...

Page 15: ...splayed on the LCD screen Press OK to add the device into Control Panel D e t e c t e d O k D o o r C o n t a c t Step 4 Repeat Step 1 3 to learn in other devices Edit Device Use this function edit th...

Page 16: ...the same way as if a Burglar device is triggered Home Access When the system is in Home mode if a Home Access device is triggered the Control Panel will start an Entry Delay period to give enough tim...

Page 17: ...trol Panel within the 30 second period will return the system to Disarm mode and silence the built in siren No alarm event will be reported When the system is in Disarm mode if a Entry is triggered th...

Page 18: ...i r m O n C o n f i r m O f f E n t r y S n d O n E n t r y S n d O f f Learn Siren In order to learn a Siren into the Control Panel the Control Panel must first learn in a device of any kind Step 1 P...

Page 19: ...l time Step 1 To edit the setting select t Interval and press OK to confirm Step 2 Select your desired interval time press OK to confirm 4 h o u r 8 h o u r 1 2 h o u r 1 6 h o u r 2 0 h o u r 2 4 h o...

Page 20: ...by email the SMTP and From setting must be completed first The email upload format is mailto user example com MMS In order to sent the picture video to a mobile number the MMS setting must be complete...

Page 21: ...ed in the Control Panel Each individual User can be given a name for easy recognition User PIN Code 1 is set to 1234 by Factory Default Step 1 Select Pin Code press OK to confirm Step 2 You will enter...

Page 22: ...as the User PIN code It is used to access the system in duress situation When this code is used for accessing the system the Control Panel will report a secret alarm message without sounding the sire...

Page 23: ...system the LCD will display XX after current mode The XX represents the number of fault event in system A w a y A r m X X 0 0 0 1 J a n 0 1 View Fault Events When fault event exists in system press D...

Page 24: ...r Away Only will not be triggered under any Home Arm mode Device set to Home 1 2 Omit will not be triggered under Home Arm 1 2 mode Device set to Home 1 3 Omit will not be triggered under Home Arm 1 3...

Page 25: ...press OK The sensor will be marked with a to indicate it is bypassed You can also remove the bypass condition by selecting the sensor and press OK again D C Z 0 1 I R Z 0 2 The bypassed condition of...

Page 26: ...During an alarm the Control Panel wil sound the siren and report to programmed telephone number The screen will display ALARM ALARM to notify the user Stopping the Alarm Step 1 To Stop the alarm disar...

Page 27: ...1 Select Fault Display press OK to confirm If fault events The screen will display S T A R T Step 2 Press Down key to scroll through the fault events When all fault events are displayed the screen wil...

Page 28: ...nse Instant Burglar Alarm No Response Instant Burglar Alarm No Response No Response Instant Burglar Alarm No Response Home Access No Response Instant Burglar Alarm Start Entry Timer Start Entry Timer...

Page 29: ...er Alarm Instant Water Alarm Instant Water Alarm Instant Water Alarm Instant Water Alarm Instant Water Alarm Set Unset Arm Disarm Arm Disarm Arm Disarm Arm Disarm Arm Disarm Arm Disarm Arm Disarm Arm...

Page 30: ...4 New User PIN Code Parameter 3 JOHN For User Name Parameter 4 1 Latch Report On The final SMS message is PROG 7982 USRS 1 1234 JOHN 1 N NO OT TE E Some parameters can be left blank to indicate no cha...

Page 31: ...VRPT Change voice report setting Send SMS Example VRPT 1 5 Parameter 1 Follow on function 0 disable 1 enable Parameter 2 leave blank Parameter 3 leave blank Parameter 4 leave blank Parameter 5 leave b...

Page 32: ...d in minutes 0 1440 0 always PSDM Switch dimmer Send SMS Example PSDM 1 1 80 Parameter 1 Enter 1 Parameter 2 Zone number 1 40 Parameter 3 Switch level 0 10 20 30 100 RQMD Request media Send SMS Exampl...

Page 33: ...ium 3 High Parameter 4 Home entry sound 0 Silent 1 Low 2 Medium 3 High Parameter 5 Away exit sound 0 Silent 1 Low 2 Medium 3 High Parameter 6 Home exit sound 0 Silent 1 Low 2 Medium 3 High Parameter 7...

Page 34: ...mode 1 Away Arm a1 mode 2 Home Arm 1 a1 mode 3 Home Arm 2 a1 mode 4 Home Arm 3 Alarm a1 alarm 5 Burglar a1 alarm 6 Smoke a1 alarm 7 Medical a1 alarm 8 Water a1 alarm 9 Silent Panic a1 alarm 10 Panic a...

Page 35: ...ogle Play and search for Vesta EZ Home to find the application Download and start the application 5 1 For iPhone The iPhone version of Vesta EZ Home Application supports all SMS command functions exce...

Page 36: ...N Code in the panel The factory default PIN code in the Control panel is 1234 for User PIN Code 1 You can change both SMS Keyword and PIN code later by editing panel information The panel does not hav...

Page 37: ...the system for the first time please check both application and Control Panel settings for discrepancies If there are discrepencies please enter the correct setting in the application and press Save...

Page 38: ...d the SMS command to panel N NO OT TE E You can delete the User PIN code by keeping the Pin Code field blank and save the setting User PIN Code 1 cannot be deleted IMPORTANT NOTE When you change SMS K...

Page 39: ...n you are satisfied with all of your alarm settings press Save A SMS message edit screen will appear for you to confirm Press Send to send the SMS command to panel Reporting Setting The Report Setting...

Page 40: ...device name and attribute for Door Contact PIR and EIR Sensor Select the Zone number of the device you want to edit and enter a new name For Door Contact PIR Sensor PIR Camera and PIR Video Camera ple...

Page 41: ...you to confirm Press Send to send the SMS command to panel PSS Control The PSS Control option allows you to turn on off your Power Switch groups Select the Power Switch group you want to control then...

Page 42: ...A SMS message edit screen will appear for you to confirm Press Send to send the SMS command to panel Home Automation Rules Set Home Automation rules Select the condition you will enter the rule settin...

Page 43: ...oup from 1 4 5 2 For Android Phone The Android version of Vesta EZ Home Application supports complete SMS command functions including the commands to inquire Control Panel setting and update appllicat...

Page 44: ...on are included in every SMS command sent with the app for the Control Panel to verify the SMS command The PIN code must be identical to a User PIN Code in the panel The factory default PIN code in th...

Page 45: ...sing Edit Enter the new panel name panel SIM card number and PIN Code and the SMS keyword you desired Press Save to confirm when finished Away Arm Home Arm Disarm To change system mode Press the Arm H...

Page 46: ...nel Vesta EZ Home app will update the current system mode accordingly for you to view Please remember to sync your Vesta EZ Home app with all your panel setting when you first create the panel PIN Set...

Page 47: ...e option you want to edit to change the setting When you are satisfied with all of your alarm settings press Save The phone will send a SMS command to panel You can press the Menu button on your Andro...

Page 48: ...lumn to select the reporting priority you want to edit Enter the telephone number for reporting and select report type and events Only SMS CID SMS Text GSM CID Voice reporting options are available Pr...

Page 49: ...ync options and choose to sync either Reporting 1 3 or 4 6 Device Setting The Device Setting Menu allows you to edit device control Siren PSS and request PIR Camera image Select the top column to choo...

Page 50: ...it and Entry attributes are available For other devices without attribute you can select any attribute as it will not affect the device setting Press Save The phone will send a SMS command to panel Yo...

Page 51: ...he phone will send a SMS command to panel PSS Control The PSS Control option allows you to turn on off your Power Switch Select the Power Switch group you want to control then choose to turn on off th...

Page 52: ...Select Area 1 then specify the zone number of the PIR Camera you want to take picture then press Save The phone will send a SMS command to panel Home Automation Rules Set Home Automation rules Select...

Page 53: ...triggered 114 Heat When the Heat Detector HD is triggered 120 Panic When the Panic Button of the Remote Controller RC is pressed 121 Duress When the Duress Code is entered to disarm or arm the system...

Page 54: ...344 Interference 374 Arm with Fault When fault exists in system and the system is armed by confirming the arm action Arm Fault Type set to Confirm 380 Device AC Failure When an AC power accessory dev...

Page 55: ...is connected Consult the dealer or an experienced radio TV technician for help FCC Caution To assure continued compliance any changes or modifications not expressly approved by the party responsible...

Reviews: