


PULSAR
®
3D SUCTION BLAST CABINET
Page 12
© 2020 CLEMCO INDUSTRIES CORP.
www.clemcoindustries.com
Manual No. 29374
removed by blasting and obtain a safety data
sheet (SDS) for the blast media.
To avoid unscheduled downtime, establish an inspection
schedule. Inspect all parts subjected to media contact,
including the gun and nozzle, media hose, flex hose, wear
plate, and all items covered in this section. Adjust
frequency of inspections as needed, based on the
following:
Usage:
Frequently used cabinets require more
maintenance
and
inspections
than
those
occasionally used.
Type of media:
Aggressive media wears parts
faster than nonaggressive media.
Condition of parts being blasted:
Heavily
contaminated parts require more maintenance to the
cabinet
’s media recovery system.
Friability of media:
Media that rapidly breaks
down require more maintenance to the cabinet
’s
media recovery system and dust collector.
5.1
Daily Inspection and Maintenance Before
Blasting with the Air OFF
5.1.1
Check media level:
Check media level in
reclaimer and refill as necessary.
5.1.2
Inspect reclaimer debris screen and door
gasket:
Check reclaimer debris screen for debris. The
screen is accessible through the reclaimer door. With the
exhauster OFF, remove the screen and empty it daily or
when loading media. Empty the screen more often if part
blasted causes excessive debris. Do not operate the
machine without the screen in place; oversized byproduct
from blasting could plug the nozzle. While the door is
open, inspect the door gasket for wear or damage.
Replace the gasket at the first sign of wear.
5.1.3
Drain compressed-air filter:
The cabinet is
equipped with a manual-drain air filter. Drain the filter at
least once a day, and more often if water is present. Moist
air inhibits the flow of media. Drain the air line and receiver
tank regularly. If the filter does not remove enough
moisture to keep media dry and flowing, it may be
necessary to install an air dryer or aftercooler in the
compressed-air supply line.
5.1.4
Inspect dust container:
Empty the dust
container regularly. Start by checking the container at
least daily and when adding media, then adjust frequency
based on usage, contamination, and friability of the
media.
5.1.4.1
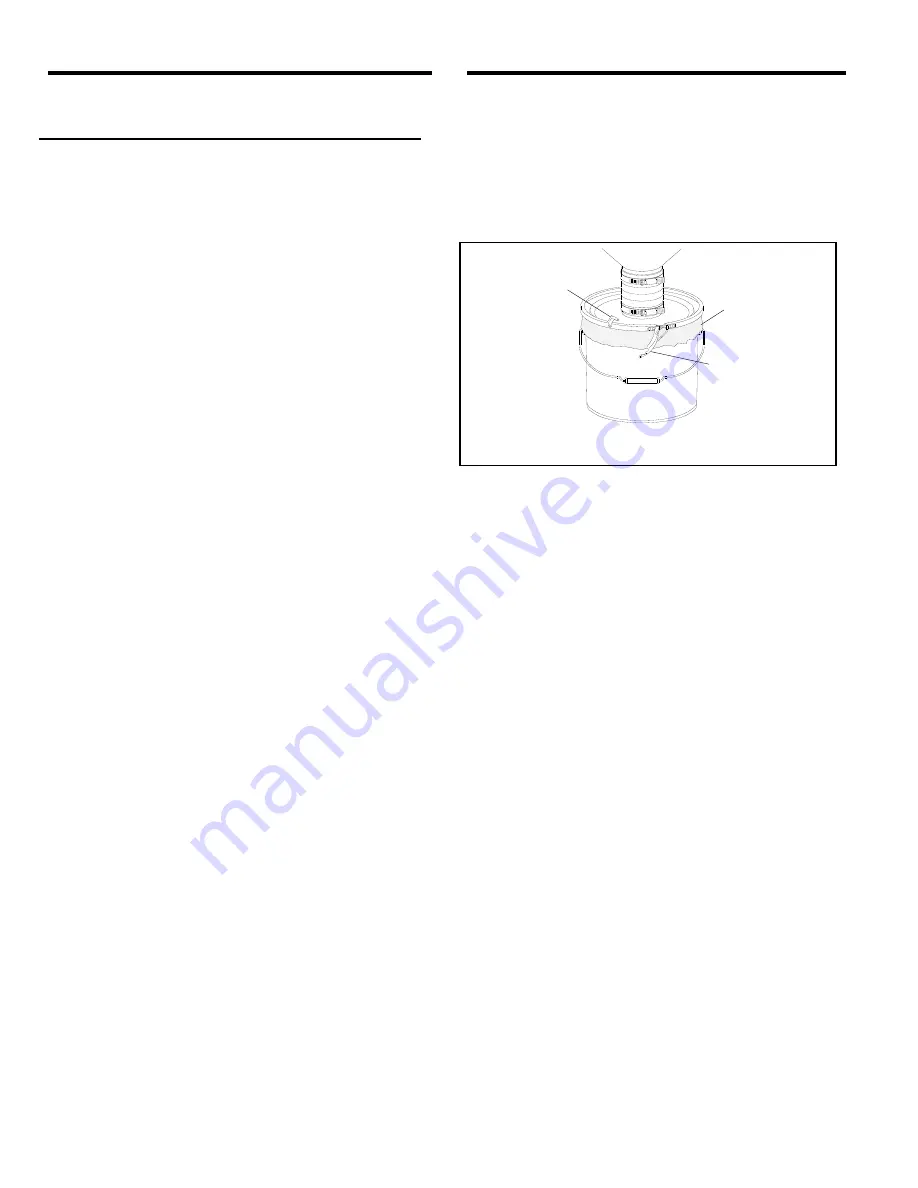
Turn off the exhauster and
unlatch the lid lock ring
from the dust container, as shown in Figure 12.
5.1.4.2
Pry off the lid from the container (the lid's flexible
inlet hose allows easy removal) and remove the
container.
Figure 12
5.1.4.3
Tie off or otherwise seal the top of the liner and
remove it from the container. Dispose of the sealed liner
into a suitable disposal receptacle.
NOTE: Blasting media is usually nontoxic; however,
some materials being removed by the blast process
may be toxic. Obtain SDS sheets for the media and
identify all material removed by the blast process.
Check
with
proper
authorities
for
disposal
restrictions.
5.1.4.4
Place a new liner inside the container and drape
it over the top edge. Reattach the container to the lid and
latch the lock ring, making sure the lid and clamp are
secure. Replacement liners are shown in Section 8.9.
5.2
Daily Inspection During Blasting
– Have
Someone Do the Following:
5.2.1
Inspect cabinet for dust leaks:
During
operation, inspect cabinet door seals for media leaks.
Dust leaking from the cabinet indicates saturated filter
cartridge. Refer to Section 5.2.4 for additional pulsing.
5.2.2
Check exhaust air for dust:
Dust discharge at
the outlet indicates a leaking or damaged filter cartridge.
Check immediately. Note that a small amount of dust
egress is normal for a short time before a new cartridge is
seasoned.
5.2.3
Drain pulse reservoir ‒ Figure 13:
Open the
petcock to drain water from the pulse reservoir before and
after each use.
Drum Liner
Latch Catch
Swing the catch
up to unlock the
lock-ring latch.
Latch
Pull the latch away
from the ring and
remove the ring.


