Page 39
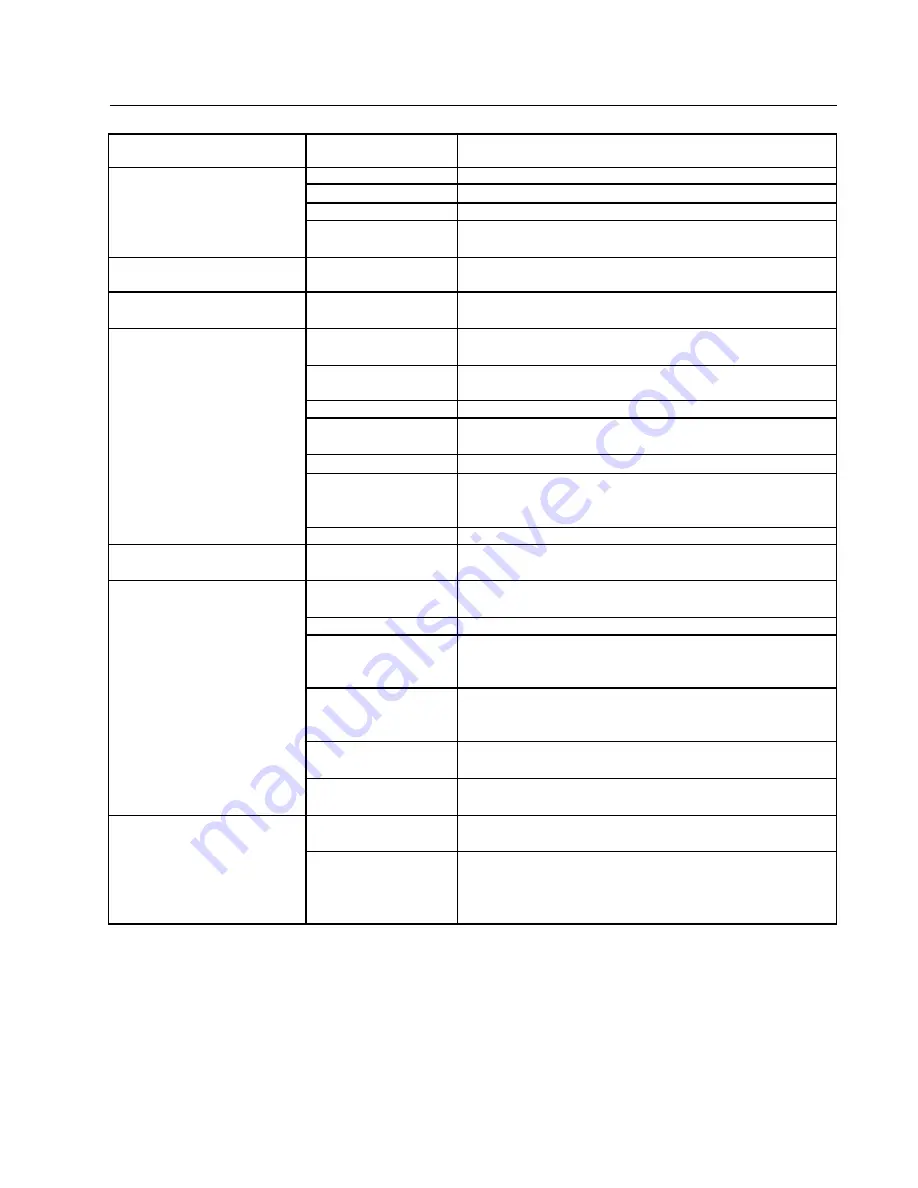
Blow out.
Adjust gas pressure per rating plate.
Send to factory for correct orifices.
Clean exhaust.
Check ground.
Replace orifices. Check factory for correct size.
Replace orifices. Check factory for correct size.
Make-up air must be 4 to 6 times the exhaust area of the dryer.
Remove lint.
Must be full open or replace.
Adjust gas pressure as specified on Rating Plate.
Check Service section for recommended sizes. Remove
obstructions or lint build up from duct work. NEVER use
smaller size exhaust duct. ALWAYS use larger size.
Replace thermostat.
Replace timer.
Check all valves in steam supply and return. Make sure
they are OPEN.
Remove and clean. Replace if defective.
On dryers using solenoid temperature control, thermostat
controls operation of solenoid valve by advancing
thermostat.
On dryers using solenoid temperature control, thermostat
controls operation of solenoid valve. If defective, replace
thermostat.
Check for inlet and outlet marking on Check Valve and invert if
neccessary.
Remove plug and blow down Strainer or remove and clean
thoroughly if heavily clogged.
Check piping per steam installation instructions.
Check trap for size and capacity. If dirty and sluggish, clean
thoroughly or replace. Check return line for high back pres-
sure, or another trap charging against the trap
functioning improperly.
Main burners burning
improperly.
Main burner cycles on and
off.
Low or high gas flame.
Dryer too hot.
Dryer does not stop at end
of time period (6).
Dryer runs no steam to coils.
Water in steam line.
TROUBLE
CAUSE
REMEDY
Dirt in burner.
High gas pressure.
Orifice too large.
Restricted or blocked
exhaust.
Defective ground.
Incorrect main burner
orifices.
Incorrect main burner
orifice.
Inadequate make-up
air.
Lint accumulated.
Exhaust duct
dampers.
High gas pressure.
Partially restricted or
inadequately sized
exhaust system.
Defective thermostat.
Defective timer.
Valve closed.
Steam Trap blocked.
Solenoid Valve.
Thermostat.
Check valve installed
incorrectly.
Strainer clogged.
Steam piping installed
incorrectly.
Trap not functioning.
TROUBLESHOOTING CHART
Summary of Contents for HD170
Page 12: ...Page 12 GAS DRYER DIMENSIONS ...
Page 13: ...Page 13 STEAM DRYER DIMENSIONS ...
Page 18: ...Page 18 GAS PIPING INSTALLATION ILLUSTRATION ...
Page 26: ...Page 26 DRYER INSTALLATION WITH MULTIPLE EXHAUST ILLUSTRATION ...
Page 33: ...Page 33 OPERATING INSTRUCTIONS TWO TIMER MODELS ...
Page 41: ...Page 41 DIRECT SPARK IGNITION OPERATION FLOW CHART ...
Page 43: ...Page 43 BURNER AIR INLET ADJUSTMENT BURNER AIR INLET ADJUSTMENT ...
Page 44: ...Page 44 BASKET ALIGNMENT FOR DRYERS WITH TM200 GEAR REDUCER ...
Page 53: ...Page 53 REAR VIEW TM200 GEAR REDUCER See following page for partnumbers ToGearM otor ...
Page 55: ...Page 55 REAR VIEW GEAR MOTOR See following page for partnumbers ToGearM otor ToFanM otor ...
Page 75: ...Page 75 ...


