background image


Welcome to Custom Integration Solutions 


Thank you for purchasing CIS devices. Our solutions make it easy for integrators to deploy networks in 
home and business settings with minimal configuration. Our support team is here to assist with setting up 
equipment and answering your network related questions. 


Overview 

The CIS-NW-POE router is equipped with five gigabit ethernet ports and one SFP port, compatible with 1 
Gb modules. The device is pre-configured with all ports switched together (excluding the WAN port). The 
device is capable of powering other devices through PoE. The QuickConnect system lets you connect a 
CIS-SW-POE switch or second CIS-NW-POE router into a single rack space if desired. 
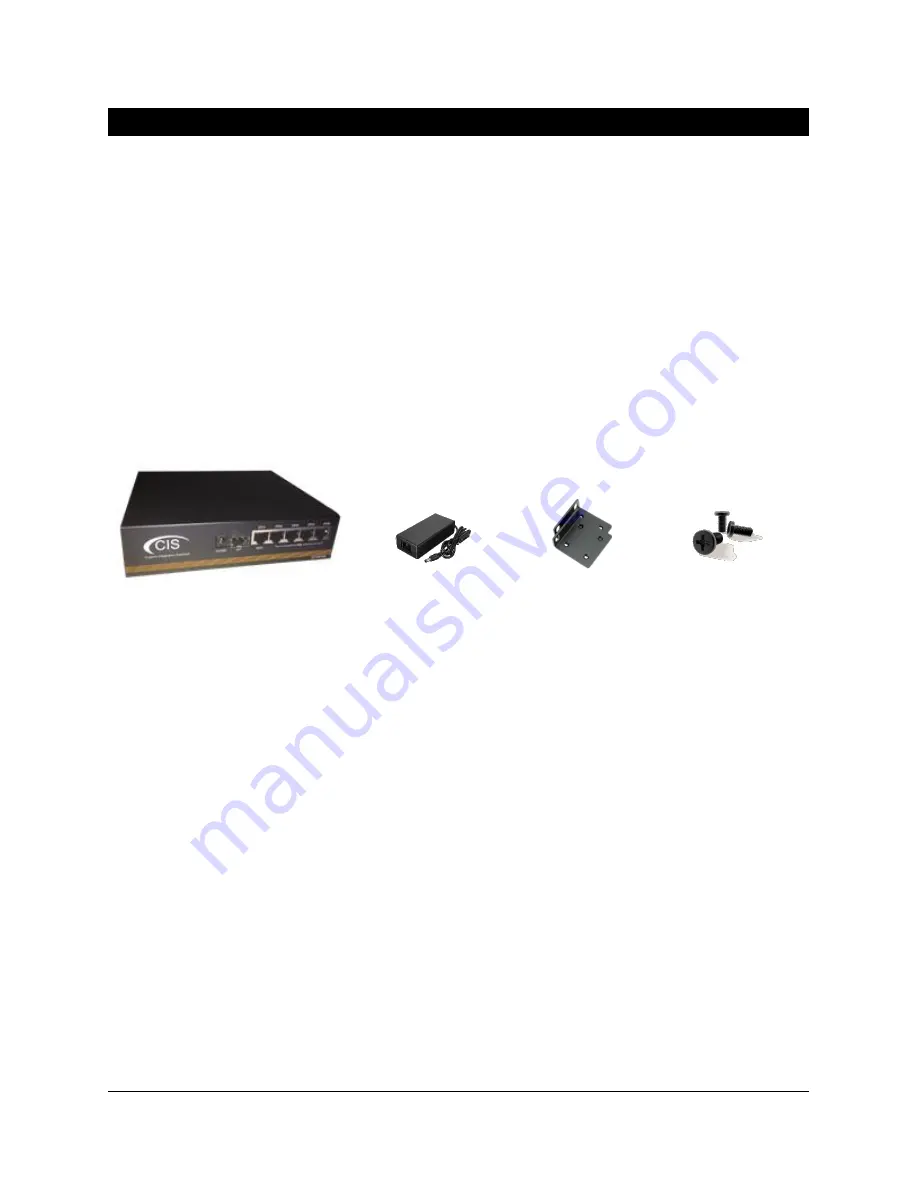
 

Package Contents 


          Router   


24v DC Adapter   

Rack ears (2)             Screws (8) 


Power 

The device is powered with a 24v 2-Amp Power supply or via PoE on port 1 (11

57V DC). The 24v power 

supply provides power to the 4 PoE output ports. A 48v power supply can be purchased to enable 
additional PoE capabilities. 


PoE Output 

The CIS-NW-POE can supply PoE to external devices. The output voltage will be selected automatically 
depending on the voltage the connected device requires, or you can set it manually. The device can 
power both 802.3af/at devices (with optional 48v power supply) and devices that accept passive PoE 
power.  


By default, the PoE mode is set to auto. It will not damage non-PoE devices and will auto-detect devices 
with PoE support and their required voltage. This unit provides a maximum current of 450mA for each 

port regardless of the device’s power class, with a total maximum total output of 2 A. The device 

consumes 6 W without any attachments, and up to a maximum of 59 W.  


Summary of Contents for CIS-NW-POE

Page 1: ...CIS NW POE User Manual...

Page 2: ...up 6 Accessing the Web Interface 7 The Status Page 8 Setting the Router s Identity 8 Undo Redo 9 Show Hide Passwords 9 Rebooting the Device 9 Changing the Default Password 10 Setting the Time Zone 10...

Page 3: ...oints 19 Viewing Connected Devices 20 Changing the SSID of Managed Access Points 20 Changing the Wi Fi Password of Managed Access Points 21 PoE Information and Settings 22 Enable Disable PoE on a Spec...

Page 4: ...Adapter Rack ears 2 Screws 8 Power The device is powered with a 24v 2 Amp Power supply or via PoE on port 1 11 57V DC The 24v power supply provides power to the 4 PoE output ports A 48v power supply c...

Page 5: ...ty on ports 1 through 5 o Green indicates activity Red indicates active PoE Buttons Reset button This button is located on the side next to the USB port Hold this button while the device is powered of...

Page 6: ...6 Quick Setup...

Page 7: ...CP mode 2 In a web browser navigate to 10 100 1 1 the default IP address If you have requested a different network address enter it or open a command window and use the ipconfig command to get the def...

Page 8: ...your network You can view uptime memory usage and load on the CPU Setting the Router s Identity The identity is used to identify your device on the network It is essential to set the router to the na...

Page 9: ...lecting the Hide Passwords button in the left toolbar will toggle the displaying of passwords related to Wi Fi Hotspot and more Rebooting the Device If you are having ongoing issues with your network...

Page 10: ...password to increase the security of the device Enter the old password in the top field and a secure password in the new and confirm password fields Setting the Time Zone You can find the Clock setti...

Page 11: ...u can see the WAN address on ether 01 gateway WAN the LAN address assigned to bridge operations and either a CIS support address or a PAR address The DHCP Client Tab The DHCP Client tab will present y...

Page 12: ...enewing the WAN IP Address Once you ve clicked the entry under the DHCP Client option click the Renew button to obtain a new lease The DHCP Server The main page displays the lease time for the DHCP se...

Page 13: ...13 The Leases tab displays the IP and MAC addresses of connected devices The Networks tab displays the gateway and DNS server IP addresses that the connected devices will receive...

Page 14: ...from the toolbar Do not assign any addresses inside of the DHCP pool range In addition it is recommended you perform an IP Scan to ensure the IP address you wish to assign is unused See the Tools sect...

Page 15: ...t for the new IP address to take effect The active IP address will not change until the device requests a new lease Changing the DNS Servers In the IP section in the left toolbar select the DNS tab CI...

Page 16: ...h port you open may leave the host vulnerable to attack CIS recommends using a VPN connection instead whenever possible By default there is a port forwarding rule to use as a template Select the Firew...

Page 17: ...port s to open You can enter a range e g 5000 6000 or separate multiple ports with commas e g 80 443 3389 Action Set to dst nat To Addresses Enter the IP address of the device on your network To port...

Page 18: ...You can view the traffic sent and received the status of PoE PoE settings PoE priority and current being drawn by PoE devices Power Cycling an Ethernet Port Select an Ethernet port in the table below...

Page 19: ...all CIS access points on the network To configure your CIS access point for use with the Wireless Manager view the manual for the CIS ACWAP Viewing the Connected Access Points On your CIS router sele...

Page 20: ...ion Table tab to view the connected devices Changing the SSID of Managed Access Points Select the SSID Channel tab in the Wi Fi Manager section Click on the 2 4GHz network Copy and paste the SSID so t...

Page 21: ...that you d like to change the password for If you ve purchased a guest network it will appear here Click on the network you d like to set the password for then enter the passphrase in the box below I...

Page 22: ...outer applies power on pins 4 5 and 7 8 even if no cable is attached Be careful plugging non PoE devices into a port when Forced on is selected You may damage your device Off mode When selected the ro...

Page 23: ...ab in the toolbar then enable it UPnP has implications on the security of the device and it is recommended you leave it disabled unless required Ping Ping uses Internet Control Message Protocol ICMP e...

Page 24: ...is default then enter the network address and subnet mask using CIDR notation Select bridge operations and enter 10 100 1 0 24 as the address range You may have multiple interfaces and address ranges...

Page 25: ...enable and disable notifications by clicking the D or E buttons on the left Torch Torch allows you to view packets flowing through an interface You can obtain information such as the IP addresses por...

Page 26: ...e paying the ISP for If you are connected wirelessly the speed will be affected by the distance from the access point interference from neighboring networks the number of devices connected to the acce...

Page 27: ...abused modified or disassembled Products to be repaired under this warranty must be returned to Custom Integration Solutions or a designated service center with prior notification and an assigned ret...

Reviews: