background image

Chapter 4


HDD installation and setting of a hard disk


4-1 To install the Hard disks 


Please remove the plug from the power supply outlet before assembling the hard disk, it will 

cause an electric shock and/or damage if not disconnected.   


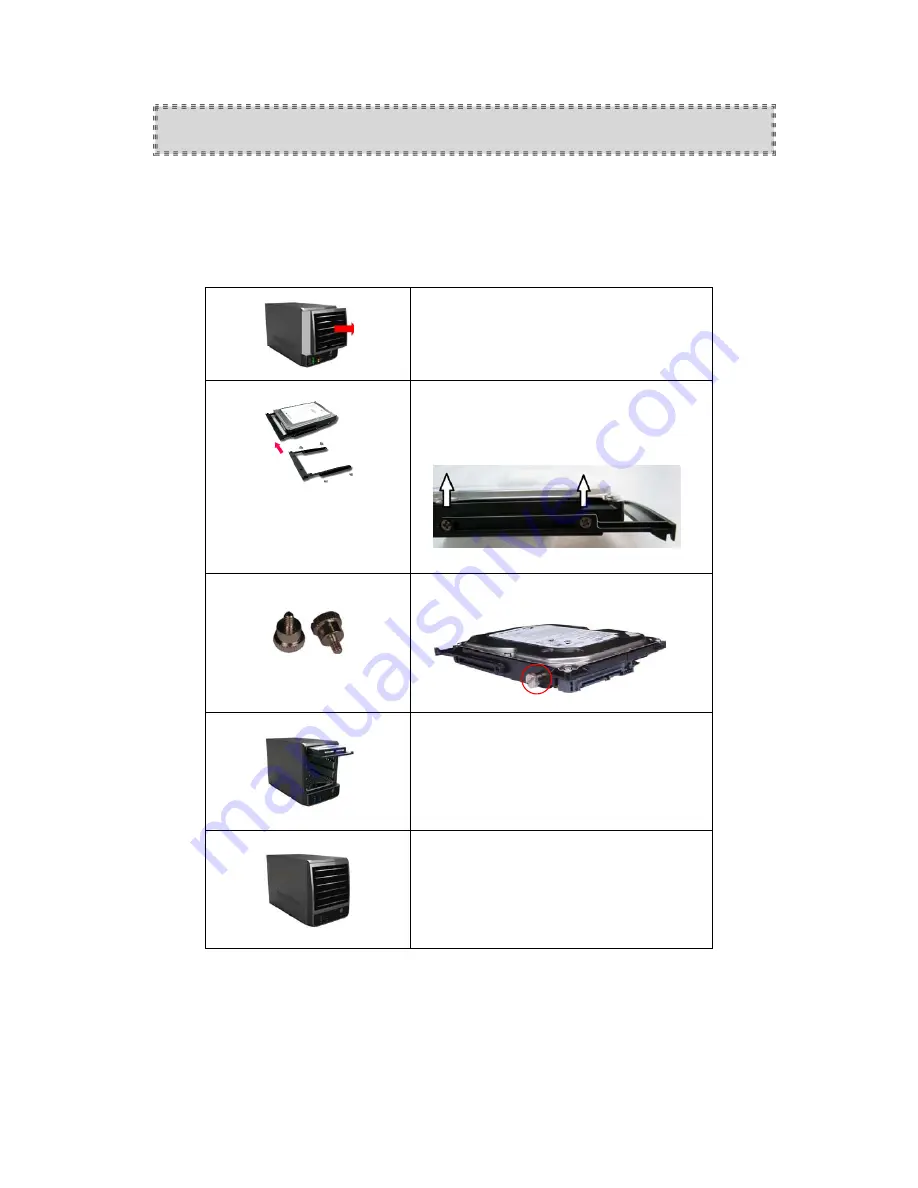
1. Please remove the front cover of the enclosure, 

the cover can be fully moved from the 
enclosure. 


2. Place the HDD and fasten on the HDD holder 

with 4 screws, 

each HDD holder 


3. Install 2 screws on each HDD 


4. Slide the SATA HDD on the holder into the 

enclosure until you hear a click sound to confirm 
the HDD holder is in position. 


5. After the HDDs are all installed in the enclosure, 

put the front cover back to enclosure, then 
connect the SATA or USB 3.0 cable. 


Summary of Contents for Home CR-H408

Page 1: ...User s Manual Home CR H408 4 Bay Portable RAID Tower EXTERNAL 4 BAY SATA RAID USB3 0 eSATA ENCLOSURE...

Page 2: ...tion 9 Chapter 4 HDD installation and setup of a hard disk 12 4 1 To install the Hard disks 12 4 2 The setting of DIP mode switch 13 4 2 1 The Mode function DIP switch definition 14 4 2 2 RAID Mode se...

Page 3: ...ely Please read the below notes before starting Please keep this manual in a place you can reach at any time when using the unit Safety Notices Before use of this device be sure to check the following...

Page 4: ...er guide to setup your device Do not pull or bend on the USB cable or power cord It may cause a fire and or fault of the device Make sure the power cable is connected correctly otherwise it may cause...

Page 5: ...rational problems Prohibit Do not turn off the device or unplug the USB cable when the access LEDs are on also do not reset the PC This will cause trouble and data loss Attention Do not let children p...

Page 6: ...oss of data or consequential losses that you use the copied software 7 The customer service will be acceptable with above items 8 It is against the copyright laws if you against any items of 1 to 6 An...

Page 7: ...without any express card to read the multi bay SATA enclosure Notice 1 When connecting one volume or combined volume of more than 137GB the version of OS needs to be the Windows 2000 SP 3 Windows XP S...

Page 8: ...made by HP COMPAQ It is not guaranteed of compatibility in all environments There is the case assume that specific machinery affinity with software are out of support Interface HDD Device SATA I II i...

Page 9: ...20 pieces of installation screws for 3 5 HDD holder 8 8 pieces of installation screws for 3 5 HDD 9 This Quick Start Guide Main bodyX1 USB3 0 cableX1 eSATA cableX1 HDD holderX5 ScrewsX20 ScrewsX8 Powe...

Page 10: ...EN RED REBUILD 4 Power switch ON OFF switch ON or OFF device power 5 Power connector Connect to an AC power outlet with the attached power supply cable 6 USB 3 0 connector Connected to an USB 3 0 port...

Page 11: ...Note 1 Because there is a high heating possibility of Hard Disk Please to confirm the fan an the back side is in good condition...

Page 12: ...move the front cover of the enclosure the cover can be fully moved from the enclosure 2 Place the HDD and fasten on the HDD holder with 4 screws each HDD holder 3 Install 2 screws on each HDD 4 Slide...

Page 13: ...itch to a new RAID mode please follow the mode chart as below press the RESET button and hold it turn on the box and keep hold reset button for 15sec DIP switch code from left to right DIP switch 1 DI...

Page 14: ...4 2 1 The Mode Function DIP switch definition Raid 10 Raid 5 LARGE...

Page 15: ...nsert the CD onto CD ROM drive of you computer then click CineRAID folder in the CD double click on Setup to run the Management software installation z The display screen will pop up the Installation...

Page 16: ...irtual disk volume Please be sure that you have backup all your old data as this action will erase the data in the HDDs 3 It is impossible to read The internal data of the HDD cannot be read during th...

Page 17: ...a disk volume at FAT32 mode over 32GB then you need the third party s utility to format the disk volume Like the Partition Magic from Power Quest 5 2 Initialization in Windows ME 98SE Execute the FDI...

Page 18: ...a PC 1 Start your computer and wait until the OS has been loaded 2 Please connect the USB cable from the device to PC s USB port 3 Connect the power cord from the USB 4X HDD device t to the outlet of...

Page 19: ...emove Please Check the drive letter to be disconnected if there are multiple devices connected 3 When the screen prompt appears read the instructions carefully If the system indicates that you not to...

Page 20: ...low even if I have access to USB Check whether the USB port is working in USB3 0 mode Check whether it is connected to a port of USB1 1 2 0 3 0 If you are using a USB HUB to PC please confirm that HUB...

Page 21: ...2 format in Windows side The volume space is less then hard disk specification the hard disk space that it is recognized and is displayed less than capacity of the hard disk Because calculation method...

Reviews: