background image

4.7 - Operating mode screen

The unit is in Local Off mode, pressing the on/off (0/1) key once 
activates the display of the operating mode screen.
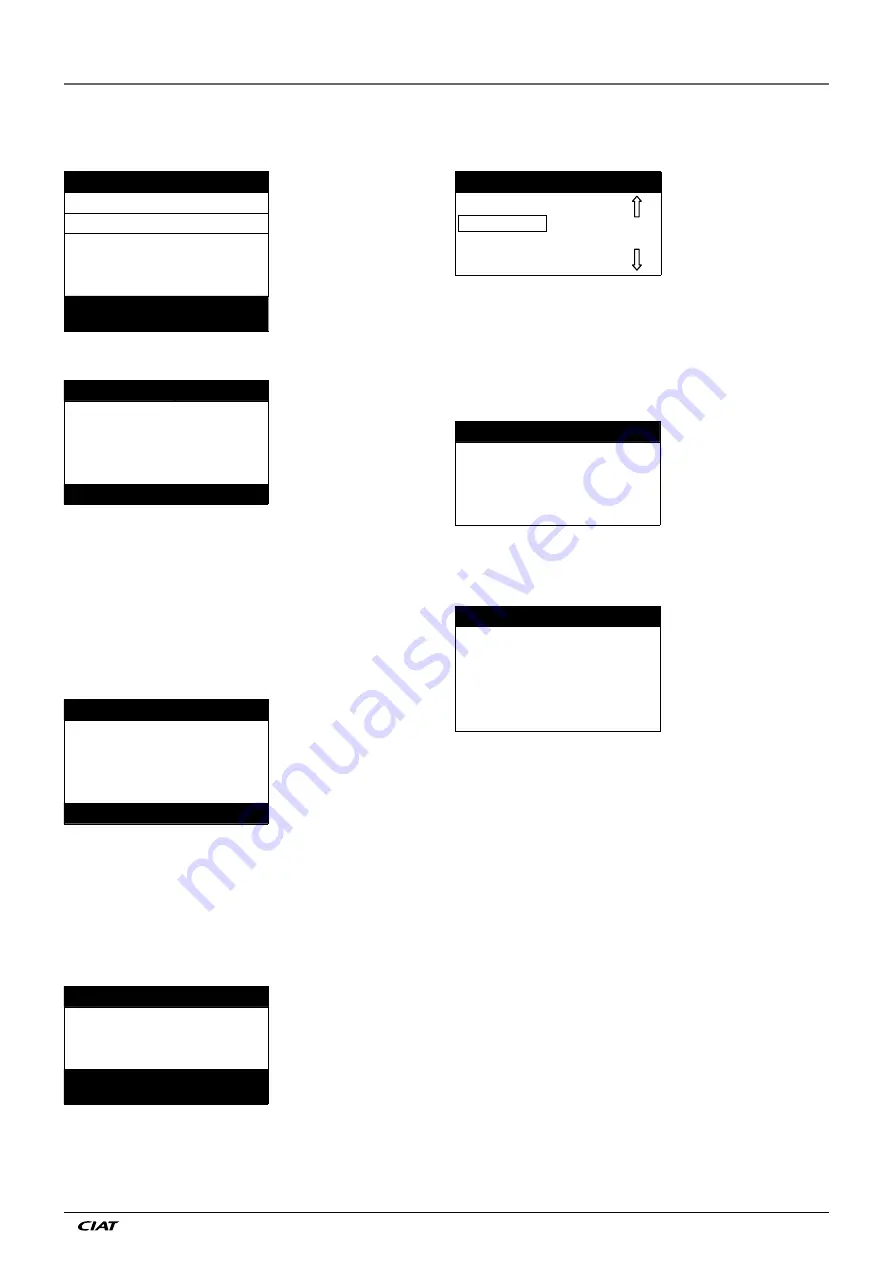
Select Machine Mode

Description of the screen

Local On

List of the machine operating modes

Local Schedule

Cursor

Network
Remote

The Up and Down keys position the cursor on the selected operat-
ing mode. Four modes are immediately displayed on the screen. 
To access operating modes that are not visible, please use the Up 
and Down keys.

When the operating mode has been selected, the new operat-
ing mode can be validated with the Enter key.

Command accept

ed

Operating mode validation screen

When the unit is in an operating mode and the On/off key is 

pressed, the unit will stop. A confirmation screen protects the 

unit against inadvertent shutdowns.

PRESS ENTER

Machine shutdown confirmation 

screen

TO CONFIRM STOP

4.6 - Parameter modification

A configuration parameter can be modified by positioning the 

cursor and then pressing the Enter key.

\\MAINMENU\SETPOINT

Current path in the menu structure

cps1        

12.0°C

List of items

cps2         

14.0°C

Cursor position

hps1        

40.0°C

hps2      

40.0°C

hramp_sp

27.4°C

Cooling Setpoint 2

Description of the item framed by 

the selection cursor

The following screen allows modification of a parameter.

Modify value

Screen description

csp 2

14.0

°C

Current value

_

°C

Cursor position

Cooling Setpoint 2    

Item description

The  Up  and  Down  arrow  keys  permit  the  selection  of  the  first 

digit. Pressing the Up key successively scrolls up to the following 
symbols:
0, 1, 2, 3, 4, 5, 6, 7, 8, 9, ., -.

The Down key follows the reverse order of the Up key in scroll-
ing down the digit list above. Each digit is validated with the 
Enter key.

The - sign is only accessible for the first selected character.

Modify value

Description of the screen

csp 2

14.0

°C

Current value

13.5_

°C

New value before validation

Cooling Setpoint 2    

Item description

The value is validated with the Enter key. At any time the return 

key cancels the current modification.

ATTENTION: If the user exits from the current data screen, the 

value is saved. A saving confirmation is displayed. The Enter 

key validates the parameter modification(s). The Return to 

the Previous Screen key cancels the current modification(s).

\\MAINMENUSETPOINT

Current path in the menu structure

Save changes?    

Confirmation that the modification 

is saved

4 - SETTING UP PRO- CONTROL


EN - 7 

EREBA ACCESS

Summary of Contents for PRO-DIALOG+

Page 1: ...Instruction manual EREBA ACCESS 8 40 kW 11 2016 10183 PRO DIALOG...

Page 2: ......

Page 3: ...3 Password screens 6 4 4 Menu screen characteristics 6 4 5 Data screen or configurable parameter characteristics 6 4 6 Parameter modification 7 4 7 Operating mode screen 7 4 8 Menu tree structure 8 4...

Page 4: ...ty to the unit be shut off before any work is begun Shut off the main power supply at the main circuit breaker or isolator IMPORTANT This equipment conforms to all applicable codes regarding electroma...

Page 5: ...mounted under a metal plate An optional water system temperature sen sor can be used for master slave assembly control in the case of leaving water control In heat pump units a sensor placed on an air...

Page 6: ...24 30A 31A NRCP2 BASE Unit operation relay output J3 CH 25 37 38 NRCP2 BASE Network connection J12 NRCP2 BASE RS 485 series connection Pin 1 signal Pin 2 ground Pin 3 signal Setpoint selection J4 CH 8...

Page 7: ...g cooling contact Open Closed With multiplexing Off On cooling On heating On auto On off contact Open Closed Closed Open Heating cooling contact Open Open Closed Closed NOTE The automatic changeover f...

Page 8: ...cs There are four default screens Each screen shows The unit status its screen number Three displayed parameters LOCAL OFF 1 On the left the unit status on the right the screen number Entering water t...

Page 9: ...on hps1 40 0 C hps2 40 0 C hramp_sp 27 4 C Cooling Setpoint 2 Description of the item framed by the selection cursor The following screen allows modification of a parameter Modify value Screen descrip...

Page 10: ...OLIDY16S HOLIDY02S OCC1P01S OCC1P02S NAVIGATION Password 0 ACCESS ALL USER DEFAULT SCREENS PASSWORD General parameters Temperatures Pressures Setpoint Inputs Outputs Pump status Operating time Unit st...

Page 11: ...emperature OAT nnn n C Outside air temperature CHWSTEMP nnn n C Common master slave temperature SCT_A nnn n C Saturated condensing temperature A SST_A nnn n C Saturated suction temperature A SCT_B nnn...

Page 12: ...B HD_POS_B 0 100 Position variable fan speed controller B RV_B On Off Four way refrigerant valve C_HEATER On Off Heat exchanger and lower coil heater BOILER On Off Boiler output EHS_STEP 0 4 Electric...

Page 13: ...urs Operating hours pump 1 hr_cpum2 nnnnn hours Operating hours pump 2 nb_def_a nnnnn Number of defrost cycles circuit B nb_def_b nnnnn Number of defrost cycles circuit A 4 9 9 MODES menu NAME FORMAT...

Page 14: ...t alarm 2 alarm_3c nnnnn Current alarm 3 alarm_4c nnnnn Current alarm 4 alarm_5c nnnnn Current alarm 5 alarm_1 nnnnn Current JBus alarm 1 alarm_2 nnnnn Current JBus alarm 2 alarm_3 nnnnn Current JBus...

Page 15: ...tartdow 1 to 7 7 Day of the week 1 Monday startwom 1 to 5 5 Week of the month Winter time stopmon 1 to 12 10 Month stoptdow 1 to 7 7 Day of the week 1 Monday stopwom 1 to 5 5 Week of the month 4 9 18...

Page 16: ...r_deg 16 7 to 16 7 0 C Cooling reset value HEATING RESET oathr_no 10 to 51 7 10 C Outside temperature for no reset oathr_fu 10 to 51 7 10 C Outside temperature for maximum reset dt_hr_no 0 to 13 9 0 C...

Page 17: ...onday Tuesday P3 period 3 7h00 21h00 Wednesday P4 period 4 7h00 17h00 Thursday Friday P5 period 5 7h00 12h00 Saturday P6 period 6 20h00 21h00 Holidays P7 period 7 Not used in this example P8 period 8...

Page 18: ...ending on the programmed periods validated for public holidays Each of these public holiday periods can be displayed and changed with the aid of a sub menu ATTENTION The broadcast function must be act...

Page 19: ...utomatic mode the outdoor temperature determines the heating cooling standby changeover based on the two threshold values configured by the user see RESETCFG menu for cooling and heating mode changeov...

Page 20: ...ents the unit from starting if it is open when the delay at start up has expired This open contact leads to an alarm shut down if the unit is running 5 5 Heat exchanger frost protection The heater for...

Page 21: ...Heating sp 2 closed Heating setpoint 2 5 6 2 Reset Reset means that the active setpoint is modified so that less machine capacity is required in cooling mode the setpoint is increased in heating mode...

Page 22: ...lt prevent ing the use of the heating capacity The other electric heating stages will continue to operate as described above 5 14 Control of a boiler NOTE The control of the electric heating stages or...

Page 23: ...The follower will automatically use the master unit active setpoint The lead machine will be held at its full available capacity for as long as the active capacity on the follower is not zero When th...

Page 24: ...t are active on the unit 6 3 Resetting alarms When the cause of the alarm has been corrected the alarm can be reset depending on the type either automatically on return to normal or manually when acti...

Page 25: ...unication is re established Installation bus fault or defective slave board Depending on the configuration compressor A3 is shut down or circuit B is shut down 16 Co ht Communication loss with the add...

Page 26: ...too low less than 10 C prevents unit start up Automatic when the temperature detected returns to normal or when the mode returns to cooling Operating compressor protection out of range or pressure se...

Page 27: ......

Page 28: ...ompagnie Industrielle d Applications Thermiques S A au capital de 26 728 480 R C S Bourg en Bresse B 545 620 114 Non contractual document With the thought of material improvement always in mind CIAT r...

Reviews: