


Downloaded from Projector.com
AUDIO
RGB/COMPONENT
AUDIO
S-VIDEO VIDEO
L
R
IN
PUT1
IN
PUT2
AUDIO
RGB/COMPONENT
AUDIO
S-VIDEO VIDEO
L
R
IN
PUT1
IN
PUT2
AT Interchangeable Equipment
External Connection
• This projector can be connected to a personal computer, TV, video deck, laser disk player, DVD, video camera, etc.
• Before making any connections or disconnections, make sure that the projector and the equipment to which it is con-
nected are turned off. Read the instruction manual supplied with the equipment to which the projector is connected.
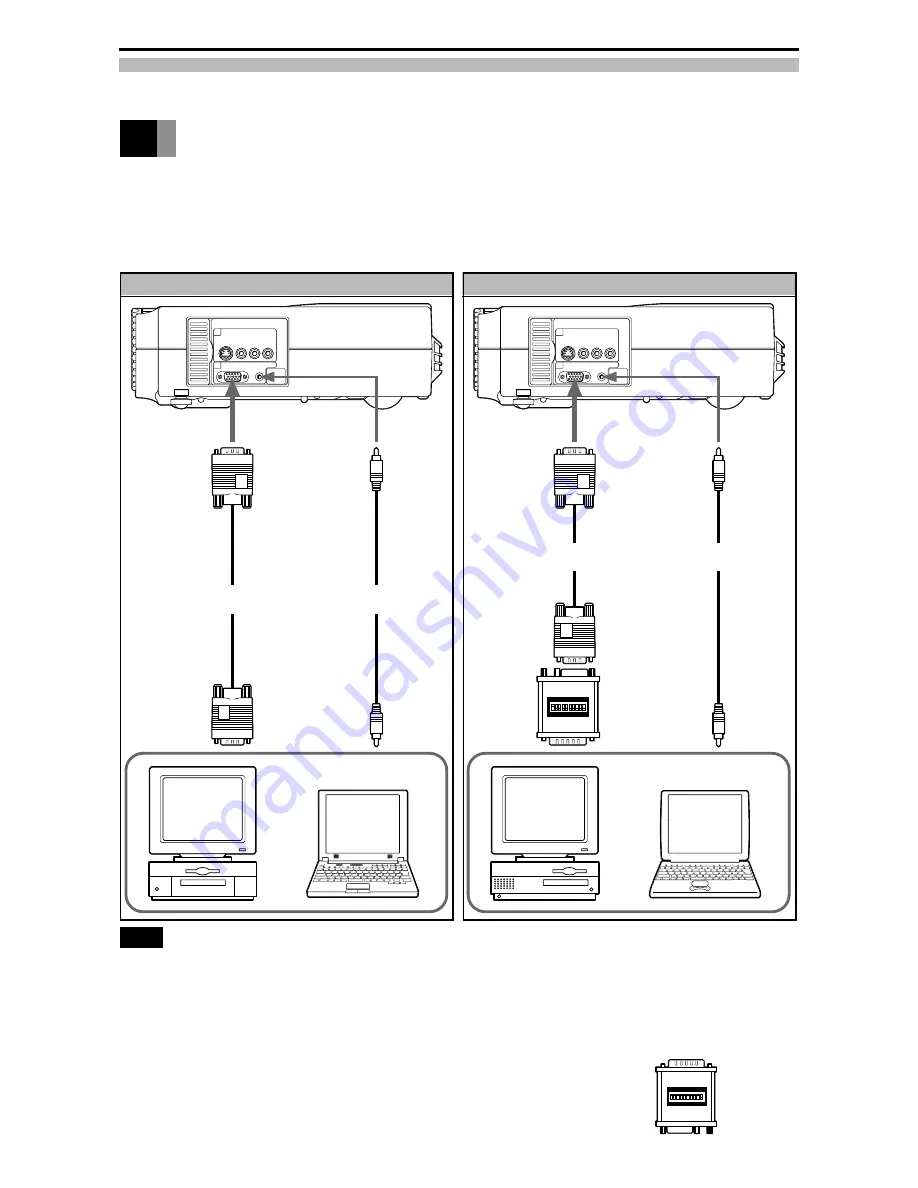
To Personal Computer
Note
• The cables marked with * are commercially available.
• Use an RGB cable that matches the shape of the image output terminal on your PC.
• For details of the PC frequencies suitable for this projector, see the list of RGB-compatible frequencies on page 35.
• When connecting the projector to a Macintosh computer, be sure to use the optional MAC connector, otherwise a blank
display may result.
• When connecting the projector to a Macintosh notebook computer, in addition to the optional MAC connector, a special
adapter (commercially available) may be necessary.
[Projector Side]
To AUDIO
terminal
(sound can be
produced)
To sound
output
terminal
To RGB/
COMPONENT
terminal (this
connection
enables PC
images to be
projected)
To RGB output
terminal
Macintosh
MAC
connector
(optional)
(see below)
[Projector Side]
To AUDIO
terminal
(sound can be
produced)
To sound
output
terminal
To RGB/
COMPONENT
terminal (this
connection
enables PC
images to be
projected)
To RGB
output
terminal
MAC connector:
RGB cable
(supplied)
Stereo audio
cable*
RGB cable
(supplied)
Stereo audio
cable*
When using a MAC connector, set the dip switches as follows.
VGA/SVGA Mode
➝
Switches 2, 3, 6, 7 ON
Mac 16" Mode (832 x 624)
➝
Switches 1, 3, 6, 7 ON
Mac 19" Mode (1024 x 768)
➝
Switches 1, 2, 6, 7 ON
Mac 21" Mode (1152 x 870)
➝
Switches 1, 2, 3, 4, 6, 7 ON
Mac 16" Multi. scan
➝
Switches 1, 4, 6, 7, 9 ON
Mac 21" Multi. scan
➝
Switches 1, 4, 6, 7, 8 ON
16


