Downloaded from Projector.com
20
RS-232C
WIRED
REMOTE
MOUSE
USB
PS/2
Mouse Functions
POWER
RGB
MENU
ZOOM-PAN
ZOOM
MUTE
LASER
VIDEO
ENTER/R-MOUSE
VOLUME
SOURCE
CANCEL
KEYSTONE
STATUS
FOCUS
AUTO
MOUSE
PJ
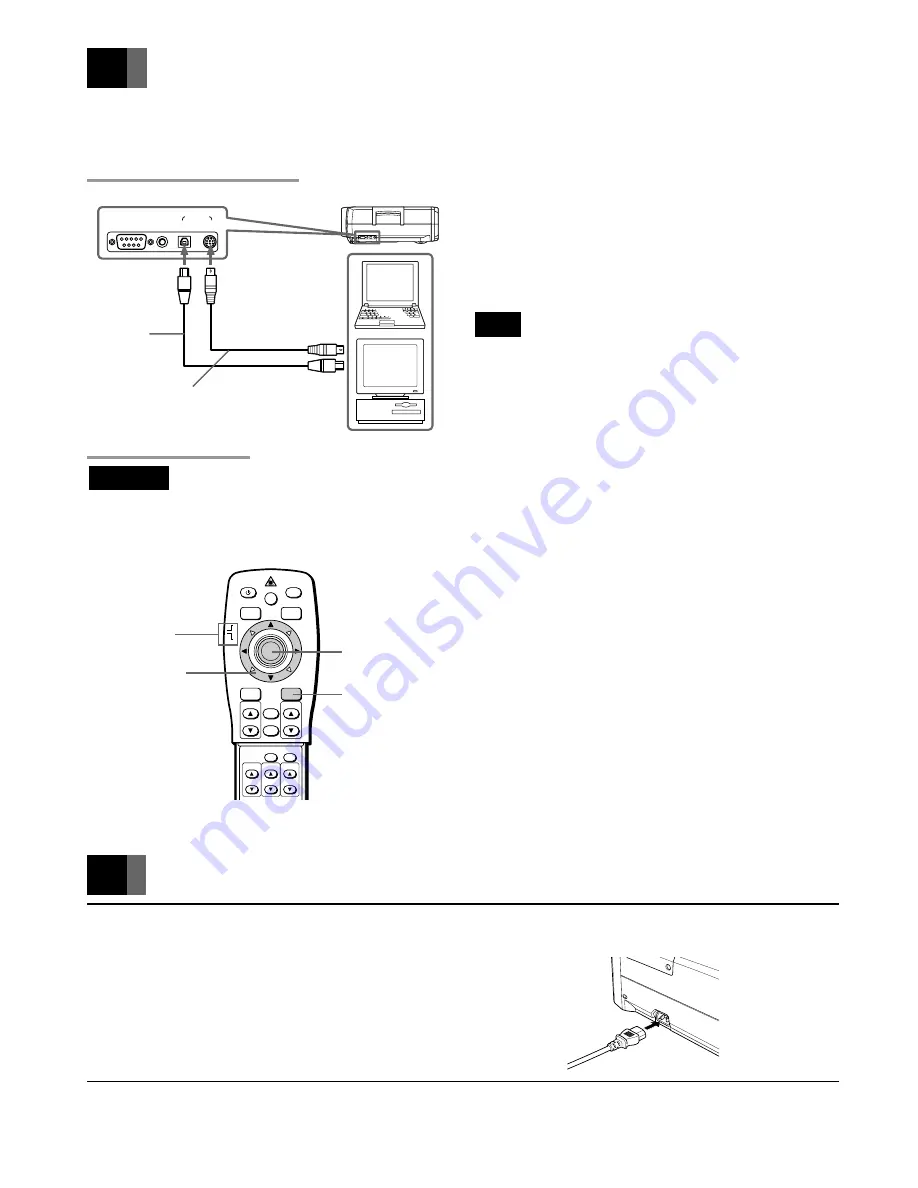
To MOUSE PS/2
terminal
R-MOUSE button
To MOUSE
USB terminal
USB mouse
connection
cable (optional)
[Projector right side]
To mouse (USB)
terminal
PS/2 mouse
connection cable
(supplied)
To mouse (PS/2)
terminal
Slide switch
Mouse pointer
buttons
L-MOUSE button
By connecting the PC mouse terminal and projector mouse terminal, the projector remote control unit can be used instead of the PC
mouse.
Connecting the Mouse
■
Connecting to AT interchangeable equipment
Connect a PS/2 mouse or USB mouse. (The PS/2 mouse
cable is supplied, but the USB mouse cable is optional.)
■
Connecting to a Macintosh PC
Connect a USB mouse or ADB mouse. (Both the USB mouse
cable and Mac mouse cable for the ADB mouse are optional.)
Note
• When connecting the ADB mouse, use the optional Mac
mouse cable instead of the PS/2 mouse cable.
• When you use the USB connection, the mouse function
may not operate depending on your personal computer or
operating system.
Mouse Functions
Important
• Set the slide switch on the remote control unit to MOUSE. If the switch is set on PJ (projector), the following operations
cannot be performed.
■
R-MOUSE button
The R-MOUSE button on the right of the remote control unit
corresponds to the right button on a mouse with two click
buttons.
■
L-MOUSE button
The L-MOUSE button in the center of the remote control
unit corresponds to the left button on a mouse with two click
buttons.
■
Moving the Cursor
When the left, right, up, down and diagonal mouse pointer
buttons are pressed, the cursor moves in the designated
direction on the screen.
■
Select and Decide
Move the cursor and press the L-MOUSE button.
■
Drag
While pressing the L-MOUSE button, press the mouse
pointer buttons in the desired drag direction.
Connecting the Power Source
1
Plug the power cable (supplied) into the power terminal on the left side of
the projector.
2
Insert the power plug into the power socket.
The POWER-ON monitor lights red and the projector is in standby status.


