3-10
J Series 2.0, 2.4, and 3.0 kW Setup Guide
020-100751-03 Rev. 1 (02-2014)
Section 3: Operation
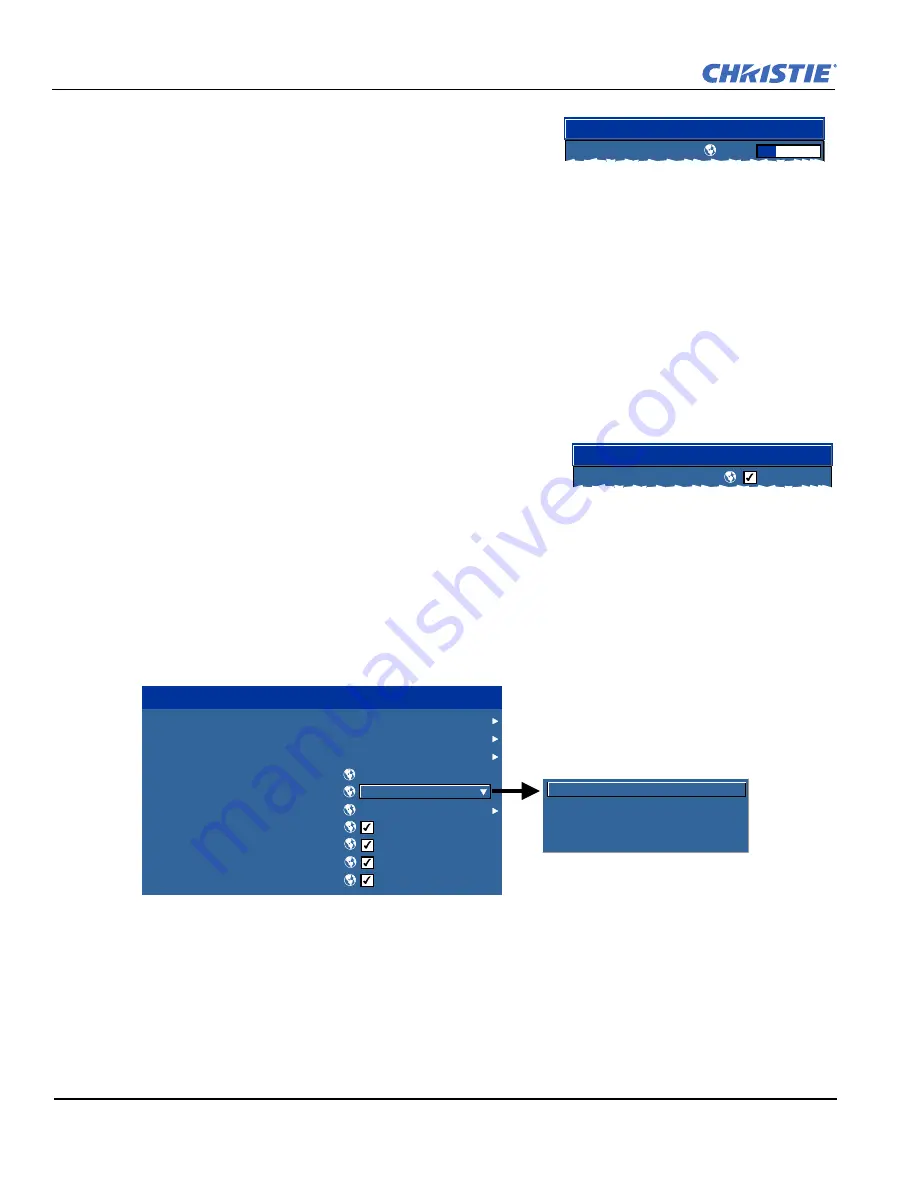
Slide Bars In Menus:
The current value for a given parameter,
such as size or vertical stretch, appears to the left of its slide bar
icon (adjustment window). This number often expresses a
percentage, or it may have units associated with it (such as
pixels), depending on the specific option. Press
L
EFT
/R
IGHT
A
RROW
K
EY
to gradually adjust the setting up or
down; both the number and the length of the bar change accordingly. Hold for continuous adjustment. Or press
E
NTER
to activate a slide bar text box for specific number entry via the keypad and then press
E
NTER
to save
(or press
E
XIT
to cancel).
“Direct” Slide Bars:
For quick access, to
Gamma
,
Brightness
, and
Contrast
slide bars without traveling the
menu system. Press
Gamma
,
Brightness
, or
Contrast
to display the contrast slide bar.
Use the arrow keys to adjust a direct slide bar, or press
E
NTER
and enter a specific number from the keypad,
then
E
NTER
or
L
EFT
A
RROW
K
EY
or
R
IGHT
A
RROW
K
EY
to save (or
E
XIT
to cancel). When you are done, press
E
XIT
to save and return to your presentation.
NOTES: 1)
You can still adjust a direct slide bar as usual if the display is turned off (see
OSD
or
Menu
Preferences
menu) — the slide bar just won’t be visible.
2)
A direct slide bar disappears if it is not used within
five seconds.
Check Boxes:
Conditions are present if its adjacent check box
contains a check mark. To toggle the check box, highlight and press
E
NTER
, or highlight and use
R
IGHT
A
RROW
K
EY
to check and
L
EFT
A
RROW
K
EY
to clear. If a check box is numbered, enter its number
to immediately toggle the check box.
Pull-Down Lists:
To see a pull-down list of options available for a given parameter:
• Highlight the list and press
E
NTER
-OR-
• Enter the menu option number
Use the
U
P
A
RROW
K
EY
or
D
OWN
A
RROW
K
EY
to navigate up and down within the list. Press
E
NTER
to
choose an option from the list.
If you prefer to quickly scroll through a list without first pulling it down, highlight the option and use
L
EFT
A
RROW
K
EY
or
R
IGHT
A
RROW
K
EY
. Press
E
NTER
when the desired choice appears.
NOTES: 1)
Press
L
EFT
A
RROW
K
EY
or
R
IGHT
A
RROW
K
EY
to jump between pages in an extra long pull-down
list.
2)
Press
E
XIT
while in a pull-down list to cancel any change.
White Uniformity
Left Side
1.
35.6
Edge Blending
Blending Enable
1.
1.
2.
3.
4.
5.
6.
7.
8.
9.
10.
Serial (RS-232 IN) Options
Serial (RS-232 OUT) Options
Serial (RS-422) Options
Projector Address
Network Routing
Ethernet Settings
Broadcast Key
Front IR Enable
Back IR Enable
Wired Keypad Enable
Communications
Separate
Separate
RS-232 and RS-422 Joined
RS-232 and Ethernet Joined
All Joined
1.
2.
3.
4.
Summary of Contents for J 2.0 kW
Page 1: ...J Series 2 0 2 4 and 3 0 kW S e t u p G u i d e 020 100751 03 ...
Page 2: ......
Page 3: ...J Series 2 0 2 4 and 3 0 kW S e t u p G u i d e 020 100751 03 ...
Page 10: ......
Page 38: ......
Page 42: ......
Page 43: ......


