background image

Using the Wall-Mounted Control
Console

THE LCD MOTION DETECTING CONTROL CONSOLE

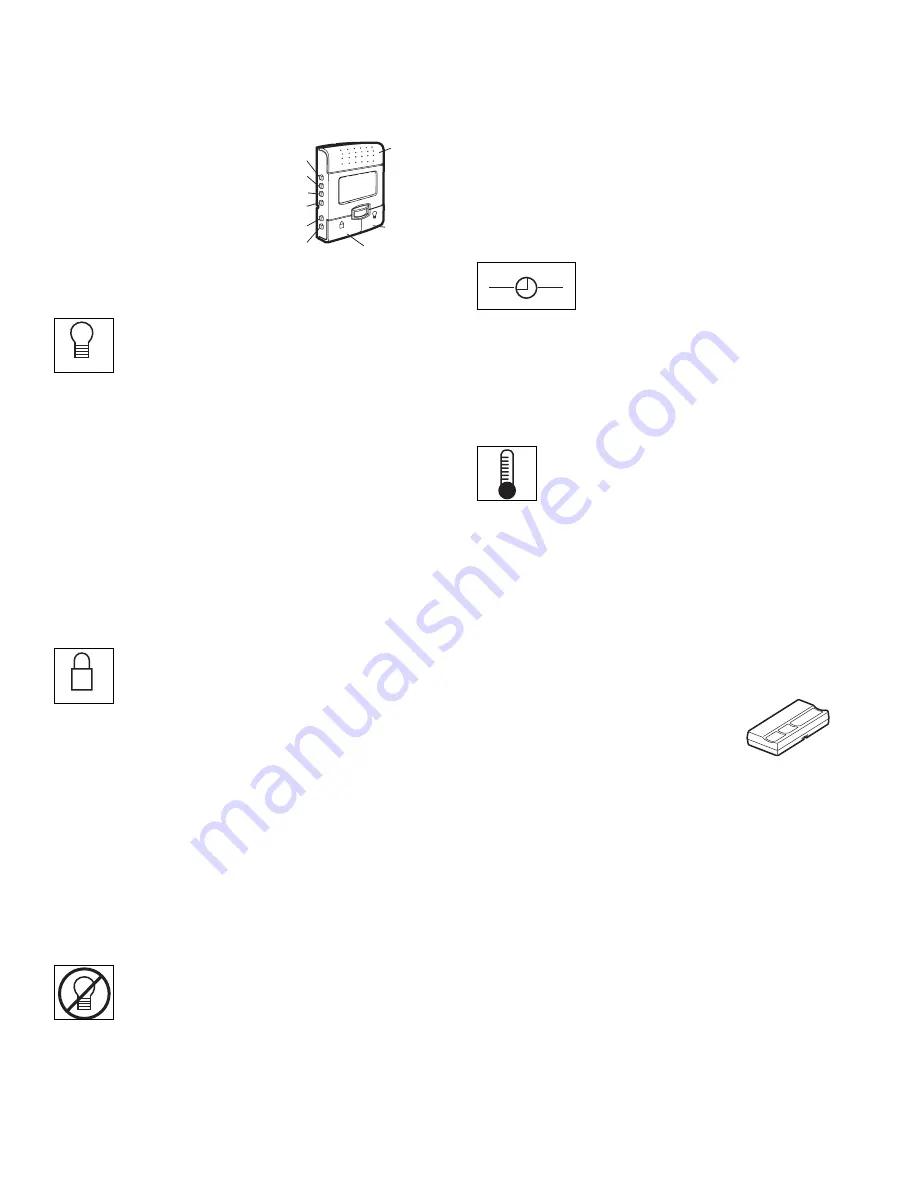
Press the push bar to
open or close the door.
Press again to reverse
the door during the
closing cycle or to stop
the door while it

'

s

opening.

This door control contains a motion sensing detector that
will automatically turn on the light when it detects a
person entering the garage.

Light feature

Press the Light button to turn the opener light on or off. It
will not control the opener lights when the door is in
motion. If you turn it on and then activate the opener, the
light will remain on for 4-1/2 minutes. Press again to turn
it off sooner. The 4-1/2 minute interval can be changed to
1-1/2, 2-1/2, or 3-1/2 minutes as follows: Press and hold
the Lock button until the light blinks (about 10 seconds).
A single blink indicates that the timer is reset to 1-1/2
minutes. Repeat the procedure and the light will blink
twice, resetting the timer to 2-1/2 minutes. Repeat again
for a 3-1/2 minute interval, etc., up to a maximum of four
blinks and 4-1/2 minutes.

When using the opener lights as working lights, we
recommend that you first disable the motion sensor. See

Automatic Light Feature, 

below.

Lock feature

Designed to prevent operation of the door from 
hand-held remote controls. However, the door will open
and close from the Door Control, the Outdoor Key Switch
and the Keyless Entry Accessories.

To activate, press and hold the Lock button for 2
seconds.

To turn off, press and hold the Lock button again for
2 seconds. The Lock feature will also turn off whenever
the “learn” button on the motor unit panel is activated.

Motion Sensing (Automatic Light Feature):

The opener

light will turn on automatically when a person enters the
garage. When a person walks in front of the door control,
the light will come on for five minutes, then shut off. This
feature works by detecting body heat.

To disable this feature, push the motion sensing
button on the side of the door control.

We recommend that you disable the motion sensor when
using the opener lights as working lights. Otherwise, they
will turn off automatically if you are working beyond the
sensors range.

Automatic Light 

On/Off 

Prog <Learn>

Hour 

Minute 

Language 

Degrees (F/C) 

Lock Button 

Light Button

Push Bar 

LIGHT


LOCK


(PROG) 

Learn Feature

The control console is equipped with a Prog <LEARN>
button to assist in learning remote controls to the unit.
Press the Prog <LEARN> button once to initiate LEARN
mode and the display will show ‘Learn Remote Control -
Press Learn Button Again to Confirm’. Press the Prog
<LEARN> button a second time and the display will show
‘Learn Mode - Press Remote Control Button to Learn
Remote.’ Press the button of the remote control to be
learned and the worklight will blink to confirm the remote
control has been learned.

Hour & Minute Feature

Press or hold either of these side buttons to increment
the hour or minute displayed on the LCD display.

(LANG) 

Language Feature

Press this side button to toggle between the three
languages - English, French and Spanish.

Degrees F/C Feature

Press this side button to toggle the temperature units
between Fahrenheit and Celsius.

Display Contrast Adjustment

Press and hold the light button then push the hour button
to increase the contrast or the minute button to decrease
the contrast.

Additional feature when used with the 3-Button
hand-held remote

To control the opener lights:

In addition to operating the door, you
may program the remote to operate
the lights.

1. With the door closed, press and hold a small remote

button that you want to control the light.

2. Press and hold the Light button on the door control.

3. While holding the Light button, press and hold the Lock

button on the door control.

4. After the opener lights flash, release all buttons.

LIGHT

LOCK

H

M

27

Summary of Contents for Elie Series 3850C

Page 1: ...e enclosed safety materials carefully Fasten the manual near the garage door after installation The door WILL NOT CLOSE unless the Protector System is connected and properly aligned Periodic checks of...

Page 2: ...a problem Troubleshooting 31 Diagnostic chart 32 Programming 33 34 To add or reprogram a hand held remote control 33 To erase all codes from motor unit memory 33 3 Button remotes 33 To add reprogram o...

Page 3: ...arage door Before you begin Disable locks Remove any ropes connected to garage door Complete the following test to make sure your garage door is balanced and is not sticking or binding 1 Lift the door...

Page 4: ...nd height of your garage door Survey your garage area to see if any of the conditions below apply to your installation Additional materials may be required You may find it helpful to refer back to thi...

Page 5: ...tional LOCK LIGHT Your garage door opener is packaged in two cartons which contain the motor unit and all parts illustrated below Accessories will depend on the model purchased If anything is missing...

Page 6: ...t WARNING CAUTION ASSEMBLY STEP 2 Set the Belt Tension By hand thread the spring trolley nut on the threaded shaft until it is finger tight against the trolley Figure 1 Do not use any tools Insert a s...

Page 7: ...ATH 3 ALL repairs to cables spring assemblies and other hardware MUST be made by a trained door systems technician BEFORE installing opener 4 Disable ALL locks and remove ALL ropes connected to garage...

Page 8: ...the door NOTE If the total number of inches exceeds the height available in your garage use the maximum height possible or refer to page 9 for ceiling installation To prevent possible SERIOUS INJURY...

Page 9: ...age Door Header Wall Garage Door UP CEILING MOUNT ONLY Wall Mounting Holes Optional Wall Mounting Holes The nail hole is for positioning only You must use lag screws to mount the header bracket UP CEI...

Page 10: ...tach the Rail to the Header Bracket Position the opener on the garage floor below the header bracket Use packing material as a protective base NOTE If the door spring is in the way you ll need help Ha...

Page 11: ...g an ideal door to rail distance Remove foam packaging Raise the opener onto a stepladder You will need help at this point if the ladder is not tall enough Open the door all the way and place a 2x4 la...

Page 12: ...t is not centered above the door 7 Remove the 2x4 Operate the door manually If the door hits the rail raise the header bracket 8 Grease the top and underside of the rail surface where the trolley slid...

Page 13: ...ousing Do NOT overtighten Replace cover by inserting top tabs first and then snap cover in place 3 For standard installations ONLY Run bell wire up wall and across ceiling to motor unit Use insulated...

Page 14: ...k or speciality light bulbs may overheat the endpanel or light socket Lens Hinge 100 Watt Max Standard Light Bulb Release Tab 100 Watt Max Standard Light Bulb INSTALLATION STEP 7 Install the Battery B...

Page 15: ...ord 2 wire adapter or change plug in ANY way to make it fit outlet Be sure the opener is grounded Ground Tab Green Ground Screw Ground Wire Black Wire PERMANENT WIRING CONNECTION White Wire Black Wire...

Page 16: ...iving eye lens The mounting brackets are designed to clip onto the track of sectional garage doors without additional hardware If it is necessary to mount the units on the wall the brackets must be se...

Page 17: ...lip hugging the back edge of the track Figure 1 If your door track will not support the bracket securely wall installation is recommended Wall installation Figure 2 3 Place the bracket against the wa...

Page 18: ...alignment is required Loosen the sending eye wing nut and readjust aiming directly at the receiving eye Lock in place Loosen the receiving eye wing nut and adjust sensor until it receives the sender s...

Page 19: ...ollows depending on your door s construction Metal or light weight doors using a vertical angle iron brace between the door panel support and the door bracket Drill 3 16 fastening holes Secure the doo...

Page 20: ...INUM STEEL DOORS WITH GLASS PANEL ETC NOT PROVIDED ONE PIECE DOORS Please read and comply with the warnings and reinforcement instructions on the previous page They apply to one piece doors also Cente...

Page 21: ...ole alignment alternative If holes in curved arm are above holes in straight arm disconnect straight arm Cut about 6 15 cm from the solid end Reconnect to trolley with cut end down as shown Bring arm...

Page 22: ...from the inner trolley by pulling straight down on the emergency release handle and sliding the outer trolley back toward the motor unit Connect the curved door arm section to the trolley using the 5...

Page 23: ...ack and purple buttons to reach the desired closed position 7 Push the remote control or the door control Figure 3 This sets the DOWN close limit and should bring the door to the open position If the...

Page 24: ...has learned the forces required to open and close your door The door must travel through a complete cycle UP and DOWN in order for the force to be set properly If the opener cannot open and close you...

Page 25: ...ustment If the unit continues to fail the Safety Reverse Test call for a trained door systems technician IMPORTANT SAFETY CHECK Test the Safety Reverse System after Each adjustment of door arm length...

Page 26: ...r is 100 watts maximum Security light feature Lights will also turn on when someone walks through the open garage door With a Motion Detecting Door Control Console this feature may be turned off as fo...

Page 27: ...ll come on for five minutes then shut off This feature works by detecting body heat To disable this feature push the motion sensing button on the side of the door control We recommend that you disable...

Page 28: ...DOWN operation either manually or by using the control console or remote To prevent possible SERIOUS INJURY or DEATH from a falling garage door If possible use emergency release handle to disengage tr...

Page 29: ...Check with local codes for disposal instructions WARNING CAUTION WARNING WARNING Battery Status LED Battery Backup Optional OPERATING INSTRUCTIONS 0To test the battery disconnect the motor unit power...

Page 30: ...rewdriver blade to pry open the case as shown Insert battery positive side up Dispose of old battery properly NOTICE To comply with FCC and or Industry Canada IC rules adjustment or modifications of t...

Page 31: ...ter fully closing and touching the floor Repeat safety reverse test after adjustments to force or travel limits The need for occasional adjustment for the force and limit settings is normal Weather co...

Page 32: ...ights do not light replace the safety reversing sensors Symptom LED is not lit on control console Inspect control console wires for a short staple in wire replace as needed Disconnect wires at control...

Page 33: ...r light will glow steadily for 30 seconds 2 Within 30 seconds press and hold the button on the hand held remote that you wish to operate your garage door 3 Release the button when the motor unit light...

Page 34: ...pening To clear the temporary password repeat steps 1 3 setting the number of hours or times to 0 in step 3 To Add Reprogram or Change a Keyless Entry PIN NOTE Your new Keyless Entry must be programme...

Page 35: ...le 2 373LMC 3 Button remote control 3 10A20 3V2032 Lithium battery 4 29B137 Remote control visor clip 5 41A2828 Emergency release rope and handle assembly 6 41B4494 1 2 Conductor bell wire white white...

Page 36: ...ith Battery wires and plug Light socket wires and plug RPM passpoint wires with plug 5 41D794 Motor with positioning sensor 6 41DB002 2 Receiver logic assembly KEY PART NO NO DESCRIPTION 7 41A6231 End...

Page 37: ...om outside by entering a password on a specially designed keyboard Also can add a temporary password for visitors or service persons This temporary password can be limited to a programmable number of...

Page 38: ...38 NOTES...

Page 39: ...39...

Page 40: ...PURPOSE ARE LIMITED IN DURATION TO THE FIVE YEAR LIMITED WARRANTY PERIOD SET FORTH ABOVE EXCEPT THE IMPLIED WARRANTIES WITH RESPECT TO THE MOTOR AND BELT WHICH ARE LIMITED IN DURATION TO THE LIFETIME...

Page 41: ...a pose accrocher ce manuel pr s de la porte de garage pour s y reporter ult rieurement La porte NE SE FERMERA PAS si le Syst me Protector n est pas branch et r gl correctement Pour un bon fonctionneme...

Page 42: ...s de fonctionnement d pannage 31 Fiche diagnostique 32 Programmation 33 34 Pour ajouter ou reprogrammer une t l commande main suppl mentaire 33 Pour effacer tous les codes de la m moire du moteur 33 T...

Page 43: ...ration de votre porte de garage Avant de commencer D sactiver les serrures Retirer toute corde raccord e la porte de garage R aliser le test suivant pour s assurer que la porte de garage est quilibr e...

Page 44: ...et la hauteur de votre porte de garage Examiner la r gion du garage pour noter si l une des conditions ci apr s s applique votre installation Des mat riaux suppl mentaires peuvent tre n cessaires Il...

Page 45: ...bo tes qui contiennent le moteur et toutes les pi ces illustr es ci apr s Les accessoires d pendront du mod le achet S il manque quoi que ce soit v rifier soigneusement le mat riel d emballage Les pi...

Page 46: ...AVERTISSEMENT MONTAGE 2E OP RATION R glage de tension de la courroie Visser et serrer la main l crou de ressort du chariot sur l arbre filet jusqu ce qu il soit contre le chariot Figure 1 Ne pas utili...

Page 47: ...ures de montage DOIVENT tre confi es un technicien form en syst mes de porte AVANT de poser l ouvre porte 4 D sactiver TOUTES les serrures et retirer TOUTES les cordes raccord es la porte de garage AV...

Page 48: ...porte REMARQUE Si le nombre total de pouces centim tres d passe la hauteur disponible dans le garage utiliser la hauteur maximum ou se reporter la page 9 pour la pose au plafond Pour pr venir d ventue...

Page 49: ...Porte de garage Trous de fixation au mur Trous de fixation au mur en option Le trou du clou n est pr vu que pour le positionnement seulement Des tire fond doivent tre utilis s pour fixer le support d...

Page 50: ...de linteau Positionner l ouvre porte de garage sur le plancher juste sous le support de linteau Utiliser une des bo tes d emballage pour le prot ger REMARQUE Si le ressort de la porte g ne il faudra d...

Page 51: ...allage en mousse Lever l ouvre porte et le faire reposer sur un escabeau Si l escabeau n est pas assez haut demander de l aide Ouvrir compl tement la porte et mettre un 2 x 4 plat sur sa partie sup ri...

Page 52: ...pe le rail lever le support de linteau 8 Graisser le dessus et le dessous de la surface du rail o glisse le chariot l aide de graisse rail REMARQUE NE PAS mettre l ouvre porte sous tension ce stade Po...

Page 53: ...ieures et enclencher le couvercle 3 Installation standard SEULEMENT Faire monter le fil de sonnerie le long du mur et du plafond jusqu au moteur Utiliser des agrafes isol es pour fixer le fil plusieur...

Page 54: ...cialis es peut causer une surchauffe du panneau d extr mit ou de la douille Ampoule standard de 100 W max Ampoule standard de 100 W max Charni re de diffuseur Languette de d gagement POSE 7e OP RATION...

Page 55: ...de quelque mani re que ce SOIT pour l ins rer dans la prise S assurer que l ouvre porte est mis la terre Patte de terre Vis verte de terre Fil de terre Fil noir BRANCHEMENT LECTRIQUE PERMANENT Fil bla...

Page 56: ...rticul es sans fixations suppl mentaires Si les unit s doivent tre mont es sur le mur les supports doivent tre fix s fermement une surface solide telle que la charpente du mur On peut se procurer des...

Page 57: ...uide de porte ne supporte pas solidement le support une pose murale est recommand e Pose murale Figure 2 et 3 Placer le support contre le mur les bras courb s tant dirig s vers la porte S assurer qu i...

Page 58: ...eurs Desserrer l crou de la cellule mettrice et ajuster de fa on ce qu elle vise directement la cellule r ceptrice Serrer l crou Desserrer l crou de la cellule r ceptrice et r gler le d tecteur jusqu...

Page 59: ...l g res utilisant une ferrure angulaire verticale entre le support du panneau de porte et le support de porte Percer des trous de fixation de 3 16 po Fixer le support de porte l aide des deux vis aut...

Page 60: ...NEAUX DEVERRE ETC NON FOURNIS PORTES RIGIDES Pri re de lire et de suivre les avertissements et les instructions de renforcements la page pr c dente Ils s appliquent galement aux portes rigides Centrer...

Page 61: ...o 15 cm du bout Refixer la biellette droite sur le chariot en orientant la partie coup e vers le bas comme illustr Rapprocher les biellettes Aligner deux paires de trous et raccorder les deux biellett...

Page 62: ...xt rieure du chariot vers le moteur de l ouvre porte Connecter la biellette courb e au chariot l aide de l axe de chape de 5 16 po x 1 1 4 po et de l anneau d arr t REMARQUE R glage de la fin de cours...

Page 63: ...utons noir et violet afin de r gler la position de fermeture souhait e de la porte 7 Appuyer sur la t l commande ou sur la commande murale Figure 3 Ceci permet de param trer la limite DOWN de course i...

Page 64: ...uverture et de fermeture pour que la force puisse tre r gl e correctement Si l ouvre porte ne parvient pas ouvrir ou fermer compl tement votre porte inspecter celle ci pour s assurer qu elle est bien...

Page 65: ...MPORTANTE Faire l essai du syst me d inversion de s curit apr s Chaque fois que l on modifie la longueur des biellettes et chaque fois que l on proc de un r glage de la force et de la course de la por...

Page 66: ...nt galement lorsqu une personne franchira la porte de garage ouverte Sur la commande de porte avec d tecteur de mouvement cette fonction d clairage peut tre d sactiv e de la fa on suivante les lumi re...

Page 67: ...el de chaleur n est d tect Pour d sactiver cette fonctionnalit appuyer sur le bouton ON OFF marche arr t d clairage automatique sur le c t gauche de la console de commande Prog Learn Heure Minute Lang...

Page 68: ...BLESSURES GRAVES ou LA MORT par suite de la chute d une porte de garage Si possible utiliser la poign e de d clenchement d urgence pour d gager le chariot UNIQUEMENT lorsque la porte de garage est FER...

Page 69: ...SEMENT AVERTISSEMENT Battery Status LED Batterie de secours optional INSTRUCTIONS D UTILISATION 1 Tester la batterie install e avec le moteur Pour tester la batterie d brancher le cordon d alimentatio...

Page 70: ...aide de la pince du pare soleil ou de la lame d un tournevis Ins rer la pile avec le c t positif vers le haut Se d barrasser de la pile usag e convenablement Pour pr venir d ventuelles BLESSURES GRAV...

Page 71: ...orte inverse sa course sans raison apparente R p ter le contr le de l inversion de s curit apr s avoir proc d au r glage de la force ou des limites de course Le besoin de proc der des r glages occasio...

Page 72: ...porte Inspecter la commande de porte les fils pour d tecter un court circuit agrafe dans le fil remplacer si n cessaire D connecter les fils au niveau de la commande de porte toucher les fils l un l a...

Page 73: ...rel cher le bouton learn sur le moteur Le t moin lumineux learn s allumera en continu pendant 30 secondes 2 Dans un d lai de 30 secondes enfoncer et tenir le bouton de la t l commande qui fera foncti...

Page 74: ...sant sur le nouveau NIP puis appuyer sur ENTER La porte devrait bouger Pour d finir un NIP temporaire Vous pouvez autoriser l acc s aux visiteurs ou aux techniciens de service l aide d un NIP temporai...

Page 75: ...0 Pile au lithium 3V2032 4 29B137 Agrafe de pare soleil de la t l commande 5 41A2828 Poign e et corde pour fonctionnement d urgence 6 41B4494 1 Fil de sonnerie blanc et blanc rouge 2 conducteurs 7 41A...

Page 76: ...prise Fils de douille d ampoule et prise Fils de liaison r gime moteur avec prise 5 41D794 Moteur avec capteur de positionnement 6 41DB002 2 Plaque logique du r cepteur N DE R F PI CE D SIGNATION 7 41...

Page 77: ...ier de conception sp ciale Peut galement ajouter un mot de passe temporaire pour les visiteurs ou les pr pos s au service Ce mot de passe programmable peut tre limit un nombre programmable d heures ou...

Page 78: ...38 REMARQUES...

Page 79: ...39 REMARQUES...

Page 80: ...GARANTIE LIMIT E DE CINQ ANS TELLE QUE D CRITE CI DESSUS EXCEPTION FAITE DES GARANTIES TACITES RELATIVES AU LE MOTEUR Y COURROIE QUI SONT LIMIT ES EN DUR E LA P RIODE DE GARANTIE LIMIT E DE A VIE POUR...

Reviews: