2
Installation
1
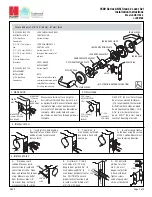
Attach the shaft collar to garage door opener
To avoid installation diffi culties, do not run the garage door opener until
instructed to do so.
1. Loosen the set screws.
2. Attach shaft collar to the garage door opener motor shaft. The side of the shaft
collar with the larger hole should be placed on the motor shaft. Ensure that the
shaft collar is seated all the way on motor shaft until stop is reached.
3. Position the shaft collar so the screws are facing out and are accessible when
attached to the torsion bar.
4. Securely tighten the 2 square head set screws closest to the motor shaft by
turning the screws 1/4 - 1/2 turn after making contact with the motor shaft.
Set
Screws
Shaft Collar
Motor
Shaft
To prevent possible SERIOUS INJURY or DEATH:
• Concrete anchors MUST be used if mounting bracket into masonry.
• NEVER try to loosen, move or adjust garage door, springs, cables, pulleys,
brackets or their hardware, ALL of which are under EXTREME tension.
• ALWAYS call a trained door systems technician if garage door binds, sticks or
is out of balance. An unbalanced garage door might NOT reverse when required.
• Garage door opener MUST be mounted at a right angle to the torsion bar to
avoid premature wear on the collar.
• Upon completion of Installation, test safety reversal system. Door MUST
reverse on contact with a 1-1/2" (3.8 cm) high object (or a 2x4 laid fl at) on the
fl oor.
To prevent possible SERIOUS INJURY or DEATH, the collar MUST be properly
tightened. The door may NOT reverse correctly or limits may be lost due to collar
slip.
2
Position and mount the garage door opener
NOTE:
For additional mounting options, refer to your owner's manual.
1. Close the garage door completely.
2. Slide the garage door opener onto the end of the torsion bar.
NOTE:
Ensure the shaft collar does NOT touch the bearing.
If the replacement shaft collar matches the previous shaft collar, align the garage
door opener mounting bracket to the existing holes. Use a level to position and
vertically align the garage door opener. Skip to Step 6.
If the replacement shaft collar does
NOT
match the previous shaft collar, start at
Step 3.
3. To mark new mounting holes: Tighten the set screws on the torsion bar to hold
the garage door opener in place while marking the new mounting holes using
the mounting bracket. Use a level to position and vertically align the garage
door opener.
NOTE:
The garage door opener does not have to be fl ush to the wall.
4. After marking new mounting holes, remove the garage door opener from the
torsion bar. Drill 3/16" pilot holes at the marked locations. Drill through metal
door rail plates if necessary.
5. Slide the garage door opener back onto the torsion bar until the pilot holes
align with mounting bracket.
6. Tighten the 2 square head set screws on the torsion bar. For a hollow torsion
bar, tighten screws 3/4 - 1 full turn after making contact with the bar. For a
solid shaft torsion bar, tighten screws 1/4 - no more than 1/2 turn after making
contact with the shaft. If installing on a keyed torsion bar, DO NOT tighten the
set screws into the keyway.
7. Secure the mounting bracket to the wall and to the garage door opener. Use the
14-10 x 2" screws to secure the mounting bracket to the wall.
Set screws
(Torsion bar)
Bearing
Plate
Shaft
Collar
Torsion Bar
.25" (.6 cm) min.
space between
bearing and
shaft collar
Mounting Bracket
Screws 14-10 x 2"
Summary of Contents for 041D8615
Page 7: ...7 ...