background image

- 11 -

SDOPD

SETTINGS AND ADJUSTMENTS

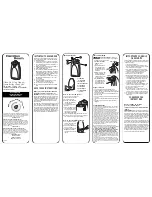
11. Disengaging from Garage Door

Pull down on the Red Coloured Disengage Cord (Fig.9) to disengage the AGDO from the Garage door.

Important Notes:

a. Never attempt to open/close the Garage door by pulling on the Disengage Cord. Doing so

may result in SERIOUS PERSONAL INJURY, PROPERTY AND/OR AGDO DAMAGE.

b. Always disengage the AGDO with the Garage door in the fully closed position.

c. If attempting to disengage the AGDO from any position other than with the garage door

fully  closed  ensure  that  there  are  no  persons  and/or  property  near  or  directly  under  the

path of the garage door.

12. Engaging to Garage Door

Open the garage door by hand so that it is approx 1 meter off the ground.

Pull down on the Green Coloured Engage Cord. (Fig 9)

Press the Green Coloured “Run” Button located on the Rear Cover of the AGDO. (Fig.11)

After a short time the AGDO will self-engage into the Carriage.

Important Note: If the AGDO runs for some time (first cycle) and then stops without engaging into

the Carriage press the Green Coloured “Run” Button again and the AGDO will self-engage on the

second cycle.

13. Travel Adjustment

Close Direction Garage Door Travel Adjustment

Locate the 2 Door Travel Adjusting Screws (DTAS) found on the underside of the Power Head. (Fig 10)

Increase Travel

- turn the DTAS marked with the

Red

arrow clockwise towards “MORE”.

Decrease Travel

-turn the DTAS marked with the

Red

arrow anti-clockwise towards “LESS”.

Important Notes:

a. The AGDO will switch on automatically and “follow the limits” when they are adjusted in

the direction of increased travel.

b. In the fully closed position the garage door should be sitting lightly on the ground with the

rubber weather seal not fully compressed. (sectional garage doors only)

c. LED Indicator (Fig 11) will glow solid once the AGDO reaches the Close Limit position.

CLOSE

OPEN

LESS

MORE

LESS

RUN

SET

CODE

UP FORCE

MIN

MAX

DOWN FORCE

MIN

MAX

SWITCH

WALL

PHOTO

BEAM

Fig 10

Open Direction Garage Door Travel Adjustment

Locate the 2 Door Travel Adjusting Screws (DTAS) found on the underside of the Power Head. (Fig 10)

Increase Travel

-turn the DTAS marked with the

Green

arrow anti-clockwise towards “MORE”.

Decrease Travel

- turn the DTAS marked with the

Green

arrow clockwise towards “LESS”.

Important Notes:

a. The AGDO will switch on automatically and “follow the limits” when they are adjusted in

the direction of increased travel.

b. In the fully open position the garage door should not be sitting against the door track

stoppers.

Summary of Contents for SDO-10

Page 1: ...1 IMPORTANT SAFETY RECOMMENDATIONS 802 011 01 D...

Page 2: ...2 SDOPD...

Page 3: ...ower Head to Ceiling 9 Attaching Towing Arms 9 Adjusting Disengage Cord 10 Connecting to Power Supply 10 Settings and Adjustments 11 Disengaging from Garage Door 11 Engaging to Garage Door 11 Travel A...

Page 4: ...llation of the AGDO 6 The counter balance springs on sectional type garage doors must be lubricated annually between each of the coils with heavy automotive bearing grease Failure to adequately lubric...

Page 5: ...ving out of its view 25 Adjustments to the Safety Obstruction Force settings must only be carried out by a technically qualified person Attempting to adjust the settings without suitable technical qua...

Page 6: ...sembling Drive Pole and Power Head Refer to Figs 1A C in order to identify Garage Door type and length of rail required On a clean smooth surface unpack the Power Head Drive Pole Carriage and Terminal...

Page 7: ...ensuring that the teeth of the Chain Sprocket engage into the links of the Drive Chain Fig 4 Extend the remainder of the Drive Chain back to the Bullet Fig 4 Fig 4A Fig 4B Fig 4C Turn the Lock Nut all...

Page 8: ...l member of the garage door Mark the location of at least 2 screw holes as far apart from each other as possible Drill the 2 screw holes with appropriate drill and securely mount the Towing Bracket to...

Page 9: ...the floor along both planes For Sectional and Track Type Tilt Doors only For Jamb Type Tilt Door refer Fig 1B Important Notes a With the garage door in the fully open position the underside of the Dri...

Page 10: ...o that the end hangs approximately 1800mm above the garage floor Fig 9 Fig 9 10 Connecting to Power Supply Connect the AGDO to a properly earthed power supply using the Power Cord provided Important N...

Page 11: ...ustment Close Direction Garage Door Travel Adjustment Locate the 2 Door Travel Adjusting Screws DTAS found on the underside of the Power Head Fig 10 Increase Travel turn the DTAS marked with the Red a...

Page 12: ...pen As the garage door is opening slowly turn the Open Force green adjustment pin Fig 11 in an anti clockwise direction until the garage door stops Now turn the same pin clockwise 5 degrees Safety Obs...

Page 13: ...bottom of the garage door is resting lightly on the floor of the garage refer Sec 13 for door travel adjustment instructions 15 Hand Transmitters Code Learning The AGDO can store up to 14 individual...

Page 14: ...3 Dip No 4 15 off off 30 on off 45 off on 60 on on 17 Courtesy Lamp The in built Courtesy Lamp will illuminate each time the AGDO is activated and then switch off automatically 3 min after receiving...

Page 15: ...None AGDO is traveling between open and closed positions 21 Output Terminals 4 Output Terminals Fig 11 are provided within the back cover of the AGDO to support the connection of the following access...

Page 16: ...e is glowing red Adjust the Emitter Safety Beam module by turning the mounting bracket so that it is aimed directly at the lens of the Receiver Safety Beam module An indicator lamp located along the t...

Page 17: ...rage The Wireless Wall Switch may be learned into the AGDO as per the procedure outlined in Sec 15 Hand Transmitter Code Learning The switch can be permanently screwed to the wall through the mounting...

Page 18: ...Stop Check function of AGDO by operating from Run button 15 23 AGDO will not function from Check function of AGDO by learning in a substitute Hand Transmitter 13 16 Hand Transmitter Re learn Hand Tran...

Page 19: ...19 SDOPD NOTES...

Reviews: