background image

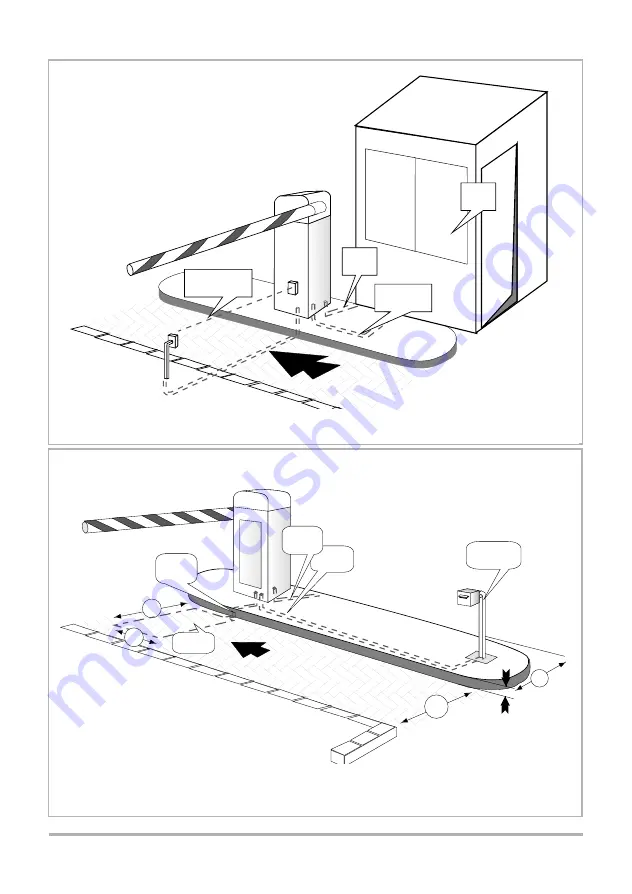
6.2 COMPLEX (Commercial) (Basic Application)

No Ticket Spitter

6.0 CABLING REQUIREMENTS

E

I

D

RC

T

 O

F

I

O

N

E

RA

V

L

T

E

I

D

RC

T

 O

F

I

O

N

E

RA

V

L

T

INFRARED BEAM

(OR LOOP)

Before doing any cabling, check which operational 
mode is required for the barrier. (See Section 4.1)

NOTE: 1. Guard controls operation of barrier using
                pushbutton inside guardhut.

9

9

RESTRICTING KERB

3,5M

1M

1M

100

100

LOOP
WIRE
FEED

2M

2M

CLOSING
  LOOP

1M

1M

POWER
  220V

   20mm
CONDUIT

CARD READER

/ KEYPAD

CABLING TO

PUSHBUTTON

GUARD

HUT

220V AC

INPUT

6.1 SIMPLEX (Domestic) (Typical Application)

IMPORTANT :

2. Infra red safety beam can be replaced with inductive loop detector, fitted to the "safety loop" relay base
3. Fit BMDV1.X microprocessor to CP88 control card.

NOTE - 1. Loop detector is fitted to "safety loop" relay base.
           - 2. Card reader is connected to MI input.
           - 3. Fit BMCV3.X microprocessor to CP88 control card.

Summary of Contents for CP71

Page 1: ...Latest Revision 15 03 2004 Document Ref 1012 D 01 0001_5 Product Code CP71 CENTRY TRAFFIC BARRIER INSTALLATION MANUAL...

Page 2: ...2 2...

Page 3: ...NPUT 8 1 3 SAFETY BEAM 8 1 4 COURTESY LIGHT 8 2 COMPLEX 8 2 1 MAINS SUPPLY 8 2 2 MEMORY INPUT MI 8 2 3 CLOSING LOOP OR BEAM INPUT 8 2 4 FREE EXIT LOOP 8 2 4 1 LOOP DETAILS 8 2 5 NON MEMORY INPUT NMI 8...

Page 4: ...4 4...

Page 5: ...ONICS CP88 CONTROLLER 3m BOOM ARM 4 5m BOOM ARM STANDARD CHARGER TRANSFORMER BATTERY ENCLOSURE GEARBOX COMPONENTS MOUNTING HARDWARE PART OF GEARBOX AND ENCLOSURE 35AH BATTERY 35AH BATTERY A CENTURION...

Page 6: ...ENSION SPRING ARM LENGTH There are two standard arm lengths available OPERATIONAL MODES Two standard operational modes are available SIMPLEX sometimes called Domestic Use BMDV1 X firmware COMPLEX some...

Page 7: ...7 7 4 2 DETERMINATION OF OPERATIONAL MODE...

Page 8: ...ECTION FRONT VIEW FRONT VIEW WALL VEHICLE DIRECTION 5 0 ORIENTATIONS ORIENTATION 3 4 ORIENTATION 1 2 The following orientations are possible The factory default is Orientation 2 for single barriers Se...

Page 9: ...ide guardhut 9 9 RESTRICTING KERB 3 5M 1M 1M 100 100 LOOP WIRE FEED 2M 2M CLOSING LOOP 1M 1M POWER 220V 20mm CONDUIT CARD READER KEYPAD CABLING TO PUSHBUTTON GUARD HUT 220V AC INPUT 6 1 SIMPLEX Domest...

Page 10: ...EXIT LOOP BI DIRECTIONAL TRAFFIC RESTRICTING KERB NOTE For unidirectional traffic see 8 2 4 1 NOTE 1 THIS DISTANCE MUST BE LESS THAN A CAR LENGTH IF BI DIRECTION TRAFFIC IS REQUIRED 2 USE BMCV3 X MICR...

Page 11: ...CONCRETE SLAB M16 x 150 RAWL BOLTS Throw concrete slab approximately 500 x 500 x 300 mm deep Install cable conduits make sure conduits exit in cable entry area Leave approximately 50 mm of conduit pro...

Page 12: ...ttom nut to aid in positioning the plate when the concrete is poured Place the plate above surface of concrete Leave the concrete to dry Unscrew the nuts and washers and remove them Arrange enclosure...

Page 13: ...rbox inside the enclosure e g the unit has been incorrectly ordered or site conditions have changed Remove M6 x 10 bolts holding gearbox to enclosure Remove cables linking motor and limit switch to CP...

Page 14: ...OSURE ENCLOSURE 4 5 5 6 6 Step Step Step Step Step o Lift gearbox assembly out of the enclosure Rotate the gearbox through 180 Refit the gearbox back into the enclosure 4 Step REPOSITIONING GEARBOX IN...

Page 15: ...ARBOX IN ENCLOSURE Continued Reconnect the cable Bolt gearbox back onto enclosure Tighten cross brace 7 8 9 Step Step Step 9 Step CAPTIVE PLATE GEARBOX ASSEMBLY 7 Step Cross Bar CABLE CONNECTOR TO CP8...

Page 16: ...16 16...

Page 17: ...LIMIT SWITCH STRIKER PLATE LOOSEN LOCK NUT AND PUSH STRIKER SUCH THAT SPRING IS ON THE REVERSE SIDE OF THE PLATE e g REMOVE CRANK ARM SHAFT AND SWING CRANK ARM THROUGH ANGLE SHOWN LOOSEN CAP SCREW HO...

Page 18: ...a clearance the thickness A of the end cap between the end of the boom pole and the clamping piece A Fit the boom pole 1 into the external clamping piece 2 Fit the M10 bolt through the internal clampi...

Page 19: ...to the door old version prior Nov 1997 or to the terminal strip inside the base 1 16 ABBREVIATED WIRING INSTRUCTIONS ON CHASSIS PLATE CHASSIS PLATE ON DOOR TRANSFORMER MAINS ISOLATOR 16 WAY TERMINAL...

Page 20: ...REFER TO MANUFACTURER FOR COMPLETE DETAILS TERMINAL BLOCK NUMBERS ON CHASSIS PLATE MI MI COM COM PSU 12V 12V MI COM 12V 2 7 8 1 12 24V COMMON N O 2 3 BEAM IRB 12V LINK NOTE TYPICAL SAFETY BEAM IS SHO...

Page 21: ...21 21...

Page 22: ...Y UNDER BARRIER ARM IR BEAM TERMINAL BLOCK ON CHASSIS PLATE EXISTING WIRING INSIDE BOOM INDUCTIVE LOOP DETECTOR FITTED TO CHASSIS PLATE INSIDE BOOM ENCLOSURE PLUGGED INTO SAFETY LOOP RELAY BASE 1 2 3...

Page 23: ...12V LOOP DETECTORS ARE NORMALLY USED IN CENTRY BARRIERS 220V AC DETECTORS ARE ALSO AVAILABLE ON REQUEST 8 2 4 2 BI DIRECTIONAL TRAFFIC WITH FREE EXIT LOOP BOTH SAFETY AND FREE EXIT LOOP DETECTORS FIT...

Page 24: ...exibility in configuration 1 High 0 01 5 0 2 2 0 02 6 0 5 3 0 05 7 1 4 0 1 8 Low 2 Switch selectable Frequency Two frequency settings are available to prevent cross talk between adjacent loops Permane...

Page 25: ...T V I Signal from the CP88 CARD will prevent the ticket spitter from issuing another ticket until the arm is closing or closed NOTE The TVI contact can be selected as normally open or normally closed...

Page 26: ...f arm This can be done by loosening the nuts on the spring tensioner and adjusting the length Also make sure the boom coupler and crank arm are displaced by 150 deg NOT 45 deg BOOM COUPLER NOTE ARM IS...

Page 27: ...ck that MI or NMI LED illuminates with trigger input Check that the RAISED OLS OR LOWERED CLS limit LED s illuminate when the L S microswitches are made 9 4 Check status of RAISE LOWER LED s and see w...

Page 28: ...28 28...

Page 29: ...correct 9 8 AUTO CLOSE SIMPLEX MODE ONLY Ensure that the auto close link is fitted onto the pins provided NOTE In the COMPLEX Mode the Auto close link can be used to simulate a closing loop It must t...

Page 30: ...sion sensitivity potentiometer to an acceptable closing force when arm moves downwards CP88 CARD SENSITIVITY ADJUSTMENT ARM MUST RETURN ON STRIKING AN OBSTRUCTION SIMPLEX MODE STOPS WITHOUT REVERSAL C...

Page 31: ...UTCH RELEASE BAR CHAIN MI ON NMI ON IRB ON ON ILP ON OLS ON CLS ON RAISE ON LOWER ON POWER ON WHEN MI INPUT IS PRESENT WHEN NMI INPUT IS PRESENT SIMPLEX WHEN SAFETY BEAM LOOP BROKEN COMPLEX WHEN MAINS...

Page 32: ...ose Check the chain tension and adjust if necessary Check that the battery water level is correct and that battery voltage is 13 6 to 13 8V DC without the charger connected The exploded view of the bo...

Page 33: ...009 B228104012 CB1012 049 CB1012 060 CB1012 046 CB1012 010 CB1012 029 CB1012 029 B228104012 CB1012 048 CB1012 030 M PLAK37LH 12 1 EXPLODED ASSEMBLY ENCLOSURE CB1012 028 CB1012 032 SBR PSA3X6 W12010500...

Page 34: ...1 CH06B1085L B126106010 CB1012 036 CB1012 013 W120212000 W320212000 N120112000 N120112000 W120212000 BBP0S10LH10 N120110000 W320210000 W120101000 B124112025 CB1012 007 B121210050 W120101000 CB1012 006...

Page 35: ...ER RAISE 7 12V 0V AC AC 8 9 10 RED GREEN ORANGE PURPLE YELLOW YELLOW YELLOW YELLOW BLUE WHITE GREEN GREY BLACK MOTOR OLS CLS 5 BATTERY 6 4 ILP NMI MI IRB POTENTIAL FREE CONTACT 2 1 3 11 12 4 6 8 220V...

Page 36: ...5 9 BEAM CLOSING SAFETY LOOP M I 6 PRES 4 5 7 8 N M I RAISE BARRIER T V I 12 10 11 13 14 LOOP FREE EXIT ISOLATOR 16 0 BROWN CP110 TERMINATION BOARD CLOSING LOOP MAINS FAIL RELAY FREE EXIT LOOP BLUE CP...

Page 37: ...rations per day 1000 operations Material 1 6mm mild steel or stainless steel Surface finish White epoxy powder coat red cover Access door Lockable hinged Surface coating as per main enclosure CONTROLL...

Page 38: ...34 34 38 38...

Page 39: ...39 39...

Page 40: ...l 9 380 4020 BILLY GATES CANADA Tel 250 334 1553 ABA GATES WESTERN AUSTRALIA Tel 8 933 03061 DOMINATOR SYSTEMS NEW ZEALAND Tel 3 384 5145 ICBT VICTORIA Tel 3 933 54213 ROTECH QUEENSLAND Tel 7 326 4733...

Reviews: