background image

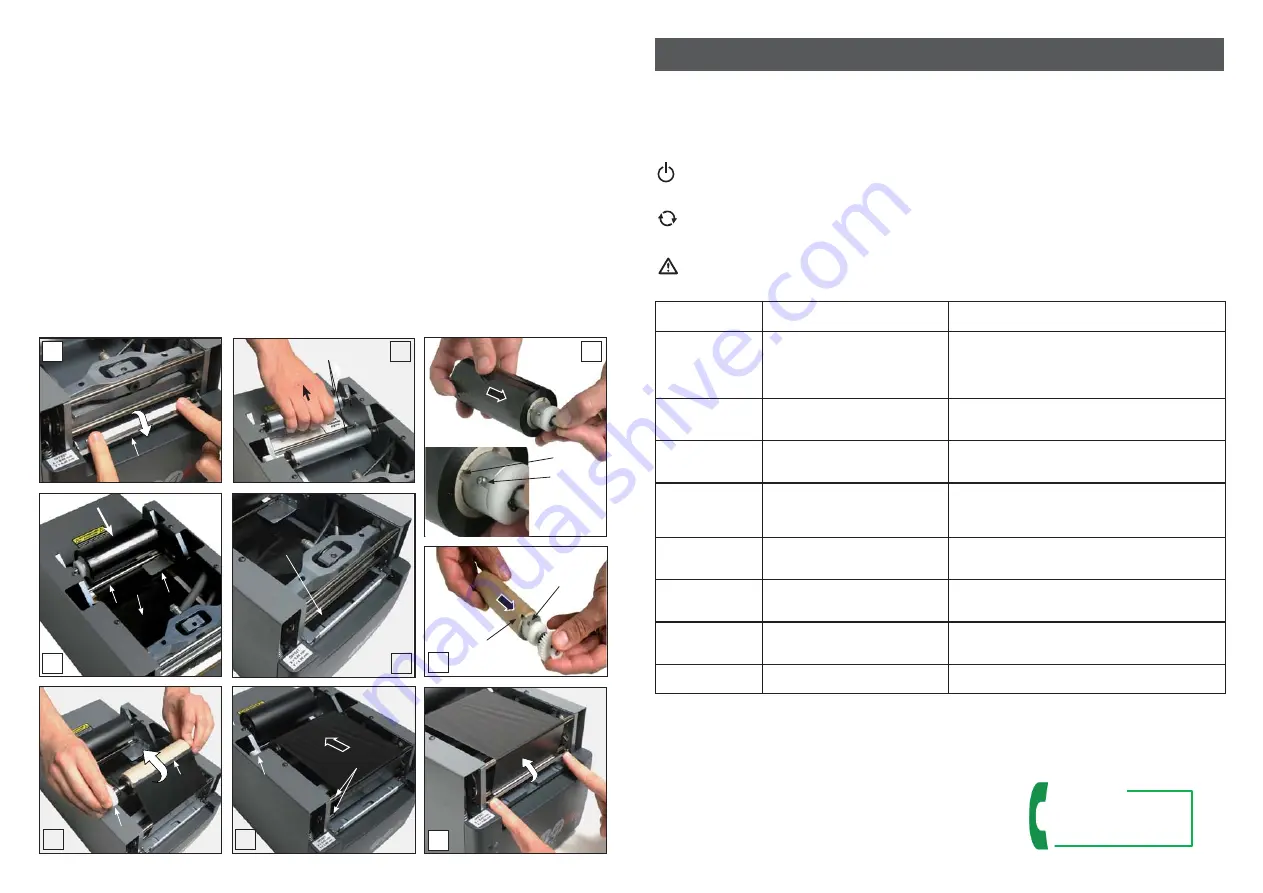
4.5) Install the printer ribbon 

Remove the lid, then: 

Rotate the media guide completely downwards. 

2

 Extract both feed (rear) and take up (front) spindles by carefully pulling them upwards.

3

 Fit the printer ribbon on to the feed spindle (rear), locating the slot in the ribbon spool fully on to the key on the spindle. 

  When viewed from the front of MG2, the key should be on the right hand side with the lead of the ribbon underneath, facing 
 forward.

4

 Relocate the loaded feed spindle 

fi

 rmly into its seatings in MG2. Unroll suf

fi

 cient ribbon to pass under the rear guide bar 

  and guide plate and over the template. 

5

 Continue unrolling the ribbon until it has passed under the front lower guide bar and is protruding through the carriage 

 aperture. 

6

  Fit the ribbon take up spool provided with MG2 onto the take up spindle (front), locating the slot in the spool fully on to the 

  key on the spindle.  

7

  Using the carriage/template as a convenient base, position the take up spool at the end of the protruding printer ribbon such 

  that the white cog is on the left hand side (viewed from the front). Ensure the ribbon is square to the spool and attach the 
  end of it to the spool with adhesive tape.  

•  Carefully and accurately wind a few turns of ribbon around the spool.     
8

  While carefully pulling ribbon through MG2, relocate the loaded take up spindle into its seatings in MG2. Ensure the ribbon 

  is correctly aligned on the front guide bars, without, tears, folds or creases. 

9

 Rotate the media guide completely upwards, then replace the lid. 


Do not operate MG2 without the lid in place. 

•  We recommend cleaning the print head at each ribbon replacement, using only the genuine cleaning kit MG2-CKP
  991670 CLEANING KIT following the procedure in section 5.1.

.50.

7. SOLUZIONE DEI PROBLEMI

La stampante è dotata di un sistema di diagnostica; errori e/o anomalie nel funzionamento vengono segnalati dai led presenti 
sul pannello frontale, agli allarmi ottici è associato anche un allarme acustico.

Signi

fi

 cati e interpretazione dei messaggi ottico acustici


LED VERDE (1): 

Il led rimane illuminato quando la stampante è in tensione e pronta all'uso.


Il led lampeggia quando è fallito il test di riconoscimento della testa di stampa oppure la testa non risulta collegata 


o è danneggiata.


LED GIALLO (2):

 Il led si illumina lampeggiando durante la fase di stampa con conseguente movimento del carrello.


Il led rimane illuminato in caso di mancato riconoscimento della piastra di interfaccia (piastra non idonea).

 LED 

ARANCIO 

(3):

 funzione principale di questo led è quella di segnalare errori o anomalie nel funzionamento della 


stampante; il numero di lampeggi/beeps consecutivi de

fi

 nisce il tipo di anomalia presente, secondo la seguente 

 tabella:

N° DI

 LAMPEGGI / BEEPS

DESCRIZIONE DELL'ERRORE

POSSIBILI SOLUZIONI

1

Nastro di stampa esaurito o mancante Controllare che il nastro non sia rotto o mancante e che 

segua il percorso corretto all’interno della stampante, pro-
cedere con il riposizionamento corretto del nastro e/o la 
sostituzione dello stesso. 
Spegnere e riaccendere la stampante

3

Mancato abbassamento della testa di 
stampa

Spegnere e riaccendere la stampante. 
Premere il pulsante (4) per far muovere il carrello control-
lando che questo si muova in modo corretto

4

Mancato sollevamento della testa di 
stampa

Spegnere e riaccendere la stampante. 
Premere il pulsante (4) per far muovere il carrello control-
lando che questo si muova in modo corretto

5

Mancato raggiungimento della posi-
zione "0" o "completamente fuori" del 
carrello di caricamento

Spegnere e riaccendere la stampante. Premere il pulsan-
te (4) per far muovere il carrello controllando che questo 
si muova in modo corretto. Rimuovere eventuali ostacoli 
davanti al carrello

6

Movimento del carrello di caricamento 
non corretto, posizione non regolare

Spegnere e riaccendere la stampante. 
Premere il pulsante (4) per far muovere il carrello control-
lando che questo si muova in modo corretto

7

Mancata lettura del sensore sulle 
piastre di interfaccia oppure sensore 
mancante

Controllare che la piastra montata sul carrello sia quella 
corretta, riprovare a stampare

8...11

Errore nel linguaggio di stampa o dri-
ver di stampa non corretti

Controllare che le impostazioni deI Drivers e del Software 
siano corrette, riavviare la stampante e riprovare a stam-
pare.

12.....

Errori dovuti all'elettronica della stam-
pante

Riavviare la stampante, se il problema persiste, contattare 
la 

Cembre

.

PULSANTE (4): 

questo pulsante oltre a comandare l'uscita o l'entrata del carrello, permette anche di accedere a speci

fi

 che 

funzioni di programmazione

 riservate solamente a personale quali

fi

 cato

Mantenendo premuto il pulsante per più di 6 sec in fase di accensione della stampante si accederà alla modalità di TEST 
(tale modalità è indicata dal lampeggiamento simultaneo dei led giallo e arancio). 
Per uscire dalle modalità TEST basterà riavviare la stampante.

Per qualsiasi necessità, informazioni sull'utilizzo della stampante o in 
caso di malfunzionamento, rivolgersi al 

Servizio Assistenza

 chiamando  

gratuitamente il numero verde da tutta Italia, nei giorni feriali dal lunedì 
al venerdì dalle 8.00 alle 12.00 e dalle 13.00 alle 17.00.

Numero verde

800.852.355

Slot

Key

Media guide

Feed guide 

plate

Guide 

bar

Ribbon

Ribbon

Slot

Key

Adhesive

tape

Cog

Guide 

bar

Cog

Spindle

.15.

1

9

8

2

3

5

6

4

7

Summary of Contents for MarkinGenius 2

Page 1: ...th Sutton Coldfield West Midlands B76 9EB Great Britain Tel 01675 470440 Fax 01675 470220 E mail sales cembre co uk www cembre co uk Cembre S p A Via Serenissima 9 25135 Brescia Italia Telefono 030 36921 Telefax 030 3365766 E mail info cembre com www cembre it Cembre S a r l 22 Avenue Ferdinand de Lesseps 91420 Morangis France Tél 01 60 49 11 90 Fax 01 60 49 29 10 B P 37 91421 Morangis Cédex E mai...

Page 2: ... vida es organizada y manejada por el fabri cante El usuario que desee deshacerse del presente equipo deberá por lo tanto contactar con el fabricante y seguir el sistema adoptado por el mismo para permitir la recogida por separado del equipo que ha concluido su ciclo de vida La adecuada recogida selectiva para el sucesivo envío del equipo dado de baja al reciclaje al tratamiento y al saneamiento a...

Page 3: ...or to maintenance operations Use MG2 in a dust free environment on a stable surface and always with the lid in place As much as possible avoid the ingress of environmental contamination eg dust into MG2 If located in a dusty environment fit the protective cover when not in use Do not insert sharp hard or pointed objects e g screwdrivers rulers or knives into the front aperture of MG2 otherwise the...

Page 4: ...upport template for flat media ɋ MG2 ETR 991600 black printer ribbon Ɍ MG2 CRB 991654 ribbon take up spool ɍ MG2 COV 991680 protective cover Ɏ Operation and maintenance manual software installation instruction guarantee certificate Printing mode thermal transfer Supply voltage 230 V 50 Hz 115 V 60 Hz Operating current 230 V 115 V 0 6 A 1 2 A Power consumption 140 W Printing speed 9 seconds per ful...

Page 5: ...o tempo fornito dalla Cembre con la stampante oppure in mancanza di altri riferimenti indicare la data approssimativa di acquisto Articolo Colore MG2 ETR 991600 Nero MG2 ETR 991601 Blu MG2 ETR 991602 Rosso MG2 ETR 991603 Verde MG2 ETR 991607 Argento MG2 ETR 991606 Bianco Articolo Descrizione MG2 PWC 991000 Piastra per targhette MG TPM MG2 PLT 991002 Piastra per targhette etichette targhe e prodott...

Page 6: ...re errori o anomalie nel funzionamento della stampante il numero di lampeggi beeps consecutivi definisce il tipo di anomalia presente secondo la seguente tabella N DI LAMPEGGI BEEPS DESCRIZIONE DELL ERRORE POSSIBILI SOLUZIONI 1 Nastro di stampa esaurito o mancante Controllare che il nastro non sia rotto o mancante e che segua il percorso corretto all interno della stampante pro cedere con il ripos...

Page 7: ...gli altri componenti Per rimuovere la polvere all interno della stampante utilizzare un pen nello morbido Parti metalliche e plastiche utilizzare un panno morbido inumidito con un detergente neutro Tracce di adesivo o parti di etichette utilizzare alcool denaturato Durante la pulizia porre attenzione che gocce di liquido non ven gano in contatto con le parti elettriche Afine lavoro spegnere la sta...

Page 8: ...ETTE MG TAPW Possono essere stampate con diversi fonts gli steli sono iden tificabiliperunafacilerintraccia bilitàsulloschema Inoltreaccan to ad ogni targhetta è possibile riportare il modello di tubetto da inserire La scheda stampata viene divi sa in lische piegando e spezzan do gli estremi di giunzione L inserimentodeltubetto PM può essere quindi effettuato diretta mentesullelischesenzastacca re...

Page 9: ...n at the end of the cycle with the sheet printed Remove printed sheet and continue loading print preview printing cycle 4 9 MARKINGENIUS media examples of applications Targhette MG TAPW ecc Targhette MG TPM Targhette MG CPM MG TDM 4 7 1 Posizionamento delle schede su piastra di interfaccia tipo MG2 PLT Le schede stampabili con piastra di interfaccia MG2 PLT dispongono di due fori per permetterne u...

Page 10: ...ting partially used sheets ensure there are no protruding sprues burrs along the sheared edges or tags bent upwards which may damage the print head When printing partially used sheets ensure the Jump function is used correctly to avoid printing non existent media contaminating the support template and possibly causing irrevocable damage to the print head Protective cover MG2 COV 991680 46 9 4 6 Mo...

Page 11: ...ds If the problem persists please contact Cembre see section 7 RED BUTTON 4 Authorised user only TEST mode accessed by pressing RED BUTTON 4 for more than 6 seconds during the initial start up cycle is indicated by the YELLOW and ORANGE LEDs blinking simultaneously Inadvertent access may be cancelled by switching MG2 OFF and then ON again after a few seconds 10 45 4 5 Caricamento del nastro di sta...

Page 12: ...emendo il pulsante rosso 4 posto sul pannello frontale della stampante si otterrà l uscita del carrello di caricamento per la chiusura basterà premere nuovamente tale pulsante Accertarsi che davanti alla stampante vi sia spazio sufficiente per la fuoriuscita completa del carrello Mai forzare il movimento del carrello in fase di apertura o chiusura 4 MESSA IN FUNZIONE VISTE PRINTER RIBBONS monochro...

Page 13: ...abile larghezza max 110 mm lunghezza max 140 mm Requisiti di sistema PC con processore dual Core equivalente o superiore 2 Gb di memoria RAM 2 Gb di spazio disponibile su disco risoluzione monitor 1280x1024 sistemi operativi Windows XP service pack 3 Windows VISTA Windows 7 Nastro di stampa diametro interno 28 mm diametro esterno 53 mm larghezza 120 mm Certificazioni marcatura CE in conformità all...

Page 14: ...geur 230 mm hauteur 221 mm Poids 9 6 kg Zone imprimable largeur max 110 mm longueur max 140 mm Exigences de système PC avec processeur dual Core équivalent ou supérieur 2 Gb de mémoire RAM 2 Gb d espace disponible sur le Disque Dur Résolution moniteur 1280x1024 Systèmes d exploitation Windows XP SP3 Windows VISTA Windows 7 Ruban d impression diamètre interne 28 mm diamètre externe 53 mm largeur 12...

Page 15: ...ture 4 MISE EN SERVICE ARRIERE VUES 14 En caso de fallo de la impresora contactar con nuestro Agente de Zona quien les aconsejará y eventualmente les facilitará las instrucciones necesarias para remitir la impresora a nuestro centro de servicio más cercano En tal caso adjuntar a ser posible una copia del Certificado de Ensayo entregado en su día por Cembre con la impresora o a falta de otro elemen...

Page 16: ... parpadeando durante la fase de impresión con el consiguiente movimiento del carro El led permanece iluminado cuando no reconoce la placa de interfaz placa no idónea LED NARANJA 3 la función principal de este led es la de indicar errores o anomalías en el funcionamiento de la impresora De acuerdo al número de parpadeos beeps consecutivos es posible definir el tipo de error haciendo referencia a la...

Page 17: ...ausar daños irreparables en ésta 5 2 Limpieza de otros componentes Para quitar el polvo en el interior de la impresora utilizar un pincel suave Para las partes metálicas y plásticas utilizar un paño suave humedecido con detergente neutro Para los residuos de adhesivo o partes de etiquetas utilizar alcohol desnaturalizado Durante la limpieza prestar atención para que las gotas de líquido no entren ...

Page 18: ...ales tournées vers l intérieur de l imprimante FIG B FIG C 4 Plateaux disponibles sur demande 17 ETIQUETAS MG TAPW Pueden ser impresas con di versas fuentes los vástagos son identificables gracias a su fácillocalizaciónenelesquema Además al lado de cada eti queta es posible indicar el mo delo de tubo a insertar La tarjeta impresa se divide en aletas plegando y partiendo los extremos de unión La in...

Page 19: ...da del carro ya provisto de placa ver 4 6 Posicionar manualmente la tarjeta insertando a fondo los orificios en las clavijas presentes en la placa el lado a imprimir deberá mirar hacia arriba Ref FIG B y C La tarjeta una vez colocada deberá quedar plana y sin asperezas sin ángulos plegados o sobresalientes esto permitirá un apoyo correcto de la cabeza en la fase de impresión Una vez posicionada pu...

Page 20: ...prime des cartes déjà partiellement utilisées s assurer qu il n y ait pas de bavures saillantes sur les bords des repères ou des plaquettes tournées vers le haut qui pourraient endommager la tête d impression Quand on imprime des cartes déjà partiellement utilisées s assurer de lancer le fichier d impression opportuné ment modifié en fonction du nombre de repères effectivement présents sur la cart...

Page 21: ...1 Erreur dans le langage d impression ou pilote d impression non correct Contrôler que les configurations du pilote et du Logiciel sont correctes redémarrer l imprimante et réessayer d imprimer 12 Erreurs imputables à l électronique de l imprimante Redémarrer l imprimante Si le problème persiste contacter Cembre BOUTON 4 ce bouton en plus de commander la sortie ou l entrée du chariot permet aussi ...

Page 22: ... botón rojo 4 colocado en el panel frontal de la impresora se obtendrá la salida del carro de carga Para el cierre es suficiente pulsar nuevamente dicho botón Asegurarse de que delante de la impresora haya espacio suficiente para la salida completa del carro Nunca forzar el movimiento del carro en fase de apertura o de cierre 4 PUESTA EN MARCHA VISTAS Réf Couleur MG2 ETR 991600 Noir MG2 ETR 991601...

Page 23: ...2 mm ancho 230 mm alto 221 mm Peso 9 6 kg Área imprimible ancho máx 110 mm longitud máx 140 mm Requisitos del sistema PC con procesador dual Core equivalente o superior 2 GB de memoria RAM 2 GB de espacio disponible en el Disco Duro Resolución monitor 1280x1024 Sistemas operativos Windows XP SP3 Windows VISTA Windows 7 Cinta de impresión diámetro interno 28 mm diámetro externo 53 mm ancho 120 mm C...

Page 24: ...h Max Breite 110 mm Max Länge 140 mm Systemanforderungen PC mit Dual Core Prozessor gleichwertig oder höher 2 GB RAM Speicher 2 GB freier Speicherplatz Bildschirmauflösung 1280x1024 Betriebssysteme Windows XP SP3 Windows VISTA Windows 7 Druckband Innendurchmesser 28 mm Außendurchmesser 53 mm Breite 120 mm Zertifizierungen CE Markierung gemäß Europäische Richtlinien 2006 42 EG und 2004 108 EG 1 ALL...

Page 25: ...embre ZUR ÜBERPRÜFUNG Sollten am Gerät Fehler auftauchen wenden Sie sich bitte an unsere Gebietsvertretung welche Sie gerne beraten und Ihnen alle nötigen Informationen zum Einschicken des Gerätes an unseren Hauptsitz geben wird Wenn vorhanden legen Sie bitte dem Gerät das von Cembre mitgelieferte Überprüfungszertifikat bei In Ermangelung dieser Informationen geben Sie bitte an wann Sie das Gerät ...

Page 26: ...ser LED besteht darin Fehler oder Störungen während des Druckvor ganges zu melden je nach aufeinanderfolgender Blinkhäufigkeit kann der aufgetretene Fehler definiert werden In der nachfolgenden Tabelle werden die Fehlermeldungen beschrieben BLINKHÄUFIG KEIT BEEPS FEHLERBESCHREIBUNG MÖGLICHE LÖSUNGEN 1 Druckerband fehlt oder ist zu Ende Kontrollieren ob das Band fehlt oder abgerissen ist und im Inn...

Page 27: ...Den Drucker einschalten und dabei die rote Taste 4 auf der Vorderseite der Maschine für mindestens 6 Sekunden ge drückt halten bis die gelbe LED 2 im Modus REINIGUNGSMODUS DRUCKERKOPF blinkt Nach dem Loslassen der roten Taste blinken die gelben und orangen LED Die grüne LED leuchtet dauerhaft und der Schlitten 5 bleibt vorgefahren Das Reinigungsspray auf den Lappen sprühen und die im Reinigungssat...

Page 28: ...e lieferbar MG2 PLT Grundplatte MG2 PWC Grundplatte MG2 QTB MG2 LTB MG2 WTB MG2 STB MG2 CTB MG2 MTB MG2 PTD Grundplatte MG TAPW SCHILDER Sie können mit verschiedenen Schriftarten bedruckt werden die Äste sind gut erkennbar Au ßerdem kann an jedem Schild der jeweilige Tüllentyp aufge druckt werden Die gedruckte Karte wird in Äste unterteilt indemdieVerbindungs stücke gebogen und anschlie ßend abgeb...

Reviews: