background image

Troubleshooting

53

Brave 30  ES- Brave 60 ES - Brave 90 ES

7  -  Troubleshooting

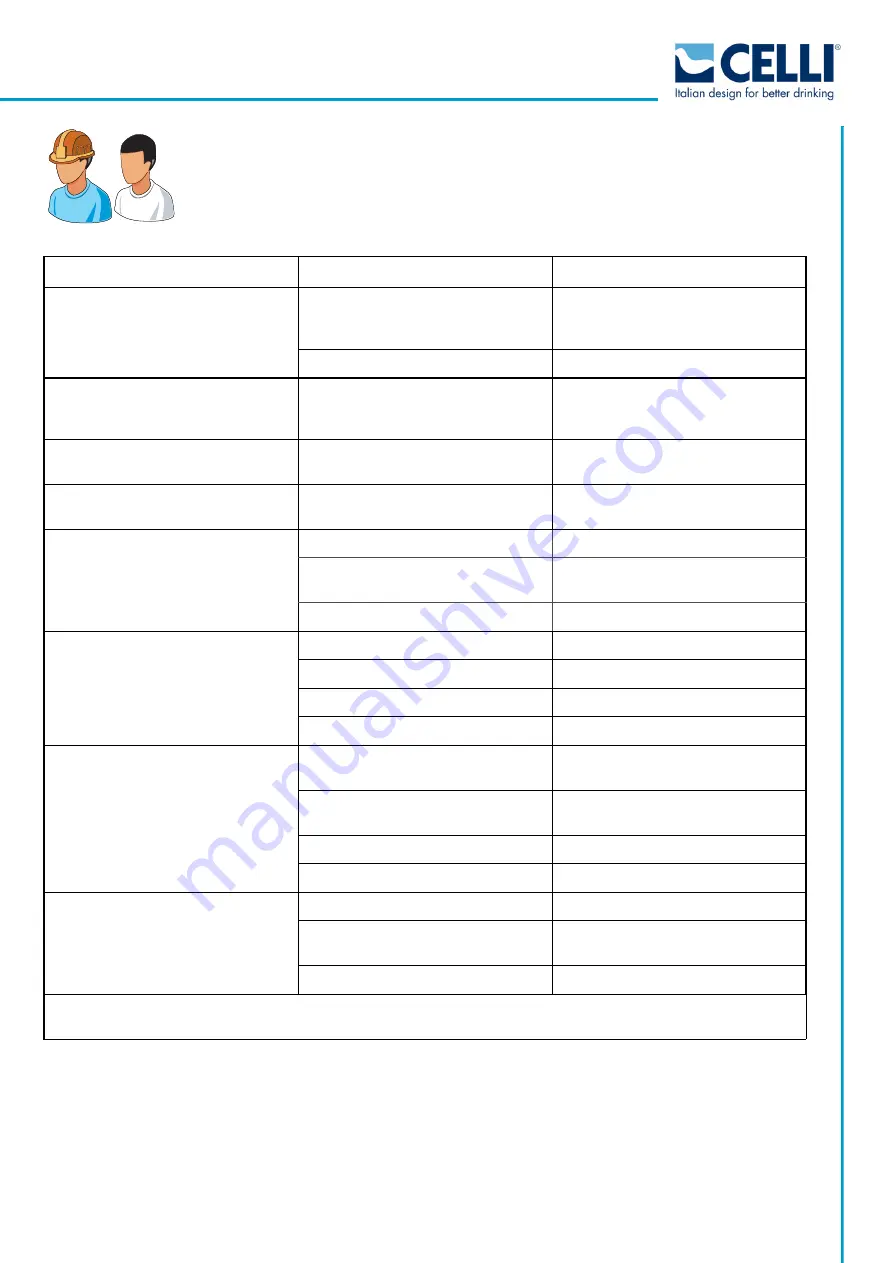
PROBLEM

PROBABLE CAUSE

REMEDIES

The dispenser does not start up

Power supply failure

Check that power is present. 
If the power is OK, call an authorised 
technician.

Thermostat failure

Call an authorised technician

The cooling unit operates 

continually, and the water 

delivered is warm

Refrigerant gas leak

Call an authorised technician

The cooling unit operates 

continually, and the water freezes

Thermostat failure

Call an authorised technician

Noisy water pump

Water supply failure

Check that water is reaching the 
appliance

The dispenser does not deliver 

water

Main water tap turned off

Turn on the water tap

Water supply connection tube crushed 
or obstructed

Inspect the path of the tube

No electricity supply

Check the plug is well inserted

The dispenser does not deliver 

sparkling water

CO

2

 cylinder has run out

Replace the CO

2

 cylinder

Electronic control unit malfunction

Call an authorised technician

Pump failure

Call an authorised technician

CO

2

 cylinder shut off

Open the CO

2

 cylinder valve

The dispensed product is not cold 

enough

The ice bank has run out

Wait until the ice bank has fully 
reformed

The water entering the machine is too 
hot

Check the incoming water temperature 
is lower than 32°C

Soda recirculation pump malfunction

Call an authorised technician

Inadequate insulation on the python

Call an authorised technician

Only water is dispensed

The syrups have run out

Replace the syrup tanks with new ones

The syrup lines are obstructed

Sanitise the syrup lines, as indicated in 
the relevant paragraph

No CO

2

Replace the CO

2

 cylinder

FOR ANY OTHER PROBLEMS NOT COVERED HERE, 

CONTACT THE SERVICE CENTRE

Summary of Contents for Brave 30 ES

Page 1: ...9735 www celli com celli celli com Code 070344 TRANSLATION OF THE ORIGINAL BRAVE 30 ES BRAVE 30 ES BRAVE 30 ES BRAVE 30 ES BRAVE 90 ES BRAVE 90 ES BRAVE 90 ES BRAVE 90 ES BRAVE 60 ES BRAVE 60 ES BRAVE...

Page 2: ......

Page 3: ...ndard functions 21 3 5 2 Optional functions 22 3 6 Technical data 25 3 6 1 Sound emissions 25 3 7 Dimensions in mm 26 3 7 1 BRAVE 30 ES 26 3 7 2 BRAVE 60 ES 26 3 7 3 BRAVE 90 ES 26 3 8 Differential sw...

Page 4: ...ditional instructions 54 8 1 Waste disposal 54 8 2 Dismantling of the machine 54 8 3 Disposal of electronic equipment WEEE directive 55 9 Annexes 56 9 1 BRAVE 30 60 ES electrical diagram Version with...

Page 5: ...in this manual in compliance with Machine Directive 2006 42 EC The use of the dispenser for any purposes other than those for which it was designed is not allowed under any circumstances Likewise its...

Page 6: ...ures If a disposable CO2 cylinder is used secure it vertically to prevent it from falling or overturning DANGER REFRIGERANT The refrigerant used is R290 or R134a To verify which of these two is used r...

Page 7: ...sanitisation carefully read the instructions provided by the manufacturer of the sanitisation product and make sure that all personal protection equipment gloves masks etc is worn Ensure that the pre...

Page 8: ...90 ES 1 4 Residual risks During regular operating conditions the machine is safe There are still residual risks listed in the hazard list which are reduced if the machine is used correctly and accordi...

Page 9: ...mentation without any obligations in relation to third parties and does not accept liability for any errors or inaccuracy in the contents of this manual This version of the operator s manual describes...

Page 10: ...ate EC nameplate shown below It contains the model the serial number and all the machine technical data necessary for ordering spare parts or reporting technical problems to the service centre 2 3 War...

Page 11: ...eople in general which may cause minor non serious injury it is therefore essential to take great care and proceed with the greatest caution 2 5 Staff qualification To ensure that all works performed...

Page 12: ...led water chilled syrups Inside the machine the syrups and water are cooled via a cooling unit In addition carbon dioxide can be added to natural water thanks to a carbonation process and will thereby...

Page 13: ...Description of the machine 11 Brave 30 ES Brave 60 ES Brave 90 ES 3 1 Main components of the BRAVE 30 ES 5 6 7 8 1 2 3 4 9 10 11 16 15 14 26 27 12 13 17 21 24 28 30 29 31 18 20 19 22 23 25 BR0020...

Page 14: ...MP MOTORS 11 PUMP MOTOR FOR SODA RECIRCULATION 12 PUMP MOTOR FOR THE CARBONATOR 13 STILL WATER PUMP 14 DEHYDRATOR FILTER 15 BUTTON PAD WITH DISPLAY 16 FRONT PANEL 17 CONDENSER 18 DUCT 19 FAN UNIT 20 T...

Page 15: ...Description of the machine 13 Brave 30 ES Brave 60 ES Brave 90 ES 3 2 Main components of the BRAVE 60 ES 1 3 4 5 6 7 8 9 11 13 14 16 12 2 17 18 19 21 20 10 22 23 29 31 25 26 27 15 24 28 30 BR0030...

Page 16: ...MP MOTORS 11 PUMP MOTOR FOR SODA RECIRCULATION 12 PUMP MOTOR FOR THE CARBONATOR 13 STILL WATER PUMP 14 DEHYDRATOR FILTER 15 BUTTON PAD WITH DISPLAY 16 FRONT PANEL 17 CONDENSER 18 DUCT 19 FAN UNIT 20 S...

Page 17: ...Description of the machine 15 Brave 30 ES Brave 60 ES Brave 90 ES 3 3 Main components of the BRAVE 90 ES 1 2 3 4 5 6 7 8 9 11 13 14 15 16 17 18 19 20 21 23 24 23 24 25 29 27 28 22 12 10 8 26 BR0040...

Page 18: ...R AND PUMP MOTORS 11 PUMP MOTOR FOR SODA RECIRCULATION 12 PUMP MOTOR FOR THE CARBONATOR 13 ENERGY SAVING CONTROL UNIT 14 FAN UNIT 15 DEHYDRATOR FILTER 16 CONDENSER 17 ON OFF LIGHT SWITCH 18 FRONT PANE...

Page 19: ...The water and syrups pass through different coils and never come into contact with each other inside the machine the mixing of water and syrup takes place in the spout of the dispensing valve located...

Page 20: ...power supply to the valves thereby stopping the dispensing operation if the CO2 pressure falls below 3 5 bar 0 35 MPa Soda recirculation To ensure that chilled and adequately sparkling soda is always...

Page 21: ...ressure switch P activates the pump A the water passes through the cooling coil B the check valve C and the pressure reducer D The solenoid valve E remains closed When soda needs to be dispensed the e...

Page 22: ...malies or faults Some functions are standard and are therefore included on all machines in the BRAVE ES range whereas others are optional and require connection to add on devices which are installed d...

Page 23: ...the screen The power supply to the dispensing tower and compressor is cut off The alarm condition can be removed by pressing the RESET button once you have checked that the system is working correctly...

Page 24: ...The alarm condition can be removed by pressing the RESET button once you have checked that the system is working correctly The alarm is transmitted via telemetry if present Anti flooding control with...

Page 25: ...s below a given value 25 the warning message CO2 BULK LEV LOW appears on the screen This message can be transmitted via telemetry if present When the level drops to zero the warning message CO2BULK LE...

Page 26: ...H2O VASCA HIGH T H2O BATH Automatic Wet anti flooding probe ALLAGAMENTO WATER LEAKAGE RESET button Time out for inlet of water into machine 10 min ING H2O TIME OUT IN H2O TIME OUT RESET button Inlet...

Page 27: ...8 in 950 mm 37 4 in Width 436 mm 17 1 in 491 mm 19 3 in 552 mm 21 7 in Depth 632 mm 24 8 in 722 mm 28 4 in 887 mm 34 9 in Shipping weight 60 kg 95 kg 130 kg Tank capacity 36 5 L 9 64 US gal 56 L 14 79...

Page 28: ...e 60 ES Brave 90 ES 3 7 Dimensions in mm 3 7 1 BRAVE 30 ES 3 7 2 BRAVE 60 ES 3 7 3 BRAVE 90 ES BR0120 436 17 1 583 23 632 24 8 478 18 8 99 3 8 484 19 BR0130 491 19 3 607 23 8 722 28 4 566 28 4 91 3 5...

Page 29: ...k It does not offer any protection against overload or short circuit between phase and neutral The differential switch is equipped with a TEST A button that allows you to verify its proper functioning...

Page 30: ...rd box and a suitable amount of padding material Dispose of this in accordance with the relevant local legislation Do not burn packaging components or dump them in the environment 4 2 Positioning The...

Page 31: ...may freeze causing damage to the machine itself 4 4 Electrical requisites Check that all electrical equipment complies with the data provided on the machine nameplate DANGER ELECTRICITY SUPPLY Always...

Page 32: ...inlet outlet tube connection panel B to a large container or a drainage point Check the overflow connector is not obstructed Check the level of the water in the tank ensuring it is correct and visible...

Page 33: ...nto contact with heat sources and avoid any restrictions which may obstruct the water flow ACTIVATING THE FILTERS After fitting or replacing the filter allow the water to flow from the drain tap just...

Page 34: ...parates the water to be used for making soda from the water that will remain still 2 Connect the still water coil outlet and the soda recirculation outlet to the python The internal diameter of the wa...

Page 35: ...B use pneumatic pumps powered with CO2 or compressed air syrup contained in steel kegs use CO2 to push the syrup along to the valves If you use carbon dioxide CO2 be sure to air the room 4 5 4 Connect...

Page 36: ...oils and the respective dispensing valves The thickness of the python insulation depends on the environmental temperature and the degree of humidity Refer to the tables below ENVIRONMENTAL TEMPERATURE...

Page 37: ...e exposed to a high concentration of CO2 will experience trembling swiftly followed by loss of consciousness and suffocation DANGER GAS CYLINDER POSITION To prevent damage or hazards always place the...

Page 38: ...et Use a suitable spanner to firmly fix the reducer to the gas cylinder or the high pressure tube to the cylinder and pressure reducer if installed 3 Insert the tube in the appropriate connection poin...

Page 39: ...ivalent model homologated in the country of use The machines of the BRAVE ES range comply with the safety standards in force and carry the EC mark CAUTION If the machine is installed in a kitchen Euro...

Page 40: ...s Refer to the specifications of the type of syrup actually used Connect the plug to a suitable power supply socket checking that the characteristics of the electricity supply system correspond to the...

Page 41: ...just the ratio of water syrup supplied to the valves remember to respect the indications provided by the syrup manufacturer 1 Remove the cover from the valve 2 Turn on the water tap on the valve or in...

Page 42: ...to increase reduce the syrup flow An alternative method involves checking with the aid of a tool known as a refractometer This has a scale giving a reading that must be compared with the specification...

Page 43: ...re using the dispenser This is essential to flush out the internal circuits and ensure that the appliance has been prepared correctly At first start up only it will take about 2 hours after the machin...

Page 44: ...rom heat and bad weather Cover it so that dust and or splashes of any kind cannot damage it Turn off the water supply and the valve of the CO2 cylinder Remove the syrup containers connections and wash...

Page 45: ...haracteristics CELLI S p A will consider itself relieved of any responsibility for people s safety or machine malfunctioning Any unauthorised modification invalidates the contractual warranty Do not c...

Page 46: ...nths every 6 months once a year ROUTINE MAINTENANCE Syrup tanks chapter 6 3 pag 45 as necessary CO2 cylinder chapter 6 4 pag 46 as necessary Water filter chapter 6 5 pag 47 manufacturer s recommendati...

Page 47: ...e syrup keg until you have discharged the CO2 pressure inside 1 Remove the empty steel keg by first detaching the syrup tube A black then the CO2 tube B grey 2 Rinse the connections in hot water to re...

Page 48: ...ero Remove the pressure reducer or disconnect the high pressure hose from the cylinder if present Check the condition of the gaskets between the reducer and the cylinder or between the high pressure h...

Page 49: ...o flow from the drain tap just after the filter until the water leaving the appliance is free from all cloudiness or sediment The machine must not be supplied with filtered water until this has been d...

Page 50: ...denser must always be cleaned when necessary 1 Disconnect the machine from the electricity supply 2 Remove the upper and front panels 3 Use a soft brush a vacuum cleaner or low pressure compressed air...

Page 51: ...ter of potable water 20 40 C CAUTION After the sanitizing solution has passed through the lines you must rinse very well with clean water until every trace of the sanitizing agent is completely elimin...

Page 52: ...You will need to acquire an adapter for example recovering one from an old BIB to be connected to the suction line in place of the BIB in order to keep the connector permanently open 4 Stop the suppl...

Page 53: ...ped in the control valve the CO2 might flow back into the water supply system 1 Disconnect the machine from the electricity supply 2 Remove the upper panel 3 Shut off the water and CO2 supplies 4 Disc...

Page 54: ...an water to about 2cm 1 inch below the overflow hole 7 Refit the upper cover 8 Reconnect the machine to the electricity supply If the machine is to be left unused for a long time always empty the tank...

Page 55: ...ath of the tube No electricity supply Check the plug is well inserted The dispenser does not deliver sparkling water CO2 cylinder has run out Replace the CO2 cylinder Electronic control unit malfuncti...

Page 56: ...nal protective equipment mentioned in the user s manual and also refer to the instructions and diagrams in this manual or request specific information to the manufacturer CFC HCFC and HFC refrigerant...

Page 57: ...res manufacturers and users of electrical and electronic equipment a number of obligations relating to the collection treatment recovery and disposal of such waste It is recommended to strictly follow...

Page 58: ...es 9 1 BRAVE 30 60 ES electrical diagram Version with still water and special pump The electrical diagram can also be found on the inner part of the insulating tank cover Refer to that diagram if ther...

Page 59: ...0 ES 9 2 BRAVE 30 60 ES electrical diagram Version with still water The electrical diagram can also be found on the inner part of the insulating tank cover Refer to that diagram if there are any diffe...

Page 60: ...ES 9 3 BRAVE 30 60 ES electrical diagram Version with still water and telemetry The electrical diagram can also be found on the inner part of the insulating tank cover Refer to that diagram if there a...

Page 61: ...0 ES electrical diagram Version with still water pressure switch and solenoid valve The electrical diagram can also be found on the inner part of the insulating tank cover Refer to that diagram if the...

Page 62: ...0 ES 9 5 BRAVE 90 ES electrical diagram Version with still water and telemetry The electrical diagram can also be found on the inner part of the insulating tank cover Refer to that diagram if there ar...

Page 63: ...Annexes 61 Brave 30 ES Brave 60 ES Brave 90 ES 9 6 BRAVE ES hydraulic diagram Version with special still water pump BR0400...

Page 64: ...Annexes 62 Rev 10 17 Brave 30 ES Brave 60 ES Brave 90 ES 9 7 BRAVE ES hydraulic diagram Version with still water kit pressure switch and solenoid valve BR0410...

Page 65: ...Annexes 63 Brave 30 ES Brave 60 ES Brave 90 ES 9 8 BRAVE 30 60 ES hydraulic diagram Version with still water and telemetry BR0402...

Page 66: ...Annexes 64 Rev 10 17 Brave 30 ES Brave 60 ES Brave 90 ES 9 9 BRAVE 90 ES hydraulic diagram Version with still water carbonator BR0402...

Page 67: ......

Page 68: ...47842 S Giovanni in Marignano Rimini Italy Tel 39 0541 755211 Fax 39 0541 759735 www celli com celli celli com WE RESERVE THE RIGHT TO MODIFY OUR PRODUCTS IN ANY WAY WE CONSIDER USEFUL WITHOUT PREWARN...

Reviews: