Be sure to fit the parts in the
same order as the diagrams
shown.
!
Make sure the screws are fully
tightened with the allen key.
!
FIXINGS:
PARTS:
x
1
Part
No.
J2
Be sure to fit the parts in the
same order as the diagrams
shown.
!
Make sure the foot peg is fully
tightened with the allen key.
!
x
1
Part
No.
J4
x
1
Part
No.
J3
x
3
Part
No.
J5
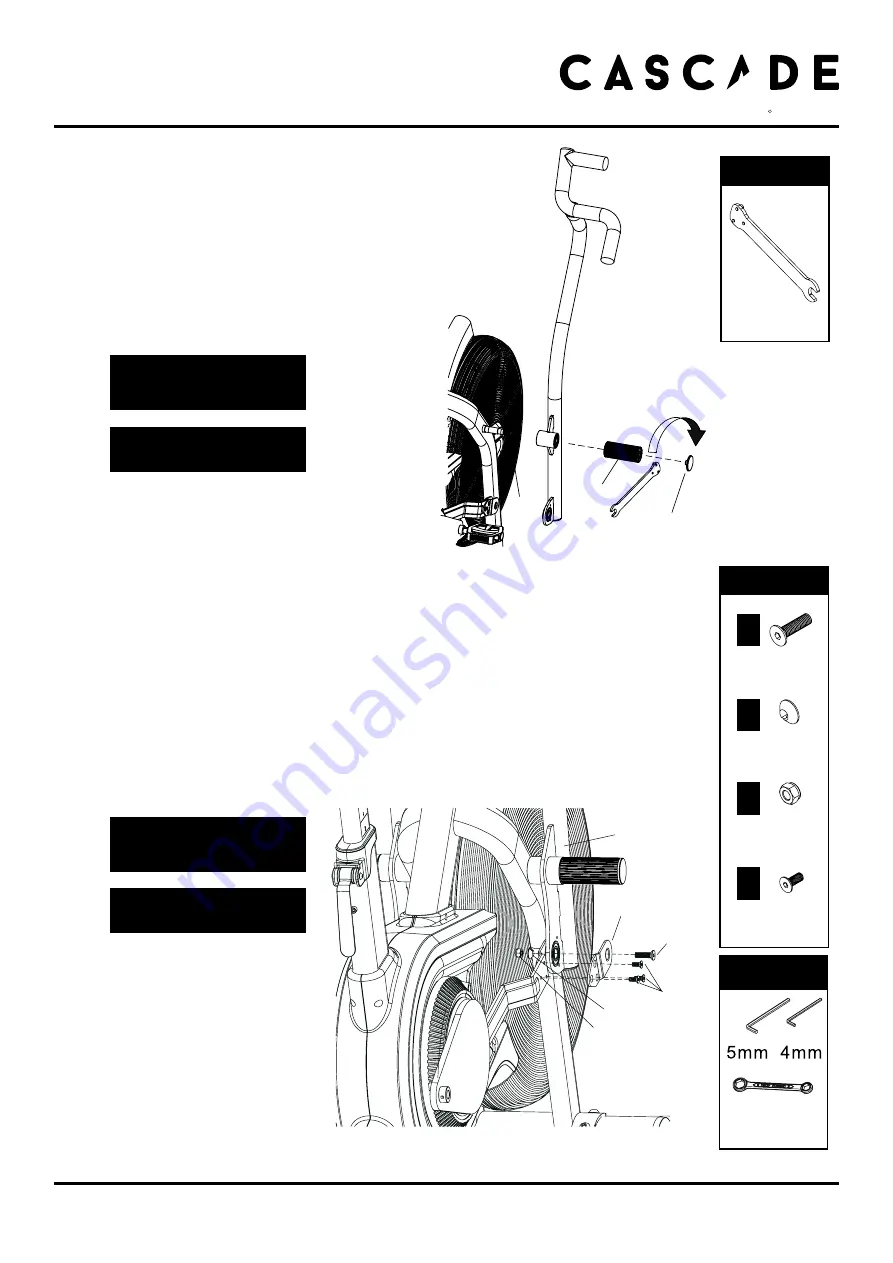
3-3. Attach the Right Dual Action Handlebar
Slide the
•
right Dual Action Handlebar (D2)
onto
the pivot axle carefully.
Install the
•
Foot Peg (G)
by screwing it on, and
tighten it with the wrench as shown.
Attach the
•
End Cap (J1)
onto the
Foot Peg (G)
securely.
3-4. Install the Fix Plate & Linkage Bar
Connect the
•
right Dual Action Handlebar (D2)
and
Linkage
Bar with Fix Plate (I)
,
Disc Spacer (J4)
,
M8x30mm Screw (J2)
and
M8 Nylon Locknut (J3)
and tighten with 5mm Allen Key &
13/17 Wrench.
Doubly secure the
•
Fix Plate (I)
to the Linkage Bar with three
M6x15mm Screws (J5)
and secure with 4mm Allen Key.
( You should be able to fit these three screws for better align-
ment by loosening the front screw assembly and try again when
all four screws are in place, tighten with the allen key provided. )
FIXINGS:
TOOLS:
Wrench
13/17
9
FIXINGS:
TOOLS:
Wrench
J2
J5
I
J4
J3
D2
G
A
J1
wrench
cascadehealthandfitness.com
H E A L T H & F I T N E S S
R


