1
48/50HG014---028, 48/50PG20---28
Single---Package Rooftop Units
with
COMFORT
Link
t
and Electro---Mechanical Controls
Return and Supply Smoke Detectors Accessory
Installation Instructions
PART NO. CRSMKDET001D00, CRSMKSUP001B00, CRSMKSEN001A00
TABLE OF CONTENTS
GENERAL
1
. . . . . . . . . . . . . . . . . . . . . . . . . . . . . . . . . . . . . . . .
SAFETY CONSIDERATIONS
1
. . . . . . . . . . . . . . . . . . . . . . . .
INSTALLATION
2
. . . . . . . . . . . . . . . . . . . . . . . . . . . . . . . . . . .
Check Package Contents
2
. . . . . . . . . . . . . . . . . . . . . . . . . . .
Return Air Smoke Detector Installation
2
. . . . . . . . . . . . . . .
Supply Air Smoke Detector Installation
5
. . . . . . . . . . . . . . .
Sensor Installation
7
. . . . . . . . . . . . . . . . . . . . . . . . . . . . . . .
Configuring the
Comfort
Link
t
Controller
8
. . . . . . . . . . . .
OPERATION
8
. . . . . . . . . . . . . . . . . . . . . . . . . . . . . . . . . . . . . .
MAINTENANCE
9
. . . . . . . . . . . . . . . . . . . . . . . . . . . . . . . . . . .
Cleaning Procedure
9
. . . . . . . . . . . . . . . . . . . . . . . . . . . . . .
Recommended Service Schedule
9
. . . . . . . . . . . . . . . . . . . .
Sensor Tests
9
. . . . . . . . . . . . . . . . . . . . . . . . . . . . . . . . . . . .
Controller Tests
9
. . . . . . . . . . . . . . . . . . . . . . . . . . . . . . . . . .
TROUBLESHOOTING
10
. . . . . . . . . . . . . . . . . . . . . . . . . . . . .
Dirty LED
10
. . . . . . . . . . . . . . . . . . . . . . . . . . . . . . . . . . . .
Power LED
10
. . . . . . . . . . . . . . . . . . . . . . . . . . . . . . . . . . . .
Trouble LED
10
. . . . . . . . . . . . . . . . . . . . . . . . . . . . . . . . . .
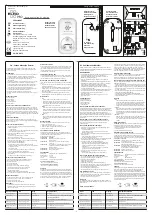
IMPORTANT
: There are two different design revision 48/50HG
units that have been produced. Because of these differences, there
are two different versions of this accessory. This accessory
literature covers accessories manufactured for units with design
revision 1. This revision designator is found in the 13th digit of
the unit model number located on the units’ rating plate. Design
revision 0 units are not covered in this accessory book.
To determine the design revision, refer to the full unit model
number. See Fig. 1 for an example of an HG model number. The
design revision number in the model number nomenclature is
located in position 13.
Position No.
1
2
3
4
5
6
7
8
9
10
11
12
13
14
15
16
Example:
4
8 H G D 0
1
6 A
A
C
6
1
1
A
A
DESIGN REVISION NUMBER
C07172
Fig. 1
---
Model Number Chart
GENERAL
An HVAC (heating, ventilation and air-conditioning) system
supplies conditioned air to virtually every area of a building.
Smoke introduced into this air duct system will be distributed
throughout the entire building. Smoke detectors designed for use
inside the unit are used to sense the presence of smoke passing
through the unit.
The smoke detector utilizes photoelectric technology for the
detection of smoke. This detection method, when combined with
an efficient ducting design, samples air passing through the unit.
If sufficient smoke is sensed, an alarm signal is initiated and the
Comfort
Link controls will shut down the unit. With the unit shut
down, the unit will not blow toxic smoke and fire gases
throughout the areas served by the duct system.
The
return
air
smoke
detector
is
part
number
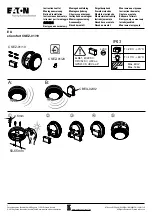
CRSMKDET001D00, which includes a Smoke Sensor and a
Smoke Control Module combined with sampling tube, harnesses
and hardware. The supply air smoke detector is part number
CRSMKSUP001B00, which includes a Smoke Sensor and a
Smoke Control Module combined with sampling tube, harnesses
and hardware. Part number CRSMKSEN001A00 is a Smoke
Sensor only for use as a second (Supply with existing Return, or
Return with existing Supply) Air Smoke Detector with sampling
tube, harnesses and hardware.
The Control Module can be attached to a Smoke Sensor and
installed as an assembled unit, or it can be installed separate from
a sensor. One Controller can be used to control up to two
detectors (Smoke Sensors).
SAFETY CONSIDERATIONS
Installation and servicing of air-conditioning equipment can be
hazardous due to system pressure and electrical components.
Only trained and qualified service personnel should install, repair,
or service air-conditioning equipment.
Untrained personnel can perform the basic maintenance functions
of cleaning coils and filters and replacing filters. All other
operations should be performed by trained service personnel.
When working on air-conditioning equipment, observe
precautions in the literature, tags and labels attached to the unit,
and other safety precautions that may apply.
Follow all safety codes. Wear safety glasses and work gloves. Use
care when handling and installing the accessory.
Recognize safety information. This is the safety--alert symbol
. When you see this symbol on the unit and in instructions or
manuals, be alert to the potential for personal injury.