Chiller Alignment
ALIGNMENT METHODS — There are several established
procedures for aligning shafts. The dial indicator method is
presented here since it is considered to be one of the most
accurate and reliable. Another faster and easier method for
alignment involves using laser alignment tools and comput-
ers. Follow the laser tool manufacturer’s guidelines when
using the laser technique.
Where job conditions such as close-spaced shafts prohibit
the use of dial indicators for coupling face readings, other
instruments such as a taper gage may be used. The same pro-
cedures described for the dial indicator may be used with the
taper gage.
Shafts placed in perfect alignment in the non-operating
(cold) condition will always move out of alignment to some
extent as the chiller warms to operating temperature. In most
cases, this shaft misalignment is acceptable for the initial run-in
period before hot check and alignment can be made (see Hot
Alignment Check section, page 61).
NOTE: The physical configuration of the 17FX compressor
makes the oil sump temperature a more significant factor in
alignment than the suction and discharge temperatures. There-
fore, warm the sump oil to operating temperature (approxi-
mately 140 F [60 C]), if possible, before beginning align-
ment procedures.
General
1. Final shaft alignment must be within .002-in. (.05-mm)
TIR (Total Indicated Runout) in parallel. Angular align-
ment must be within 0.00033 inches per inch of traverse
(0.00033 mm per mm of traverse) across the coupling face
(or inch of indicator swing diameter) at operating tem-
peratures. For example, if a bracket-mounted indicator
moves through a 10-in. diameter circle when measuring
angular misalignment, the allowable dial movement will
be 10 times 0.00033 for a total of 0.0033 in. (0.0033 mm).
2. Follow the alignment sequence specified in the Near
Final Alignment section.
3. All alignment work is performed on gear and drive equip-
ment. Once the compressor is bolted in a perfectly level
position and is piped to the cooler and condenser, it must
not be moved prior to hot check.
4. All alignment checks must be made with the equipment
hold-down bolts tightened.
5. In setting dial indicators on zero and when taking read-
ings, both shafts should be tight against their respective
thrust bearings.
6. The space between coupling hub faces must be held to
the dimensions in Fig. 29 and 30.
7. Accept only repeatable readings.
High Speed Coupling Alignment
1. Move the gear with the coupling attached into alignment
with the compressor coupling. The compressor must be
in the thrust position and the gear must be centered be-
tween the thrust collars when determining gear position
relative to the compressor. Adjust the jackscrews to reach
close alignment. Follow the procedures outlined in the
Correcting Angular Misalignment and Correcting Paral-
lel Misalignment sections.
2. A 5-in. long spacer hub is supplied between the gear and
compressor. Maintain the exact hub-to-hub distance speci-
fied in Fig. 29.
3. Where the shaft ends are very close, a taper gage may be
used in place of the dial indicator.
4. Get the gear alignment as close as possible by using the
jackscrew adjustment.
Low Speed Coupling Alignment
1. Move the motor with the coupling attached into align-
ment with the gear coupling. The motor must be in its
mechanical center and the gear must be centered between
the thrust collars when determining the motor position
relative to the gear. Adjust the jackscrews to reach close
alignment. Follow the procedure outlined in the Correct-
ing Angular Misalignment and Correcting Parallel Mis-
alignment sections.
2. Maintain the exact hub-to-hub distance as specified in
Fig. 30.
3. Where the shaft ends are very close, a taper gage may be
used in place of the dial indicator.
4. Get the motor alignment as close as possible by using the
jackscrew adjustment.
NOTE: The drive shaft end-float at final drive position must
not allow the coupling hub faces to make contact or the cou-
pling shroud to bind.
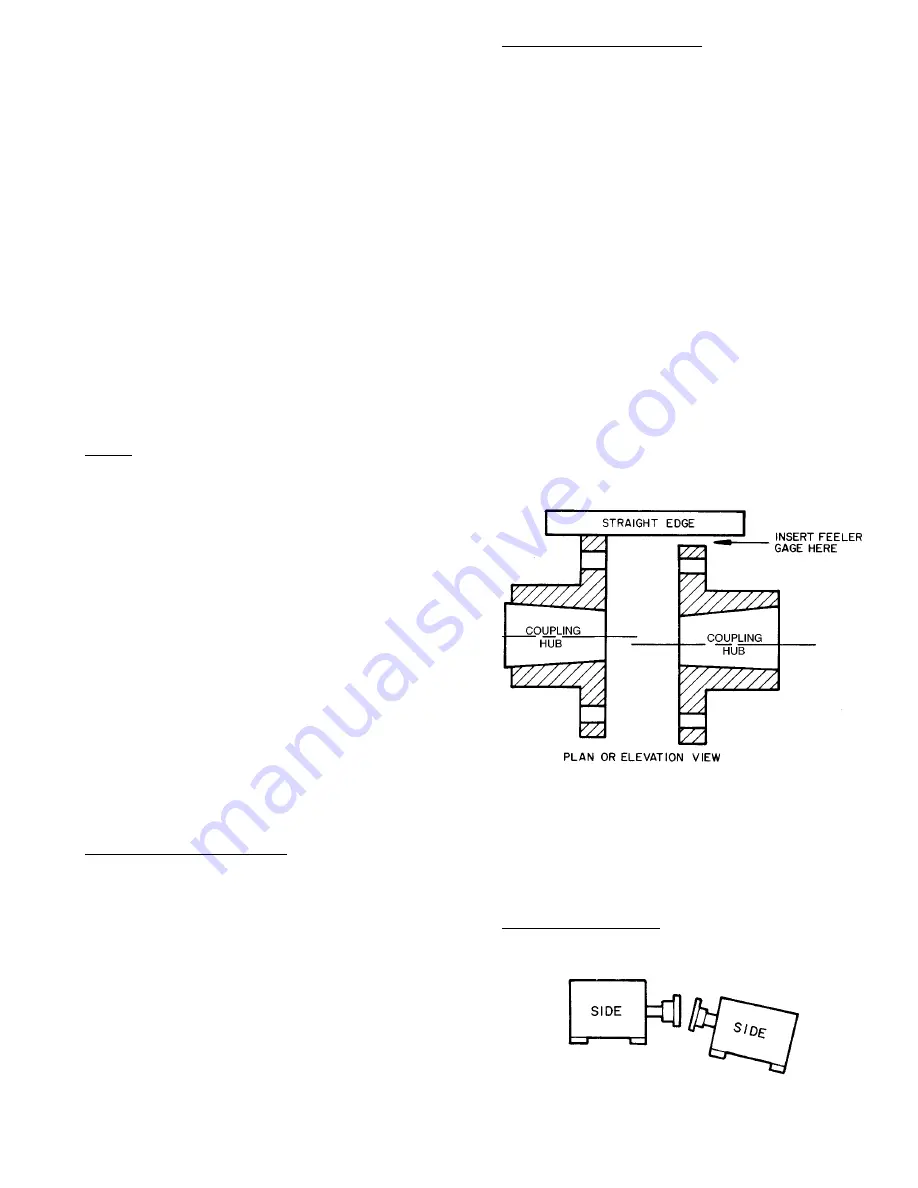
PRELIMINARY ALIGNMENT — To get within dial indi-
cator range, roughly align the equipment as shown in Fig. 37
and as described below.
Place a straight edge across the OD of one coupling to the
OD of the other. Measure the gap between the straight edge
and the OD of the second coupling with a feeler gage. Then,
by adding or removing shims at each corner, raise or lower
the equipment by the measured amount.
In a similar manner, measure the shaft offset from side to
side and jack the equipment over as required to correct.
NEAR FINAL ALIGNMENT — Once the chiller compo-
nents are within dial indicator range, the adjustments for mis-
alignment should be made in a specific sequence. The four
positions of alignment described below are arranged in the
recommended order.
1. Angular in elevation — This alignment is adjusted
with shims and is not readily lost in making the other
adjustments.
Fig. 37 — Checking Preliminary Alignment
71


