background image


10 


Satellite swap 

Generally, satellites can be swapped by entering a different satellite in the 
menu option "Search satellite" and selecting the automatic search. To 

facilitate a quick and convenient swap to a different satellite, the so-
called "quick satellite-swap" function has been added to the DISEqC 
system. This function allows the antenna to be aimed at four preset 
satellites in a very short time. However, this function only works 

correctly if the preset satellites are actually receivable at your current 
location. 
 

Presetting the positions: 

Call up the menu item "SAT position" and assign the four positions to 
the respective satellites (see page 17). If you do not assign all four 
positions, the remaining positions will retain the satellites preset by the 
manufacturer.  The presets are now complete, you may now exit the 

settings menu.


It is quite easy to change to a different satellite: Press   to scroll 
forward in the general menu until the message "SAT swap" appears in 

the display.


Now, press 

 to show the currently received satellite in the display. 

Press   or   to scroll between the four preset satellites. 


Note: If you decide not to assign all four positions and find that you would rather not 

use one of the factory-preset satellites, you can also assign the same satellite to more 
than one position. If for example you wish to swap between Astra and Hotbird only, 
then set Astra to position 1, Hotbird to position 2, Astra again to position 3 and 
Hotbird again to Position 4. When scrolling with the keys or 

the system will 

then only alternate between Astra and Hotbird.


When the desired satellite is shown in the display, press 

 to directly 

move the antenna into the corresponding position. 
The display will then revert to "Sat mode". 

 
This SAT swap procedure takes a few seconds when performed after an 
automatic search. If the antenna has already been aimed at a satellite, no 

Summary of Contents for VISION II

Page 1: ......

Page 2: ...Operating Instructions CARO VISION II Date August 2006 Software Version 1 07...

Page 3: ...to change the overall device by removing or adding individual components It is not permitted to use other parabolic antennas or LNBs than those installed originally at the equipment The installation m...

Page 4: ...u 7 Automatic satellite search 8 Manual satellite search 9 Satellite swap 10 Menu Settings 12 DISEqC system 18 Restarting the system 22 Troubleshooting table 23 DISEqC troubleshooting table 24 Safety...

Page 5: ...reset satellite automatically as long as the system is located within the footprint of this satellite Please ensure that the system always has a clear view to the south In Europe all satellites are in...

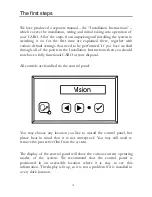
Page 6: ...Instructions then you should now have a fully functional CARO at your disposal All controls are handled via the control panel Vision You may choose any location you like to install the control panel...

Page 7: ...afe and reliable operation of the system please make sure the CARO is in rest mode before disconnecting the control panel Check that no text is displayed on the panel this is an indication that it is...

Page 8: ...position has changed since the system will not receive any signals and the automatic search is started Please refer to section Settings see page 12 for the selection default setting of the desired sat...

Page 9: ...can start all functions or select submenus Use the keys and to navigate in this general menu then use to activate the individual functions Sat mode The system is in normal operating mode Press or to s...

Page 10: ...inutes you are most likely located in an area in which the preset satellite cannot be received or the signal beam is obstructed In this case the message not found appears in the display of the control...

Page 11: ...s First the pivot angle needs to be adjusted To change between the pivot angle and the elevation angle press and hold and at the same time press one of the arrow keys Using the arrow keys adjust the s...

Page 12: ...u It is quite easy to change to a different satellite Press to scroll forward in the general menu until the message SAT swap appears in the display Now press to show the currently received satellite i...

Page 13: ...has been started and the vehicle has not moved since aiming will be much quicker However after retracting and re opening the system the antenna will be moved into the position of the preset search sa...

Page 14: ...switch the CARO system on before you can use the menu Menu controls The arrow keys and are used to navigate through all levels of the menu With the aid of these keys you can select a desired submenu...

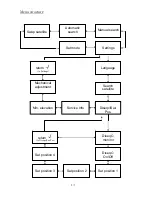
Page 15: ...ttings Min elevation Service Info Diseqc Sat Pos Search satellite Language return to Diseqc Sat Pos Sat position 1 Sat position 4 Sat position 2 Sat position 3 DiseqC On Off DiseqC monitor Sat mode Se...

Page 16: ...this menu item press to open the DiseqC sub menu where you can change the settings for the satellite swap function and the DiseqC system for more information see page 10 and 18 Service info Different...

Page 17: ...nto positions below the set value The higher the number the higher the lower limit of the LNB will be If you change this value the LNB will immediately move into the corresponding position allowing yo...

Page 18: ...satellite number last sent by your receiver This position number will be used to position the antenna when the CARO system performs an automatic satellite change DISEqC On Off Default setting Off The...

Page 19: ...es to be used for the normal satellite swap or a DISEqC satellite change To each of the 4 positions one satellite from the search satellite list can be allocated First select Position 1 and press Now...

Page 20: ...a DISEqC signal to the multi switch the switch connects the receiver to the satellite aimed at the respective satellite The DISEqC signals are standardized and are generated by almost all state of th...

Page 21: ...stem The first satellite is to be Astra 1 the second Eutelsat Hotbird If the channels of these two satellites are not stored in your receiver a channel scan must be performed after the antenna has aut...

Page 22: ...when an Astra channel is selected as Astra has been assigned to position A 1 When switching to a Hotbird channel the figure 02 should be displayed as this satellite has been assigned to position B 2 I...

Page 23: ...tomatic search this may take several seconds If the antenna has already been aimed at a satellite no automatic search has been started in the mean time and the vehicle has not moved since the aiming p...

Page 24: ...ove the fuse and then re insert it into its holder after a few seconds If the fuse is not accessible disconnect the Western connector on the right hand side of the control panel To do this press the p...

Page 25: ...on The search did not yield the reception of a satellite Do you have a clear view to the South Are you inside the search satellite s footprint Does your position require the LNB s skew angle to be adj...

Page 26: ...extended special functions These must not be activated In such cases it must be checked whether your receiver is set to DISEqC 1 0 1 1 or 1 2 Also there are DISEqC 2 xx signals that may be misinterpr...

Page 27: ...s blank the wrong satellite 1 Following the DISEqC configuration an automatic search must be performed 2 Are the positions in the menu option SAT position correctly set The assignment in the CARO syst...

Page 28: ...o ensure that the antenna is fully retracted Please note also that different legal requirements apply to the operation of electrical and electronic equipment in different countries As the user of this...

Page 29: ...It transmits the popular English language news channels The footprint is even larger than that of Astra 1 but the reception area is split into a northern and a southern zone The full range of channel...

Page 30: ...Canary Islands The range of programs is focused on the Spanish region EUTELSAT W3A This satellite has the largest footprint of all It covers the whole of Europe and the Middle East region However its...

Page 31: ...onics but sometimes requires some manual fine tuning by pivoting the LNB reception head by some degrees Skew angle compensation in different regions approx values The values stated are for reference o...

Page 32: ...electronic devices This is indicated by the symbol on the product the operating manual or the packaging The materials can be reused in accordance with their identification By reusing or recycling old...

Page 33: ...ng your CARO VISION II system please feel free to call us Phone 49 0 72 37 48 55 0 We are available Monday Friday 7 30 a m 5 30 p m We hope you get a lot of enjoyment out of your CARO VISION II system...

Reviews: