Carel pCO5+ User Manual Download Page 16

16

ENG

pC0300020EN rel. 1.2 - 07.11.2013


Important:

• 

For safety reasons the controller should be installed inside an electrical 
panel so that the only accessible parts are the display and the built-in 
terminal’s keypad.

• 

Install the controller so that the disconnection devices can be used 
safely and without hindrance.

• 

When laying out the wiring, separate as much as possible the probe 
cables, digital input cables and serial line cables from the power 
cables (connected to contactors, thermomagnetic devices, etc.) avoid 
electromagnetic interference.

• 

Never run power cables and probe signal cables in the same conduits 
(including the ones in the electrical panels).

• 

For control signals, use shielded cables with twisted wires. If the control 
cables have to cross over power cables, the intersections should be as 
close as possible to 90 degrees; under no circumstances should the 
control cables be laid parallel to the power cables.

• 

Keep the paths of the probe cables as short as possible and avoid 
making spiral paths that enclose power devices.

• 

In case of malfunctions do not attempt to repair the device, but 
contact a CAREL service centre.

Electrical installation

Important:

 Before servicing the equipment in any way disconnect 

the controller from the power mains by putting the system’s main switch 
on OFF.

Make sure the system is provided with a power disconnector conforming 
to regulations. Use cable lugs that are suitable for the terminals used. 
Loosen each screw and insert the cable lugs, then tighten the screws. 
There is no limit to the number of wires that can be connected to 
each individual terminal. When tightening the terminal screws apply 
a tightening torque no greater than 0.6 Nm. For information on the 
maximum allowable length of the connections to the analogue/digital 
inputs and to the analogue outputs please refer to the “Technical 
Specifi cations” table. In environments subject to strong disturbance use 
shielded cables with the braiding bonded to the earthing conductor 
in the electrical panel. The terminals can accept wires with a maximum 
cross-section of 2.5 mm2 (12 AWG). After making the connection, gently 
tug on the cables to make sure they are suffi

  ciently tight.

Note: 

• 

secure the cables connected to the controller with clamps placed at 3 
cm from the connectors;

• 

if the power transformer's secondary winding is earthed, make sure 
the earth conductor is bonded to the conductor that goes to the 
controller and is connected to terminal G0. This applies to all the 
devices connected to the controller through a serial network.


Important:


• 

Using a supply voltage other than specifi ed can seriously damage the 
system.

• 

Connect the fuse close to the controller.

• 

Installing, servicing and inspecting the controller should be done 
only be qualifi ed personnel and in compliance with national and local 
regulations.

• 

All the very low voltage connections (24 Vac/Vdc or 28 to 36 Vdc 
analogue and digital inputs, analogue outputs, serial bus connections, 
power supplies) must have reinforced or double insulation from the 
power mains.

• 

Avoid touching or nearly touching the electronic components 
mounted on the boards to avoid electrostatic discharges from the 
operator to the components, which can be very damaging.

• 

Do not press the screwdriver on the connectors with excessive force, 
to avoid damaging the controller.

• 

Using the device in any way other than specifi ed by the Manufacturer 
can compromise its protection system.

• 

Use only optional boards and connectors supplied by CAREL.
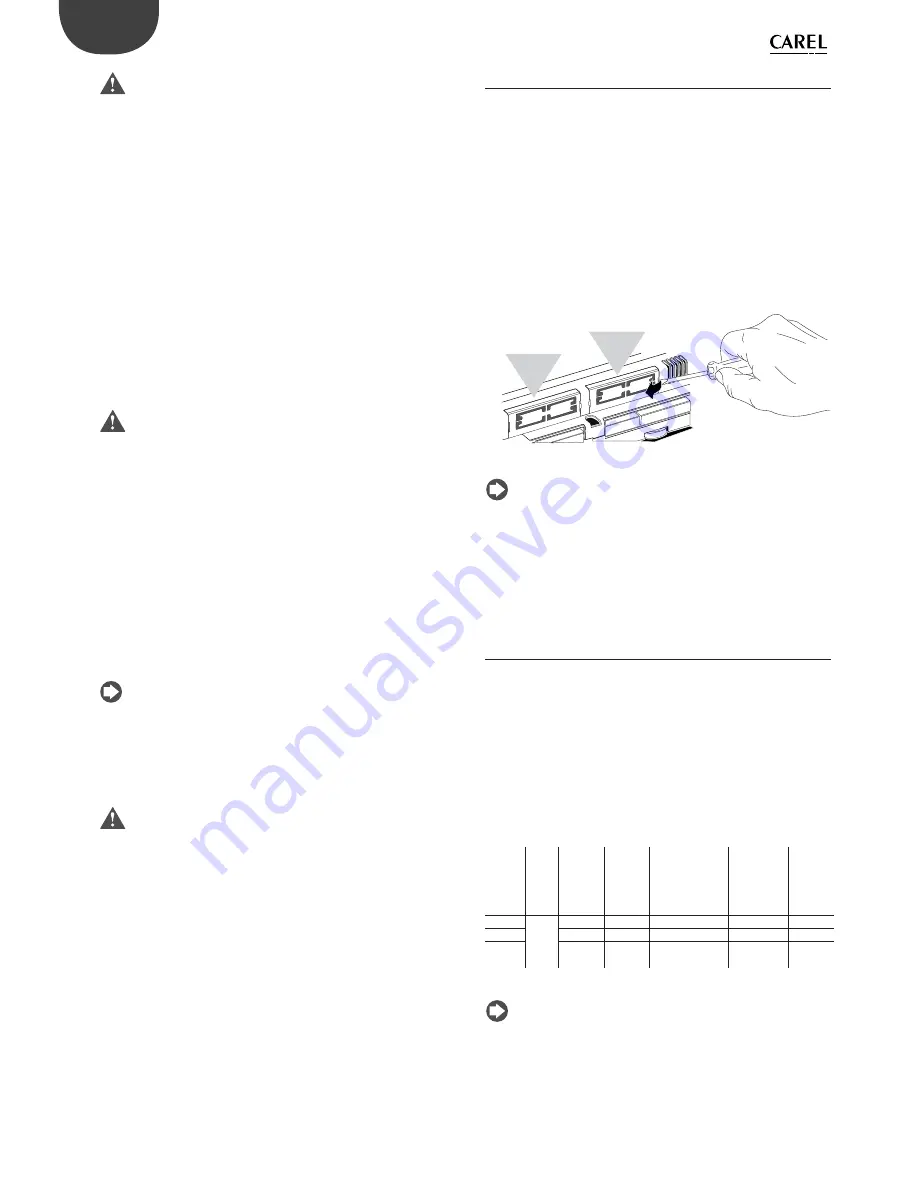
4.3 Preliminary 

operations

Installing the serial cards

If the Fieldbus and BMS serial cards built into the pCO5+ are insuffi

  cient 

for the required application, you can add a Fieldbus serial port and a BMS 
serial port, which are available as accessories (see chap.1). 
To install them, proceed as follows:

1. 

Locate the Fieldbus or BMS serial port.

2. 

Using a screwdriver, take off  the cover.

3. 

Using a pair of nippers, cut out the perforated plastic part to create 
an opening.

4. 

Plug the optional card into the edge-card connector, making sure it 
is fi rmly secured and makes contact.

5. 

Put back the cover so that the serial card’s connector is aligned with 
the opening.

6. 

Make the electrical connections required.

F

ie

l

dB

u

s


card

BMS


card

Fig. 4.b

Note: 

For details, refer to the instructions sheets of the cards to 

install.

Installing the pCOe expansion card

See instructions sheet code +050003265.

Installing the Ultracap module

See instructions sheets codes +0500042IE and +0500041IE.

4.4  Serial network electrical connections

To improve the controller’s immunity against electromagnetic 
interference, the serial connection cable should be a shielded twisted 
pair cable, 2-pole or 3-pole depending on the insulation of the serial 
connection. The following rule applies:

• 

if the serial port is isolated (functionally) from the power supply, a third 
wire is required in the serial cable to act as a common reference for the 
controllers. If the serial port is not optically isolated and the common 
reference is already present, no third wire is required.

Technical specifi cations for connections

Use a shielded, twisted pair cable (AWG 20-22) with inter-conductor 
capacitance <90pF/m.

Master 

device

HW

Lmax(m)

Wire/

wire 

capaci-

tance 

(pF/m)

Resistance on 

fi rst and last 

devices

Max. no. 

of slave 

devices on 

bus

Data rate 

(bit/s)

FBUS

RS485

1000

< 90

120 Ω

64

19200

PC

1000

< 90

120 Ω

207

38400

pLAN

500

< 90

-

32

62500/

115200

Tab. 4.b

Note:

 In case of a Master–Slave network the max. allowable length 

is 1000 m. If the network is longer than 100 m, apply 120Ω, 1/4W 
terminating resistors to the fi rst and last devices in the network.

Non-optically-isolated serial port

This is the case of the serial ZERO - pLAN (J11), Fieldbus 2 (J23 and J26) 
and BMS2 if not optically isolated (on models with built-in ports that are 
not optically isolated).

Summary of Contents for pCO5+

Page 1: ...I n t e g r a t e d C o n t r o l S o l u t i o n s E n e r g y S a v i n g s pCO5 NO POWER SIGNAL CABLES TOGETHER READ CAREFULLY IN THE TEXT Programmable Controller User manual...

Page 2: ......

Page 3: ...corrosive chemicals solvents or aggressive detergents to clean the device Do not use the product for applications other than those speci ed in the technical manual All of the above suggestions likewi...

Page 4: ...4 ENG pCO5plus 0300020EN rel 1 2 07 11 2013...

Page 5: ...12 pCO5 terminals description 24 5 INPUT OUTPUT CONNECTIONS 26 5 1 Power supply 26 5 2 Universal inputs outputs 26 5 3 Digital inputs 29 5 4 Optically isolated analogue outputs 31 5 5 Connecting the...

Page 6: ...6 ENG pCO5plus 0300020EN rel 1 2 07 11 2013...

Page 7: ...ding software and commissioning fast upload download of controller software using a Smart Key or any pendrive provided the controller is equipped with the relative port universal inputs outputs con gu...

Page 8: ...RS485 Sch interfaccia Ethernet BACnet Servocontrollo della serranda BELIMO Valvola di servocontrollo MP BUS Scheda MP BUS 5 8 4 S R s u t a t s GNX RS485 P1 P2 P3 B A Cnet MS TP FieldBus 1 BMS 1 J1 J2...

Page 9: ...s terminal panel installation This model can be installed on the panel Its graphics properties are identical to those of the PGDE000 terminal Accessories for installation telephone connection cable co...

Page 10: ...ntroller consequently acts as a MASTER i e supervisor therefore other con trollers or devices can be connected as SLAVES Up to 64 devices can be connected PCO100TLN0 tech lea et Code 050003270 tLAN an...

Page 11: ...er e g pCO5 Small EVD Evolu tion external Ultracap module pCOE tech lea et code 050003265 Expansion card Increases the number of inputs outputs on the controller A maximum of 5 expan sion cards can be...

Page 12: ...White press together with DOWN and ENTER to change the terminal s address only for PGDE terminal see par 6 4 press to increase value Enter White press to con rm value DOWN White press together with UP...

Page 13: ...NO16 NO17 NO18 C16 ID15H ID15 IDC15 ID16 ID16H Y5 Y6 ID17 ID18 IDC17 U9 GND U10 GND FieldBus card BMS card J23 FBus2 J11 pLAN J25 BMS2 J26 FBus2 4 3 2 1 ONLY FOR LARGE AND EXTRALARGE MODELS Fig 3 a S...

Page 14: ...s2 J11 pLAN pCO5 SLAVE SLAVE Fig 3 d pLAN network J25 BMS2 J26 FBus2 J11 pLAN pCO5 J25 BMS2 J26 FBus2 J11 pLAN pCO5 J25 BMS2 J26 FBus2 J11 pLAN pCO5 MASTER SLAVE MASTER SLAVE MASTER SLAVE Fig 3 e Impo...

Page 15: ...ange of operation see Technical Speci cations large rapid uctuations in room temperature strong magnetic and or radio frequency interference avoid installing near transmitting antennas strong vibratio...

Page 16: ...ompliance with national and local regulations All the very low voltage connections 24 Vac Vdc or 28 to 36 Vdc analogue and digital inputs analogue outputs serial bus connections power supplies must ha...

Page 17: ...nel Terminating resistors are not required L 100m 230 Vac 24 Vac L N J25 BMS2 J26 FBus2 J11 pLAN pCO5 G G0 J25 BMS2 J26 FBus2 J11 pLAN pCO5 G G0 J25 BMS2 J26 FBus2 J11 pLAN pCO5 G G0 Fig 4 c The proce...

Page 18: ...ion slip the connector into terminal J10 until it clicks To remove the connector press lightly on the plastic catch on the connector and slip it out Graphic L 50 m cavo telefonico telephone cable J10...

Page 19: ...onnected to a pCO controller which is itself connected to other controllers in a pLAN network the terminal is directly powered by the controller Be sure to avoid the terminal being powered by two powe...

Page 20: ...ed PWM output 5 8 10 8 8 U Out Universal I O Analogue output max tot 5 max tot 8 max tot 10 max tot 8 max tot 8 Digital inputs Optically isolated 24 Vac Vdc input 8 12 14 12 12 ID In Digital input 4 I...

Page 21: ...J8 J1 4 J10 J1 3 J1 2 J16 J1 7 J18 J15 J6 FieldBus card BMS card J11 pLAN J2 5BMS2 J2 6FBus2 4 3 2 1 4 5 1 6 2 3 3 3 8 9 7 8 10 13 14 11 12 15 18 16 17 Fig 4 r Ref Description Ref Description 1 POWER...

Page 22: ...U7 U8 GND ID9 ID10 ID11 ID12 IDC9 ID13H ID13 IDC13 ID14 ID14H J1 J24 J2 J3 J4 J5 J7 J8 J14 J10 J13 J12 J16 J17 J18 J15 J6 FieldBus card BMS card J23 FBus2 J11 pLAN J25 BMS2 J26 FBus2 4 3 2 1 4 5 1 6...

Page 23: ...nnector 6 VG voltage A to optically isolated analogue output VG0 power to optically isolated analogue output 0 Vac Vdc 18 Fieldbus BMS selector microswitch 7 Analogue outputs 20 Electronic valve A con...

Page 24: ...N RS485 port J11 2 Tx Rx Tx Rx pLAN RS485 port J11 3 GND GND pLAN RS485 port 12 Reserved 13 Reserved 14 Reserved Ref Term Label Description 15 J12 1 C1 Common for relays 1 2 3 J12 2 NO1 Normally open...

Page 25: ...connection J28 2 3 J28 3 2 J28 4 4 22 J30 1 VBAT Power from external Ultracap module J30 2 G0 J30 3 G 23 J29 1 GND Common for power supply to probes J29 2 VREF Power to driver probes J29 3 S1 Probe 1...

Page 26: ...o handle their respective signals from the application program the universal inputs outputs cannot be used as digital outputs Max number of connectable analogue inputs The maximum number of analogue i...

Page 27: ...nical Speci cations table The probe has three wires connect one to GND and the other two to two separate but adjacent universal inputs on the same controller e g U1 U2 GND or U4 U5 GND G G0 U1 U2 U3 G...

Page 28: ...scription Wire colour 5 VREF Power Black GND Power reference Green U1 Signal White Connecting active probes with 0 to 10 V output For information on the maximum number of probes that can be connected...

Page 29: ...ty devices alarms device status indicators and remote switches These inputs are all optically isolated from the other terminals They can work at 24 Vac 10 15 or at 28 to 36 Vdc 20 10 indicated with ID...

Page 30: ...6 ID17 ID18 IDC17 U9 GND U10 GND FieldBus card BMS card 24Vac Fig 5 n 24 Vdc digital inputs The ID digital inputs can be controlled at 24 Vdc Example of connection diagram LARGE model G G0 U1 U2 U3 GN...

Page 31: ...D14H J1 J24 J2 J3 J4 J5 J7 J8 J20 J6 J19 ID15H ID15 IDC15 ID16 ID16H Y5 Y6 ID17 ID18 IDC17 U9 GND U10 GND FieldBus card BMS card 230Vac L N Fig 5 q Example 2 Connection diagram with digital inputs at...

Page 32: ...C13 ID14 ID14H J3 J4 J5 J7 J8 J20 J6 J19 ID15H ID15 IDC15 ID16 ID16H Y5 Y6 ID17 ID18 IDC17 U9 GND U10 GND eldBus card BMS card 24Vac 28 36 Vdc 0 V ID1 ID2 ID3 ID4 ID5 ID6 ID7 ID8 IDC1 ID9 ID10 ID11 ID...

Page 33: ...2 serial port J26 is however electrically isolated from the driver s serial line this ensures that in case of external faults on the line connected to FBus2 the internal driver can keep on working ind...

Page 34: ...dconsecutively at very close intervals e g star delta motor starter in the order of hundreds of ms use relays belonging to the same group according to the following table RELAY GROUPS FOR CONSECUTIVE...

Page 35: ...G0 Y1 Y2 Y3 Y4 ID1 ID2 ID3 ID4 ID5 ID6 ID7 ID8 IDC1 out H M NTC NTC G digitalinput9 CP digitalinput10 digitalinput11 digitalinput12 digital input 13 digital input 14 digital output 9 digital output 10...

Page 36: ...Each pCO constantly updates the displays on the private terminals while the shared terminals if present are updated only by the pCO that is controlling the terminal at that time The gure below illust...

Page 37: ...hed the terminal will display a blank screen In this case proceed as follows Procedure 1 Press the UP DOWN and Enter buttons together to go to the screen for setting the terminal address Display addre...

Page 38: ...CO Manager program and a serial converter with RS485 output to connect to the pCO pCO Manager is part of the 1Tool program suite it can also be installed by itself and can be obtained free of charge a...

Page 39: ...the controller immediately executes Autorun and upon con rmation from the terminal performs the operations contained in the le Upload and Download UPLOAD can be performed in three di erent ways 1 manu...

Page 40: ...the clock E is displayed as follows Select a memory to view its status T M E M O R Y S T A T U S P M E M O R Y S T A T U S E M E M O R Y S T A T U S 4 FLASH USB MEMORY Selecting this string displays t...

Page 41: ...llegamento sonde seriali DP 4 th Tune AT PCO100FD10 scheda seriale FieldBus PGD Touch EEV PGD1 Power PSD0 PCOS004850 scheda seriale RS485 PCO10000F0 schede LON PCO10W0BA0 scheda interfaccia BACnet RS4...

Page 42: ...vi terze parti FAN PUMP INVERTER PCOS004850 scheda seriale RS485 PCO10000F0 schede LON PCO10W0BA0 scheda interfaccia BACnet RS485 PCO10W0WB0 pCOWeb sch interfaccia Ethernet BACnet 5 8 4 S R s u t a t...

Page 43: ...43 ENG pCO5plus 0300020EN rel 1 2 07 11 2013...

Page 44: ...EVD200 x EVD Evolution x x CAREL slave devices tLAN x CAREL slave devices 485 x x x x x pCOexp 485 x x x x x pCOexp tLAN x Chiller2 expansion x Hydronic fan coil and CANbus x x PlantVisorPRO local x x...

Page 45: ...serial port protocols PSTN GSM Modbus Slave and CAREL Slave cannot be used on BMS serial port Modbus slave extended with pCOweb Modbus slave extended only for pCOWEB serial card with FW version 1 4 Mo...

Page 46: ...C 1Y in SSR versions Type of disconnection or microswitching microswitching Category of resistance to heat and re Category D UL94 V2 Ageing characteristics operating hours 80 000 No of automatic opera...

Page 47: ...kHz asynchronous 100 Hz asynchronous 5 8 10 Power supply for probes and terminals Vdc Active probes can be powered by the 24 21 Vdc 10 P 5 P 3 available on terminal VDC J2 The max available current i...

Page 48: ...tion of groups Model 1 2 3 4 5 6 7 8 9 10 11 SMALL 1 3 4 6 7 8 Type of relay Type A Type A Type A Type A MEDIUM BUILT IN DRIVER 1 3 4 6 7 8 9 11 12 13 Type of relay Type A Type A Type A Type A Type A...

Page 49: ...10 m or AWG14 shielded 4 wire cable Lmax 50 m Digital input connection Digital input to be activated with voltage free contact or transistor to GND Making current 5mA max length 10 m Probes Max lengt...

Page 50: ...A Non optically isolated BMS2 Non optically isolated Fieldbus2 P 5 B Optically isolated BMS2 Non optically isolated Fieldbus2 P 5 C Optically isolated BMS2 Optically isolated Fieldbus2 P 5 0 No USB p...

Page 51: ...mbols Flashing The key is connecting to the pCO During this phase which may last a few seconds the start button is disabled start Flashing The key has detected the pCO and is checking the access right...

Page 52: ...d corner Choose 1 connessione locale local connection 2 baud rate Auto 3 ricerca dispositivo nd device Auto pLAN As for the port number follow the Wizard s instructions for the port to be identi ed au...

Page 53: ...f the variables logged during monitoring Therefore to con gure Commissioning the following les are required 2CF 2CD and if necessary the DEV le which can be imported or exported For monitoring purpose...

Page 54: ...wnloaded to the pendrive as the directories created can only be numbered with XY 00 to 99 FILE TYPES FOR DOWNLOAD controller pLAN address 1 File extension Directory name Description DWL LOG00_01 Logge...

Page 55: ...and must be entered in the order shown in the table UPLOAD le labels No Label File type No Label File type 1 BIO le bin 6 PVT le pvt 2 IUP le iup 7 LCT le lct 3 BIN le bin blb 8 OED le oed 4 DEV le d...

Page 56: ...OS is updated and then the application The information is shown on the pCO s built in display and on the pGD1 terminal when both are featured Procedure 1 Connect the pendrive to port A USB key BMS car...

Page 57: ...e directory level press ESC Once the upload has started the messages shown on the screen are the same as in automatic and autorun mode Download As mentioned above the DOWNLOAD operation can be managed...

Page 58: ...to con gure pCOnet parameters Con guring pCOWeb When you select PCOWEB settings the following screen will appear D H C P I P A D D R E S S After a short time the elds are populated with the current pa...

Page 59: ......

Page 60: ...L INDUSTRIES Headquarters Via dell Industria 11 35020 Brugine Padova Italy Tel 39 049 9716611 Fax 39 049 9716600 e mail carel carel com www carel com Agenzia Agency pCO5plus 0300020EN rel 11 2 07 11 2...

Reviews: