


2. Select
Applications
from
Go
menu of Finder, double-click the
Canon Utilities
folder and
Inkjet
Extended Survey Program
folder.
3. Move
Canon Inkjet Printer/Scanner/Fax Extended Survey Program.app
to
Trash
.
4. Restart computer.
Empty
Trash
and restart your computer.
•
Changing setting:
To display the confirmation screen every time the printer usage information is sent or to resume
surveying, follow the procedure below.
1. Select
Applications
from
Go
menu of Finder, double-click the
Canon Utilities
folder and
Inkjet
Extended Survey Program
folder.
2. Double-click
Canon Inkjet Printer/Scanner/Fax Extended Survey Program
icon.
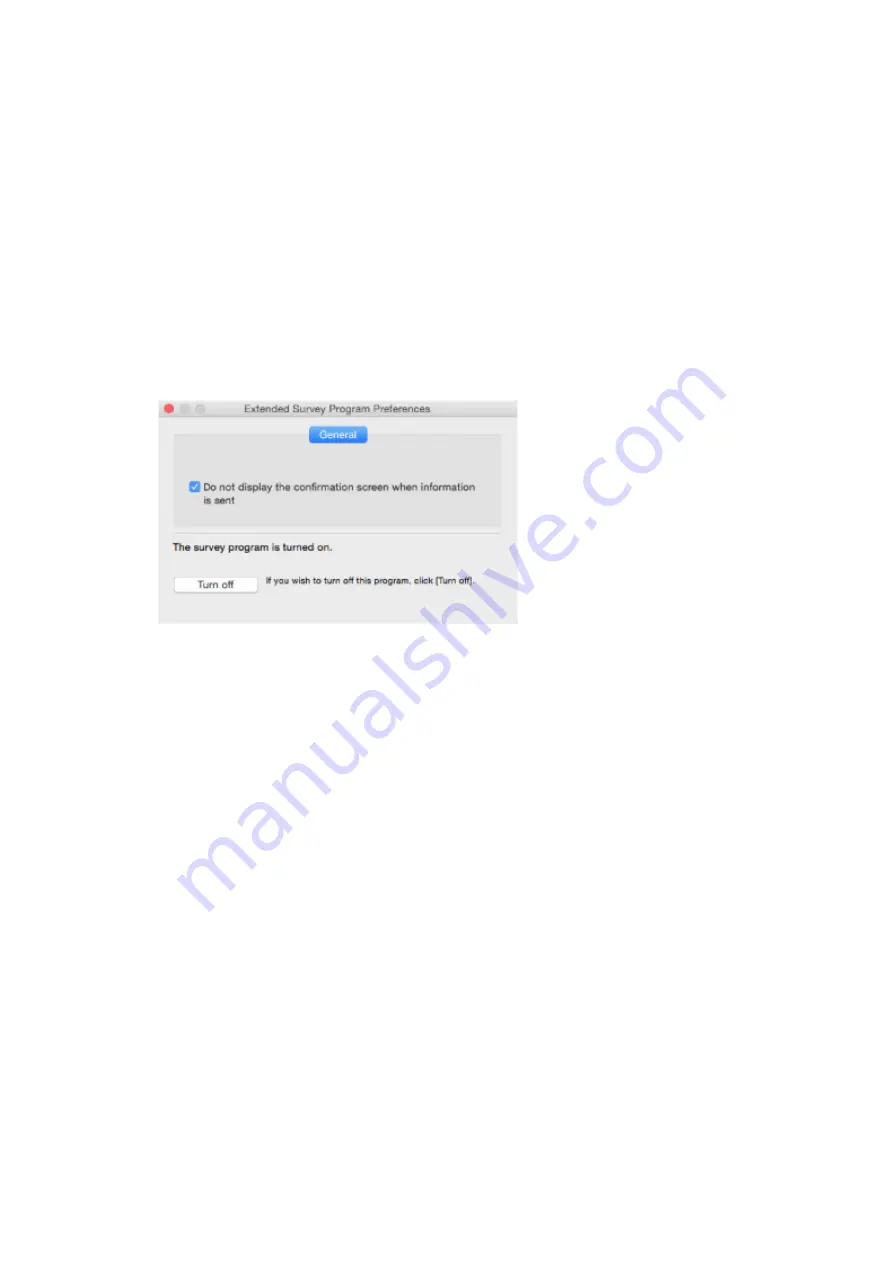
◦
Do not display the confirmation screen when information is sent
:
If the check box is selected, the information will be sent automatically.
If the check box is not selected,
Inkjet Printer/Scanner/Fax Extended Survey Program
icon will appear in the Dock at the time of the next survey. Click the icon and follow the on-
screen instructions.
◦
Turn off
/
Turn on
button:
Click the
Turn off
button to stop the Inkjet Printer/Scanner/Fax Extended Survey Program.
Click the
Turn on
button to restart the Inkjet Printer/Scanner/Fax Extended Survey Program.
520
Summary of Contents for TR7500 Series
Page 56: ...Handling Paper Originals Ink Tanks etc Loading Paper Loading Originals Replacing Ink Tanks 56 ...
Page 83: ...Replacing Ink Tanks Replacing Ink Tanks Checking Ink Status on the Touch Screen Ink Tips 83 ...
Page 113: ...Safety Safety Precautions Regulatory Information WEEE EU EEA 113 ...
Page 136: ...Main Components Front View Rear View Inside View Operation Panel 136 ...
Page 139: ... 19 platen glass Load an original here 139 ...
Page 158: ...The Page Setup tab is displayed again 158 ...
Page 168: ...For more on setting items on the operation panel Setting Items on Operation Panel 168 ...
Page 183: ...Language selection Changes the language for the messages and menus on the touch screen 183 ...
Page 223: ...Note Selecting Scaled changes the printable area of the document 223 ...
Page 241: ...In such cases take the appropriate action as described 241 ...
Page 285: ...Printing Using Operation Panel Printing Templates Such as Lined or Graph Paper 285 ...
Page 305: ...Note To set the applications to integrate with see Settings Dialog Box 305 ...
Page 315: ...ScanGear Scanner Driver Screens Basic Mode Tab Advanced Mode Tab 315 ...
Page 335: ...335 ...
Page 353: ...8 Specify number of time and select OK 9 Select OK The Function list screen is displayed 353 ...
Page 407: ...4 When a confirmation message is displayed click Yes 407 ...
Page 415: ...Receiving Faxes Receiving Faxes Changing Paper Settings Memory Reception 415 ...
Page 425: ...Other Useful Fax Functions Document Stored in Printer s Memory 425 ...
Page 433: ...Installation and Download Problems Errors and Messages If You Cannot Solve a Problem 433 ...
Page 462: ...Other Network Problems Checking Network Information Restoring to Factory Defaults 462 ...
Page 485: ...Scanning Problems Windows Scanning Problems 485 ...
Page 486: ...Scanning Problems Scanner Does Not Work ScanGear Scanner Driver Does Not Start 486 ...
Page 489: ...Faxing Problems Problems Sending Faxes Problems Receiving Faxes Telephone Problems 489 ...
Page 490: ...Problems Sending Faxes Cannot Send a Fax Errors Often Occur When You Send a Fax 490 ...
Page 500: ...Telephone Problems Cannot Dial Telephone Disconnects During a Call 500 ...
Page 512: ...Errors and Messages An Error Occurs Message Support Code Appears 512 ...


