background image

356

ç

 Contents

Registering Other Web Services

You can also add Web services besides CANON iMAGE 

GATEWAY to the camera.

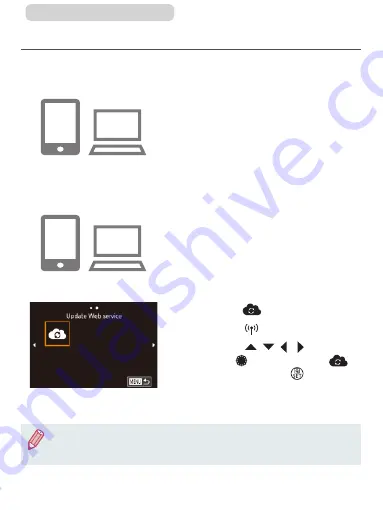
Log in to CANON iMAGE 

GATEWAY and access the 

camera link settings page.


z

From a computer or smartphone, 

access http://www.canon.com/

cig/ to visit CANON iMAGE 

GATEWAY.

Configure the Web service 

you want to use.


z

Follow the instructions displayed 

on the smartphone or computer to 

set up the Web service.

Choose [

].


z

Press the [ ] button.


z

Press the [ ][ ][ ][ ] buttons or 

turn the [ ] dial to choose [

], 

and then press the [ ] button.


z

The Web service settings are now 

updated.


If any configured settings change, follow these steps again to 
update the camera settings.

Summary of Contents for PowerShot G7X Mark II

Page 1: ...Contents return to the Contents Make sure you read this guide including the Safety Precautions 22 section before using the camera Reading this guide will help you learn to use the camera properly Stor...

Page 2: ...ems are included in the package If anything is missing contact your camera retailer Camera Battery Pack NB 13L Battery Charger CB 2LH CB 2LHE Wrist Strap Do not peel off the adhesive covering from a b...

Page 3: ...sold separately can be used regardless of capacity SD memory cards 1 SDHC memory cards 1 2 SDXC memory cards 1 2 1 Cards conforming to SD standards However not all memory cards have been verified to...

Page 4: ...copyright law and note that even for personal use photography may contravene copyright or other legal rights at some performances or exhibitions or in some commercial settings The camera warranty is v...

Page 5: ...button 11 on back Down button 12 on back Control dial 6 on back Shooting modes and on screen icons and text are indicated in brackets Important information you should know Notes and tips for expert ca...

Page 6: ...Playback magnify index 2 Strap mount 3 Lamp 4 Lens 5 Exposure compensation dial 6 Mode dial 7 Shutter button 8 Power button 9 Speaker 10 Flash 11 Control ring 12 Flash pop up switch 13 Step Continuou...

Page 7: ...image erase button 8 Movie button 9 Drive mode Story Highlights button Up button 10 Quick Set menu Set button 11 Flash Right button 12 Information Down button 13 Indicator 14 Macro Manual focus Left b...

Page 8: ...8 Contents z z Turning the control dial is one way to choose setting items switch images and perform other operations Most of these operations are also possible with the buttons...

Page 9: ...e 36 Changing the Date and Time 38 Display Language 39 Trying the Camera Out 41 Shooting Smart Auto 41 Viewing 44 Erasing Images 46 Advanced Guide Camera Basics 47 On Off 48 Power Saving Features Auto...

Page 10: ...utter 89 Continuous Shooting 90 Using Face ID 92 Personal Information 92 Registering Face ID Information 93 Shooting 96 Checking and Editing Registered Information 98 Overwriting and Adding Face Infor...

Page 11: ...Effect Toy Camera Effect 133 Making Subjects Stand Out Background Defocus 134 Shooting with a Soft Focus Effect 135 Shooting in Monochrome Grainy B W 136 Special Modes for Other Purposes 137 Shooting...

Page 12: ...hite Balance Color Temperature 182 Customizing Colors Picture Style 183 Customizing Picture Styles 185 Registering Customized Picture Styles 188 Shooting Range and Focusing 190 Shooting Close Ups Macr...

Page 13: ...to Buttons 237 Customizing the Quick Set Menu 239 Choosing Items to Include in the Menu 239 Rearranging Menu Items 241 Saving Shooting Settings 242 Settings That Can Be Saved 242 Saving Commonly Used...

Page 14: ...85 Tagging Images as Favorites 286 Using the Menu 286 Convenient Control Touch Actions 288 Using Touch Actions Functions 288 Changing Touch Actions Functions 289 Assignable Functions 290 Editing Still...

Page 15: ...Uploading Images to Web Services 357 Printing Images Wirelessly from a Connected Printer 359 Sending Images to Another Camera 362 Image Sending Options 365 Sending Multiple Images 365 Choosing Images...

Page 16: ...h Screen Panel 401 Metric Non Metric Display 402 Checking Certification Logos 402 Setting Copyright Information to Record in Images 403 Deleting All Copyright Information 404 Adjusting Other Settings...

Page 17: ...ubleshooting 445 On Screen Messages 455 On Screen Information 460 Shooting Information Display 460 Battery Level 462 Playback Detailed Information Display 463 Summary of Movie Control Panel 465 Functi...

Page 18: ...Use camera determined settings Auto Mode Hybrid Auto Mode 67 71 Shoot yourself under optimal settings Self Portrait 122 Shooting people well Portraits 116 Matching specific scenes Night Scenes 116 Und...

Page 19: ...fect 133 Background Defocus 134 Soft Focus 135 Monochrome 136 Focus on faces 67 116 198 203 Without using the flash Flash Off 67 Include yourself in the shot Self Timer 86 Movie clips and photos toget...

Page 20: ...Automatic playback Slideshow 271 On a TV 413 On a computer 421 Browse through images quickly 258 Erase images 278 Create an album automatically 312 Record View Movies Record movies 67 152 229 View mov...

Page 21: ...21 Contents Save Save images to a computer 421 Use Wi Fi functions Send images to a smartphone 326 Share images online 351 Send images to a computer 372...

Page 22: ...yesight In particular remain at least 1 meter 3 3 feet away from infants when using the flash Store this equipment out of the reach of children and infants A strap wound around a child s neck may resu...

Page 23: ...light source This may damage your eyesight If your model has an interchangeable lens do not leave the lens or the camera with the lens attached in the sun without the lens cap on This could result in...

Page 24: ...als or plug Do not cut damage alter or place heavy items on the power cord if your product uses one This could result in electrical shock or fire Turn the camera off in places where camera use is proh...

Page 25: ...injury may result from the broken fragments When using the flash be careful not to cover it with your fingers or clothing This could result in burns or damage to the flash Avoid using placing or stor...

Page 26: ...at intense light sources such as the sun on a clear day or an intense artificial light source Doing so may damage the image sensor or other internal components When using the camera on a sandy beach...

Page 27: ...ts Pets biting the battery pack could cause leakage overheating or explosion resulting in product damage or fire If your product uses multiple batteries do not use batteries that have different levels...

Page 28: ...28 Contents Basic information and instructions from initial preparations to shooting and playback Basic Guide Basic Operations...

Page 29: ...ng the screen Touching Touch the screen briefly with your finger z z This gesture is used to shoot configure camera functions and so on Dragging Touch the screen and move your finger across it z z Thi...

Page 30: ...n pull the other end of the strap through the loop on the threaded end 2 z z The strap can also be attached to the left side of the camera Holding the Camera z z Place the strap around your wrist z z...

Page 31: ...ert the battery pack by pushing it in 1 and down 2 2 Charge the battery pack z z CB 2LH Flip out the plug 1 and plug the charger into a power outlet 2 z z CB 2LHE Plug the power cord into the charger...

Page 32: ...y pack see Number of Shots Recording Time Playback Time 524 Charged battery packs gradually lose their charge even when they are not used Charge the battery pack on or immediately before the day of us...

Page 33: ...amera 387 1 Open the cover z z Slide the switch 1 and open the cover 2 2 Insert the battery pack z z Holding the battery pack with the terminals in the position shown 1 hold the battery lock toward 2...

Page 34: ...the label 2 facing as shown until it clicks into place z z Make sure the memory card is facing the right way when you insert it Inserting memory cards facing the wrong way may damage the camera 4 Clos...

Page 35: ...move the battery pack z z Open the cover and press the battery lock in the direction of the arrow z z The battery pack will pop up Remove the memory card z z Push the memory card in until it clicks an...

Page 36: ...is recorded in image properties when you shoot and it is used when you manage images by shooting date or print images showing the date 1 Turn the camera on z z Press the power button z z The Date Time...

Page 37: ...ess you set the date time and home time zone the Date Time screen will be displayed each time you turn the camera on Specify the correct information To set daylight saving time 1 hour ahead choose in...

Page 38: ...ess the button 2 Choose Date Time z z Press the buttons to choose the 2 tab z z Press the buttons or turn the dial to choose Date Time and then press the button 3 Change the date and time z z Follow s...

Page 39: ...rged battery pack even if power to the camera is turned off Once the date time battery is depleted the Date Time screen will be displayed when you turn the camera on Set the correct date and time as d...

Page 40: ...yed The current time is displayed if you wait too long in step 2 after pressing the button before you press the button In this case press the button to dismiss the time display and repeat step 2 You c...

Page 41: ...determine the subject and shooting conditions 1 Turn the camera on z z Press the power button z z The startup screen is displayed 2 Enter mode z z Set the mode dial to z z Aim the camera at the subje...

Page 42: ...e 4 Shoot Shooting Still Images 1 Focus z z Press the shutter button lightly halfway down The camera beeps twice after focusing and frames are displayed to indicate image areas in focus z z If Raise t...

Page 43: ...mera will revert to the shooting screen Recording Movies 1 Start recording z z Press the movie button The camera beeps once as recording begins and Rec is displayed with the elapsed time 1 z z Black b...

Page 44: ...r movies you can view them on the screen as follows 1 Enter Playback mode z z Press the button z z Your last shot is displayed 2 Choose images z z To view the previous image press the button or turn t...

Page 45: ...o to step 3 3 Play movies z z Press the button press the buttons to choose and then press the button again z z Playback now begins and after the movie is finished is displayed z z To adjust the volume...

Page 46: ...2 Erase the image z z Press the button z z After Erase is displayed press the buttons or turn the dial to choose Erase and then press the button z z The current image is now erased z z To cancel erasu...

Page 47: ...47 Contents Advanced Guide Camera Basics Other basic operations and more ways to enjoy your camera including shooting and playback options...

Page 48: ...gain Playback Mode z z Press the button to turn the camera on and view your shots z z To turn the camera off press the button again To switch to Playback mode from Shooting mode press the button The l...

Page 49: ...o more minutes the lens is retracted and the camera turns itself off To activate the screen and prepare for shooting when the screen is off but the lens is still out press the shutter button halfway 5...

Page 50: ...The camera beeps twice and frames are displayed around image areas in focus 2 Press all the way down From the halfway position press fully to shoot z z The camera shoots as a shutter sound is played z...

Page 51: ...ed settings 41 67 71 2 Special Scene Mode Shoot with settings designed for specific scenes or add a variety of effects 116 3 Movie Mode For shooting movies 152 229 You can also shoot movies when the m...

Page 52: ...l the top of the screen down toward you z z The screen can be tilted downward approximately 45 Tilting the Screen Upward z z The screen can be tilted upward approximately 180 z z When including yourse...

Page 53: ...en the camera is not in use keep the screen closed Do not force the screen open too far which may damage the camera To cancel reverse display press the button choose Reverse Display on the 1 tab and t...

Page 54: ...235 Screen brightness is automatically increased by the night view function when you are shooting under low light making it easier to check how shots are composed However on screen image brightness m...

Page 55: ...menu z z Press the button 2 Choose a menu item z z Press the buttons to choose a menu item 1 z z Available options 2 are shown at the bottom of the screen 3 Choose an option z z Press the buttons or t...

Page 56: ...ges you can restore the camera s default settings 404 You can also exit by choosing in the menu items and pressing the button Using Touch Screen Operations to Configure Settings z z Touch in the upper...

Page 57: ...57 Contents z z You can access the screen for items labeled with a icon by touching z z You can access the screen for items labeled with a icon by touching...

Page 58: ...ng playback or settings or pages within each function 2 Tabs are identified in this manual by combining the function and page as in 1 z z Move the zoom lever to choose the function tab and then press...

Page 59: ...4 Choose an option z z When options are listed vertically press the buttons or turn the dial to choose an option z z When options are listed horizontally press the buttons or turn the dial to choose a...

Page 60: ...60 Contents To undo any accidental setting changes you can restore the camera s default settings 404 Available menu items vary depending on the selected shooting or playback mode 484 517...

Page 61: ...t touch the menu item to access the setting screen On the setting screen either drag or touch to choose the item and then touch to choose the option To return to the previous screen touch You can also...

Page 62: ...hat the length and type of information you can enter varies depending on the function you are using Entering Characters z z Touch the characters to enter them z z The amount of information you can ent...

Page 63: ...or press the button z z Touching and holding will delete five characters at a time Confirming Input and Returning to the Previous Screen z z Press the button For some functions is not displayed and c...

Page 64: ...tarting up recording reading transmitting images shooting long exposures 219 223 connected to a computer 421 connecting transmitting via Wi Fi or display off 49 392 393 Orange On Charging via USB When...

Page 65: ...the camera vertically while using the clock function it will switch to vertical display z z Press the buttons or turn the dial or turn the ring to change the display color z z Press the button again t...

Page 66: ...66 Contents Auto Mode Hybrid Auto Mode Convenient mode for easy shots with greater control over shooting...

Page 67: ...ovies 1 Turn the camera on z z Press the power button z z The startup screen is displayed 2 Enter mode z z Set the mode dial to z z Aim the camera at the subject The camera will make a slight clicking...

Page 68: ...it toward wide angle A zoom bar 1 showing the zoom position is displayed along with the range of focus 2 4 Shoot Shooting Still Images 1 Focus z z Press the shutter button halfway The camera beeps twi...

Page 69: ...wn with your finger into the camera 2 Shoot z z Press the shutter button all the way down z z As the camera shoots a shutter sound is played and in low light conditions when you have raised the flash...

Page 70: ...eas not recorded z z Frames displayed around any detected faces indicate that they are in focus z z Once recording begins take your finger off the movie button 2 Resize the subject and recompose the s...

Page 71: ...st by shooting still images The camera records 2 4 second clips of scenes before each shot which are later combined in a digest movie Clips recorded in this mode may be included in Story Highlights al...

Page 72: ...shutter sound forms a single chapter in the digest movie Battery life is shorter in this mode than in mode because digest movies are recorded for each shot A digest movie may not be recorded if you sh...

Page 73: ...r the total recording time reaches approximately 16 minutes and 40 seconds The digest movie is protected 272 Daylight saving time 36 or time zone 395 settings are changed A new folder is created 386 R...

Page 74: ...era only beeps once when you press the shutter button halfway For details on the range of focus shooting range see Shooting Range 525 To reduce red eye and to assist in focusing the lamp may be lit wh...

Page 75: ...ay cause the recording to sound muffled Avoid touching camera controls other than the movie button when recording movies because sounds made by the camera will be recorded Once movie recording begins...

Page 76: ...Dark 1 Sunsets Spotlights People 2 3 Moving People 3 3 Shadows on Face 2 Smiling 3 3 Sleeping 2 3 Babies 3 3 Smiling Babies 3 3 Sleeping Babies 2 3 Moving Children 3 3 Other Subjects 2 3 Other Moving...

Page 77: ...are not displayed for smiling or sleeping subjects and moving children in drive modes other than 78 90 Backlit icons are not displayed for moving children and smiling people when the flash is set to...

Page 78: ...re captured and the camera analyzes details such as facial expressions to save the image determined to be the best Sleeping including Babies Beautiful shots of sleeping faces created by combining cons...

Page 79: ...so applied Image stabilization for movies reducing strong camera shake as when recording while walking Dynamic Image stabilization for slow camera shake such as when recording movies at telephoto Powe...

Page 80: ...ayed around the subject or person s face determined by the camera to be the main subject and gray frames are displayed around other detected faces Frames follow moving subjects within a certain range...

Page 81: ...on the background or similar areas In these cases it is recommended that you shoot in mode 163 To choose subjects to focus on touch the desired subject on the screen is displayed and the camera enter...

Page 82: ...zoom use digital zoom for up to about 17x enlargement 1 Move the zoom lever toward z z Hold the lever until zooming stops z z Zooming stops at the largest zoom factor before the image becomes noticea...

Page 83: ...the image will appear grainy Because the blue range will not be available at some recording pixel settings 213 the maximum zoom factor can be achieved by following step 1 To deactivate digital zoom c...

Page 84: ...nterclockwise However you can set the focal length to 100 mm by turning it clockwise Changing the Way the Control of the Camera Feels with the Step Continuous Selection Lever You can change how the co...

Page 85: ...f the subject or zoom in or out faster than would be possible with the zoom lever 1 Configure the setting z z Press the button z z Press the or buttons or turn the ring or the dial to choose z z Press...

Page 86: ...tter button 1 Configure the setting z z Press the button choose in the menu and then choose 55 z z Once the setting is complete is displayed 2 Shoot z z For Still Images Press the shutter button halfw...

Page 87: ...To restore the original setting choose in step 1 Using the Self Timer to Avoid Camera Shake Still Images Movies This option delays shutter release until about two seconds after you have pressed the s...

Page 88: ...figure the setting z z Press the buttons to choose the delay time or number of shots z z Press the buttons or turn the dial to choose a value and then press the button twice z z Once the setting is co...

Page 89: ...specified two seconds before the shot the lamp blinking and self timer sound will speed up The lamp will remain lit in case the flash fires Shooting by Touching the Screen Touch Shutter Still Images...

Page 90: ...he shot is displayed you can prepare for the next shot by touching Continuous Shooting Still Images Movies In mode hold the shutter button all the way down to shoot continuously For details on the con...

Page 91: ...used with the self timer 86 Shooting may stop momentarily or continuous shooting may slow down depending on shooting conditions camera settings and the zoom position As more shots are taken shooting m...

Page 92: ...n advance so that images can be selected easily for Story Highlights 312 albums Personal Information Information such as images of a face face info registered with Face ID and personal information nam...

Page 93: ...ose Face ID Settings on the 2 tab and then press the button 58 z z Press the buttons or turn the dial to choose Add to Registry and then press the button z z Press the buttons or turn the dial to choo...

Page 94: ...the buttons or turn the dial to choose OK and then press the button z z The Edit Profile screen is displayed 3 Register the person s name and birthday z z Press the button to access the keyboard and...

Page 95: ...more points of face information expressions or angles repeat step 2 z z Registered faces are more easily recognized if you add a variety of face information In addition to a head on angle add a slight...

Page 96: ...point the camera toward people the names of up to 3 registered people will be displayed when they are detected z z Shoot z z Displayed names will be recorded in still images The names of detected peo...

Page 97: ...me recorded in the image during playback 266 Because faces of babies and children change quickly as they grow you should update their face info regularly 93 Names will still be recorded in images even...

Page 98: ...heir information z z Press the buttons to choose the person whose information you want to check or edit and then press the button 3 Check or edit the information as needed z z To check a name or birth...

Page 99: ...the screen displayed choose face information to erase by pressing the buttons or turning the dial and then press the button Erase is displayed To erase face information press the buttons or turn the...

Page 100: ...the Add Face Info screen z z Following step 1 in Registering Face ID Information 93 choose Add Face Info 2 Choose a person to overwrite their face info z z Press the buttons to choose the name of the...

Page 101: ...if you add a variety of face information In addition to a head on angle add a slight side angle a shot when smiling and shots inside and outside You cannot add face information if all 5 information sl...

Page 102: ...on 93 and choose Erase Info 2 Choose a person to erase their information z z Press the buttons to choose the name of the person to erase and then press the button z z After Erase is displayed press th...

Page 103: ...he screen aspect ratio will be updated z z To restore the original setting repeat this process but choose Used for display on widescreen HDTVs or similar display devices Native aspect ratio of the cam...

Page 104: ...fit on a memory card see Number of Shots per Memory Card 526 z z Press the button choose in the menu and choose the desired option 55 z z The option you configured is now displayed z z To restore the...

Page 105: ...e rate indicates how many frames are recorded per second which is determined automatically based on the NTSC or PAL setting 390 For guidelines on the total recording time for movies at each level of i...

Page 106: ...x 1080 29 97 fps 1920 x 1080 23 98 fps 1280 x 720 29 97 fps For shooting in HD 640 x 480 29 97 fps For shooting in standard definition For PAL Video Image Quality Number of Recording Pixels Frame Rat...

Page 107: ...lack bars displayed on the left and right in and modes and on the top and bottom in and modes They indicate that this image area cannot be recorded You can also configure this setting by choosing MENU...

Page 108: ...ne to ensure the camera is level from front to back and left to right 1 Display the electronic level z z Press the button several times to display the electronic level 2 Straighten the camera z z 1 in...

Page 109: ...o match the camera orientation Calibrate the electronic level if it seems ineffective in helping you level the camera 390 Not available in mode Deactivating Auto Level Still Images Movies Normally aut...

Page 110: ...s the setting screen z z Press the button choose IS Settings on the 4 tab and then press the button 58 2 Configure the setting z z Press the buttons or turn the dial to choose IS Mode press the button...

Page 111: ...ize shown before shooting you can reduce image stabilization and cancel Auto Level z z Set Auto level to Disable as described in Deactivating Auto Level 109 z z Follow step 1 in Deactivating Image Sta...

Page 112: ...Menu Screen 58 Preventing the AF Assist Beam from Firing Still Images Movies You can deactivate the lamp that normally lights up to help you focus when you press the shutter button halfway in low lig...

Page 113: ...p that lights up to reduce red eye when the flash is used in low light shots 1 Access the Flash Settings screen z z Press the button choose Flash Settings on the 5 tab and then press the button 2 Conf...

Page 114: ...restore the original setting repeat this process but choose 2 sec 2 sec 4 sec 8 sec Displays images for the specified time Even while the shot is displayed you can take another shot by pressing the s...

Page 115: ...115 Contents Other Shooting Modes Shoot more effectively in various scenes and take shots enhanced with unique image effects or captured using special functions...

Page 116: ...automatically configure the settings for optimal shots 1 Enter mode z z Set the mode dial to 2 Choose a shooting mode z z Press the button choose in the menu and then choose a shooting mode 55 3 Shoot...

Page 117: ...autiful shots of evening scenes or portraits with evening scenery in the background without the need to hold the camera very still as with a tripod z z A single image is created by combining consecuti...

Page 118: ...s may look grainy because the ISO speed 169 is increased to suit the shooting conditions Because the camera will shoot continuously in mode hold it steady while shooting In mode excessive motion blur...

Page 119: ...focus is still determined Using Functions for Underwater Shots Shooting with an Underwater Focus Range Still Images Movies If focusing is difficult in mode 116 with a focus range of using a focus ran...

Page 120: ...ual Focus Focus on subjects manually 191 Refer to Shooting Range 525 for details on the range of each focus range In mode optical zoom is set to maximum wide angle In mode use of digital zoom may caus...

Page 121: ...s 1 2 in Specific Scenes 116 and choose 2 Choose white balance z z Press the button and then choose in the menu 3 Adjust the setting z z Turn the ring to adjust the correction level for B and A and th...

Page 122: ...or self portraits customizable image processing includes skin smoothing as well as brightness and background adjustment to make yourself stand out 1 Choose z z Follow steps 1 2 in Specific Scenes 116...

Page 123: ...mized for the main subject s face To use Touch Shutter choose Areas other than people s skin may be modified depending on the shooting conditions Try taking some test shots first to make sure you obta...

Page 124: ...ject 1 Choose z z Follow steps 1 2 in Specific Scenes 116 and choose 2 Shoot z z Before shooting with the shutter button pressed halfway move the camera so that it follows the subject z z With the mov...

Page 125: ...ies Three consecutive images are captured at different brightness levels each time you shoot and the camera combines image areas with optimal brightness to create a single image This mode can reduce t...

Page 126: ...ans to secure the camera 110 Any subject movement will cause images to look blurry There will be a delay before you can shoot again as the camera processes and combines the images may be displayed whe...

Page 127: ...Art Embossed Images resemble old photos with bold edges and dark ambiance Shooting with a Fish Eye Lens Effect Fish Eye Effect Still Images Movies Shoot with the distorting effect of a fish eye lens 1...

Page 128: ...s Art Bold Effect Still Images Movies Make subjects look more substantial like subjects in oil paintings 1 Choose z z Follow steps 1 2 in Specific Scenes 116 and choose 2 Choose an effect level z z Tu...

Page 129: ...ovies Soften colors for photos resembling watercolor paintings 1 Choose z z Follow steps 1 2 in Specific Scenes 116 and choose 2 Choose an effect level z z Turn the ring to choose an effect level z z...

Page 130: ...e models by choosing the playback speed before the movie is recorded People and objects in the scene will move quickly during playback Note that sound is not recorded 1 Choose z z Follow steps 1 2 in...

Page 131: ...turn to the shooting screen and then shoot Playback Speed and Estimated Playback Time for One Minute Clips Speed Playback Time Approx 12 sec Approx 6 sec Approx 3 sec Movies are played back at 30 fps...

Page 132: ...t is in horizontal orientation press the buttons and to move the frame when it is in vertical orientation press the buttons Holding the camera vertically will change the orientation of the frame Movie...

Page 133: ...ose z z Follow steps 1 2 in Specific Scenes 116 and choose 2 Choose a color tone z z Turn the ring to choose a color tone z z A preview is shown of how your shot will look with the effect applied 3 Sh...

Page 134: ...efocused through lens effects and subject and scene based image processing 1 Choose z z Follow steps 1 2 in Specific Scenes 116 and choose 2 Shoot z z Hold the camera steady as you shoot Two consecuti...

Page 135: ...h a Soft Focus Effect Still Images Movies This function allows you to shoot images as if a soft focus filter were attached to the camera You can adjust the effect level as desired 1 Choose z z Follow...

Page 136: ...Take monochrome pictures with a gritty rough feeling 1 Choose z z Follow steps 1 2 in Specific Scenes 116 and choose 2 Choose an effect level z z Turn the ring to choose an effect level z z A preview...

Page 137: ...ts twice without flash The three images are combined into a single image and processed to make the stars more prominent For details on the flash range see Camera 520 1 Choose z z Follow steps 1 2 in S...

Page 138: ...amera takes the first shot z z The second and third shots are now taken without firing the flash 5 Have the person stay still until the lamp blinks z z The person you are shooting should stay still un...

Page 139: ...y changing the exposure compensation 165 However images may not look as expected under some shooting conditions and the person should stay still in steps 4 5 which may take up to about 15 seconds To c...

Page 140: ...anced making starry skies look beautiful 1 Choose z z Follow steps 1 2 in Specific Scenes 116 and choose and then press the button z z Press the buttons or turn the dial to choose and then press the b...

Page 141: ...isable starlight processing select Off Try switching to manual focus mode 150 191 to more accurately specify the focal position before shooting Shooting Star Trails Star Trails Still Images Movies Str...

Page 142: ...Press the shutter button all the way down Busy is displayed briefly and then shooting begins z z Do not disturb the camera while shooting z z To cancel shooting press the shutter button all the way d...

Page 143: ...combines images shot at a specified interval you can create movies with fast moving stars You can adjust the shooting interval and recording duration as needed Note that each session takes a long tim...

Page 144: ...the camera on a tripod or take other measures to keep it still 4 Check the brightness z z Press the shutter button all the way down to shoot a single still image z z Switch to Playback mode 246 and c...

Page 145: ...ins and the indicator on the back of the camera blinks z z Do not disturb the camera while shooting z z To cancel shooting press the movie button again Note that cancellation may take up to about 30 s...

Page 146: ...as star trails Shot Interval 15 sec 30 sec 1 min Choose the interval between each shot Frame Rate NTSC PAL Choose the movie frame rate Shooting Time 60 min 90 min 120 min Unlimited Choose the length o...

Page 147: ...ec 16 sec 15 sec 8 sec 30 sec 8 sec 30 sec 4 sec 1 min 4 sec 1 min 2 sec There will be a delay before you can shoot again as the camera processes the images If the camera runs out of battery power or...

Page 148: ...ful when erasing images Grouped images can be played back individually 264 and ungrouped 264 Protecting 272 a grouped image will protect all images in the group Grouped images can be viewed individual...

Page 149: ...ing z z Turn the ring or press the buttons to adjust the correction level for B and A and then press the button z z Once the setting is complete is displayed B represents blue and A represents amber S...

Page 150: ...ose 140 141 or 143 2 Secure the camera z z Mount the camera on a tripod or take other measures to keep it still 3 Frame the stars to capture z z Press the button choose either press the buttons or tur...

Page 151: ...Do not move the camera until Adjustment completed is displayed z z Press the button 5 Shoot 140 141 143 The focus may not be adjusted under the following conditions In this case try again from step 3...

Page 152: ...e 55 z z Black bars are displayed on the top and bottom edges of the screen and the subject is slightly enlarged The black bars indicate image areas not recorded 2 Configure the settings to suit the m...

Page 153: ...Brightness before recording Still Images Movies You can lock the exposure before or during recording or adjust it in 1 3 stop increments within a range of 3 to 3 stops 1 Lock the exposure z z Touch t...

Page 154: ...if movement in movies is rough However under low light movies may look dark z z Press the button choose Auto slow shutter on the 8 tab and then choose A SLOW OFF 58 z z To restore the original settin...

Page 155: ...The portion of images displayed changes more than for Standard and subjects are further enlarged z z Follow the steps in Recording Movies with Subjects at the Same Size Shown before Shooting 111 to c...

Page 156: ...this case you can deactivate the wind filter z z Press the button choose Wind Filter on the 8 tab and then press the button 58 z z Choose Off 58 Using the Attenuator The attenuator can reduce audio di...

Page 157: ...z z Set the mode dial to z z Press the button choose in the menu and then choose 55 z z Black bars displayed on the top and bottom edges of the screen They indicate that this image area cannot be rec...

Page 158: ...d During recording a mark indicating the last two seconds is added to the bar showing the elapsed time Shooting Time Lapse Movies Time Lapse Movie Still Images Movies By recording a time lapse movie t...

Page 159: ...n item either press the buttons or turn the dial choose the desired option and then press the button 3 Secure the camera z z Mount the camera on a tripod or take other measures to keep it still 4 Shoo...

Page 160: ...or change the exposure for each shot Review image Play the movie immediately after it is shot for a maximum of 2 seconds Item Details Time required Time required for shooting The time varies dependin...

Page 161: ...is determined for the first shot The movie quality is and cannot be changed The frame rate of time lapse movies varies depending on the video system 390 setting and cannot be changed for NTSC and for...

Page 162: ...se z z Set the mode dial to z z Press the button choose in the menu and then choose 55 z z Black bars displayed on the top and bottom edges of the screen They indicate that this image area cannot be r...

Page 163: ...ferred shooting style Instructions in this chapter apply to the camera with the mode dial set to mode Program AE AE Auto Exposure Before using a function introduced in this chapter in modes other than...

Page 164: ...ot If the optimum exposure cannot be obtained when you press the shutter button halfway the shutter speed and aperture value are displayed in orange In this case try adjusting the ISO speed 169 or act...

Page 165: ...pensation dial to adjust brightness Deactivating Expo Simulation Images are displayed on the screen at a brightness similar to the image that will be shot Therefore the screen brightness changes accor...

Page 166: ...With the shutter button pressed halfway press the button z z is displayed and the exposure is locked z z To unlock the exposure hold the shutter button halfway down and press the button again is no lo...

Page 167: ...d is now displayed Evaluative metering For typical shooting conditions including backlit shots Automatically adjusts exposure to match the shooting conditions Spot metering Metering restricted to with...

Page 168: ...z z Follow the steps in Changing the Metering Method 167 to choose 2 Configure the setting z z Press the button choose Spot AE Point on the 6 tab and then choose AF Point 58 z z The Spot AE Point fra...

Page 169: ...tion you configured is now displayed To view the automatically determined ISO speed when you have set the ISO speed to AUTO press the shutter button halfway Although choosing a lower ISO speed may red...

Page 170: ...ange of 400 12800 and sensitivity can be specified in a range of three levels 1 Access the setting screen z z Press the button choose ISO speed on the 5 tab and then press the button 58 z z Choose ISO...

Page 171: ...6 tab and then choose the desired option 58 Auto Exposure Bracketing AEB Shooting Still Images Movies Three consecutive images are captured at different exposure levels standard exposure underexposur...

Page 172: ...us shooting 90 is not available in this mode If exposure compensation is already in use 165 the value specified for that function is treated as the standard exposure level for this function You can al...

Page 173: ...you to reduce the shutter speed and aperture value z z Press the button choose in the menu and choose the desired option 55 z z The option you configured is now displayed If you chose mount the camer...

Page 174: ...se under some shooting conditions When the effect of the Auto Lighting Optimizer is too strong and images become too bright set it to Low or Disable Images may still be bright or the effect of exposur...

Page 175: ...Improve gradation in bright image areas to avoid loss of detail in subject highlights z z Press the button choose Highlight tone priority on the 5 tab and then choose D 58 With D ISO speeds of 250 or...

Page 176: ...e Balance Still Images Movies By adjusting white balance WB you can make image colors look more natural for the scene you are shooting z z Press the button choose in the menu and choose the desired op...

Page 177: ...For shooting in cloudy weather or at twilight Tungsten light For shooting under ordinary incandescent lighting White fluorescent light For shooting under white fluorescent lighting Flash For shooting...

Page 178: ...a white object z z Aim the camera at a sheet of paper or other plain white subject so that white fills the screen z z Focus manually and shoot 191 2 Choose Custom WB z z Choose Custom WB on the 6 tab...

Page 179: ...l to choose a different image Choose OK to use that image for loading white data but note that it may not produce a suitable white balance If Unselectable image is displayed in step 3 choose OK to cle...

Page 180: ...lors White Balance 176 to choose z z Turn the ring to adjust the correction level for B and A 2 Configure advanced settings z z To configure more advanced settings press the button and adjust the corr...

Page 181: ...ne level of blue amber correction is equivalent to about 5 mireds on a color temperature conversion filter Mired Color temperature unit representing color temperature conversion filter density You can...

Page 182: ...w the procedure in Capturing Natural Colors White Balance 176 to choose z z Press the button and then adjust the setting by pressing the buttons or turning the dial You can also configure the white ba...

Page 183: ...omatically adjusts colors to suit the shooting conditions Makes pictures of blue skies greenery and sunset colors more vivid in scenes of nature outdoor and sunsets Standard Makes pictures more vivid...

Page 184: ...ter Faithfully reproduces the actual colors of subjects as measured under daylight with a color temperature of 5200 K Makes pictures have a toned down color with a subdued appearance Monochrome Create...

Page 185: ...w much difference in contrast between edges and surrounding areas there should be to enhance edges To enhance edges with smaller contrast difference set a lower value Note that if you set a lower valu...

Page 186: ...Blue skies look slightly darker Glow of sunsets is emphasized R Blue skies look much darker Colored leaves look clearly brighter G Skin tones and lips of people look muted Green leaves of trees look...

Page 187: ...Picture Style z z Press the button 2 Configure the setting z z Press the buttons to configure the level of effect and then choose an option either by pressing the buttons or turning the dial z z To r...

Page 188: ...Picture Style z z Follow the procedure in Customizing Colors Picture Style 183 to choose or z z Press the button 2 Choose a preset Picture Style z z Press the buttons or turn the dial to choose a pre...

Page 189: ...s You can register the Picture Style with the camera using the software CameraWindow 420 For registering to the camera refer to CameraWindow Help You can also choose a preset Picture Style by touching...

Page 190: ...ooting Range 525 z z Press the button choose either press the buttons or turn the dial and then press the button z z Once the setting is complete is displayed If the flash fires vignetting may occur T...

Page 191: ...on the range of focus see Shooting Range 525 1 Choose z z Press the button choose either press the buttons or turn the dial and then press the button z z and the MF indicator are displayed 2 Specify t...

Page 192: ...cannot be changed Focusing is possible when using the digital zoom 82 or digital tele converter 195 or when using a TV as a display 413 but the magnified display will not appear To focus more accurat...

Page 193: ...can adjust the colors and the sensitivity level of edge detection as needed 1 Access the setting screen z z Press the button choose MF Peaking Settings on the 4 tab choose Peaking and then choose On 5...

Page 194: ...set in three levels 1 Choose z z Press the button choose Bracketing on the 5 tab and then choose 58 2 Configure the setting z z Press the button and then adjust the setting by pressing the buttons or...

Page 195: ...tter speed is faster than it would be if you zoomed including using digital zoom in to the same zoom factor z z Press the button choose Digital Zoom on the 3 tab and then choose the desired option 58...

Page 196: ...AF frame Effective for reliable focusing You can also move the frame by touching the screen 205 A yellow AF frame is displayed with if the camera cannot focus when you press the shutter button halfway...

Page 197: ...F z z Turn the dial to move the AF frame and press the buttons to fine tune the position z z To return the AF frame to the original position in the center press the button 2 Resize the AF frame z z To...

Page 198: ...exposure evaluative metering only and white balance only After you aim the camera at the subject a white frame is displayed around the person s face determined by the camera to be the main subject and...

Page 199: ...ng If no faces are detected in Servo AF 200 mode the AF frame is displayed in the center of the screen when you press the shutter button halfway Examples of faces that cannot be detected Subjects that...

Page 200: ...displayed while you are pressing the shutter button halfway Focusing may not be possible in some shooting conditions In low light conditions Servo AF may not be activated AF frames may not turn blue...

Page 201: ...a operation of constantly focusing on subjects it is aimed at even when the shutter button is not pressed Instead you can limit camera focusing to the moment you press the shutter button halfway z z P...

Page 202: ...he shutter button halfway to focus on the subject and continue holding the button halfway down 3 Fine tune the focus z z Referring to the on screen MF indicator which shows the distance and focal posi...

Page 203: ...person s face to focus on 1 Set the AF method to Tracking 196 2 Assign to the button or the movie button 237 3 Enter Face Select mode z z Aim the camera at the person s face and press the button or th...

Page 204: ...s Face Select Off is displayed followed by the selected AF method screen 5 Shoot z z Press the shutter button halfway After the camera focuses changes to z z Press the shutter button all the way down...

Page 205: ...Choose a person s face or another subject to focus on z z Touch the subject or person on the screen z z When the subject is detected the camera beeps and is displayed Focus is maintained even if the s...

Page 206: ...ve too rapidly or when there is inadequate contrast between subjects and the background Even if you are shooting in mode 190 the camera will revert to mode if you touch the screen to specify where to...

Page 207: ...us z z With the shutter button pressed halfway press the button z z The focus is now locked and and the MF indicator are displayed z z To unlock the focus hold the shutter button halfway down and pres...

Page 208: ...utton choose a flash mode either press the buttons or turn the dial and then press the button z z The option you configured is now displayed The setting screen cannot be accessed by pressing the butto...

Page 209: ...eep it still and prevent camera shake Additionally you should set IS Mode to Off when using a tripod or other means to secure the camera 110 In mode even after the flash fires ensure that the main sub...

Page 210: ...atically adjusts the shutter speed or aperture value for flash shots to reduce washed out highlights and shoot at optimal exposure However you can deactivate automatic adjustment of the shutter speed...

Page 211: ...ject to shoot with the exposure locked With the shutter button pressed halfway press the button z z The flash fires and when is displayed the flash output level is retained z z To unlock FE press the...

Page 212: ...cess the setting screen z z Press the button choose Flash Settings on the 5 tab and then press the button 58 2 Configure the setting z z Choose Shutter Sync and then choose the desired option 58 1st c...

Page 213: ...ss the button choose in the menu and choose the desired option 55 z z The option you configured is now displayed z z To restore the original setting repeat this process but choose and indicate differe...

Page 214: ...duce file size However the compression process is irreversible and images cannot be restored to their original unprocessed state Image processing may also cause some loss of image quality RAW Images R...

Page 215: ...ng follow the same steps and remove the mark next to RAW When transferring RAW images or RAW and JPEG images recorded together to a computer always use the dedicated software 420 Digital zoom 82 is no...

Page 216: ...e time turn the ring and choose under RAW Note that only JPEG images are captured when is selected z z Press the buttons or turn the dial to choose JPEG and then choose the image size and quality Note...

Page 217: ...Contents Changing the IS Mode Settings Still Images Movies You can keep image stabilization off until the moment you shoot z z Follow the steps in Deactivating Image Stabilization 110 to choose Shoot...

Page 218: ...218 Contents Tv Av M and C Mode Take smarter more sophisticated shots and customize the camera for your shooting style Instructions in this chapter apply to the camera as set to the respective mode...

Page 219: ...The camera automatically adjusts the aperture value to suit your shutter speed For details on available shutter speeds see Camera 520 1 Enter mode z z Set the mode dial to 2 Set the shutter speed z z...

Page 220: ...eeds on a tripod you should set IS Mode to Off 110 Orange display of the aperture value when you press the shutter button halfway indicates that the optimum exposure has not been obtained Adjust the s...

Page 221: ...ue For details on available aperture values see Camera 520 1 Enter mode z z Set the mode dial to 2 Set the aperture value z z Turn the ring to set the aperture value Orange display of the shutter spee...

Page 222: ...hift on the 6 tab to On 58 to have the camera automatically adjust the shutter speed and aperture value when there are exposure problems so that you can shoot at the optimum exposure However safety sh...

Page 223: ...values see Camera 520 1 Enter mode z z Set the mode dial to 2 Configure the setting z z Turn the dial to set the shutter speed 1 z z Turn the ring to set the aperture value 2 z z When the ISO speed is...

Page 224: ...3200 1 1 2000 AUTO 125 12800 After you set the shutter speed and aperture value the exposure level may change if you adjust the zoom or recompose the shot Screen brightness may change depending on you...

Page 225: ...posure is based on the specified metering method 167 The following operations are available when ISO speed is set to AUTO Adjust exposure by turning the exposure compensation dial Touch to lock the IS...

Page 226: ...ed exposure time is displayed during exposure Maximum continuous shooting time with this feature is 4 min 16 sec Mount the camera on a tripod or take other measures to keep it still and prevent camera...

Page 227: ...hen press the button 2 Configure the setting z z Raise the flash press the button and immediately turn the ring to choose the flash output level and then press the button z z Once the setting is compl...

Page 228: ...228 Contents You can also access the Flash Settings screen 58 by pressing the button and touching...

Page 229: ...0 For details on available aperture values and ISO speeds see Aperture 522 and Changing the ISO Speed 169 1 Enter mode z z Set the mode dial to z z Press the button choose in the menu and then choose...

Page 230: ...d on your specified value is shown on the exposure level indicator for comparison to the standard exposure level The exposure level mark is shown as or when the difference from standard exposure excee...

Page 231: ...manual camera 1 Choose a function to assign to the ring z z Press the button z z Choose an option either by pressing the or buttons or by turning the ring or dial z z Press the button to complete the...

Page 232: ...ode Av Tv Step Zoom ISO ISO ISO Av Tv Focus manually 191 Correct white balance 180 Perform step zoom 83 Perform seamless zoom 85 Configure the effect of the Auto Lighting Optimizer 174 Adjust the aspe...

Page 233: ...ng or step zoom or seamless zoom can be assigned with the ring 83 When in or mode aperture value or shutter speed can be assigned Assigning Functions to the Control Ring Still Images Movies Assign fun...

Page 234: ...gn to the control ring 1 z z Functions you can assign to the control dial will be updated automatically z z Press the button to return to the shooting screen On the setting screen you can also configu...

Page 235: ...information display and then press the button 58 2 Configure the setting z z Press the buttons or turn the dial to choose any screen you prefer not to display and then press the button to remove the...

Page 236: ...Custom display 2 and then press the button z z Press the buttons or turn the dial to choose information to display and then press the button to add a mark z z To see an example of display press the b...

Page 237: ...on 1 Access the setting screen z z Press the button choose Set button or Set button on the 2 tab and then press the button 58 2 Configure the setting z z Press the buttons or turn the dial to choose a...

Page 238: ...f the button that it is assigned to adjusts and locks the focus and is displayed on the screen With pressing the button that it is assigned to deactivates screen display To restore the display do any...

Page 239: ...on choose Quick setting menu layout on the 2 tab and then press the button 58 2 Choose icons to include in the menu z z Press the buttons or turn the ring or the dial to choose an icon and then press...

Page 240: ...e buttons or turn the ring or the dial and then press the button Up to 11 items can be displayed in the menu The screen in step 2 can also be accessed by holding down the button when the Quick Set men...

Page 241: ...ttons or turn the ring or the dial to choose the icon to replace and then press the button z z Press the buttons or turn the ring or the dial to choose the new position and then press the button 2 Con...

Page 242: ...ch shooting modes or turn the camera off such as self timer settings can be retained this way Settings That Can Be Saved Shooting modes and Items set in and modes 165 223 Shooting menu settings Zoom p...

Page 243: ...hooting modes To clear information you have saved to and restore default values turn the mode dial to and choose Reset All 404 Saving Commonly Used Shooting Menu Items My Menu Still Images Movies You...

Page 244: ...on to save it z z is displayed z z To cancel saving press the button is no longer displayed z z Press the button 3 Rearrange menu items as needed z z Press the buttons or turn the dial to choose Sort...

Page 245: ...some shooting modes To make My Menu immediately accessible by pressing the button in Shooting mode set Set default view to Yes On the Select items screen for saving or clearing items you can also tou...

Page 246: ...ots and browse or edit them in many ways To prepare the camera for these operations press the button to enter Playback mode It may not be possible to play back or edit images that were renamed or alre...

Page 247: ...se images z z To view the previous image press the button or turn the dial counterclockwise To view the next image press the button or turn the dial clockwise z z Press and hold the buttons to browse...

Page 248: ...playback press the button to access the movie control panel press the buttons to choose and then press the button again 4 Adjust the volume z z Press the buttons to adjust the volume z z To adjust th...

Page 249: ...deactivate Scroll Display choose MENU 58 5 tab Scroll Display Off To have the most recent shot displayed when you enter Playback mode choose MENU 58 5 tab Resume Last shot To change the transition sho...

Page 250: ...z You can also browse through images in Scroll Display mode by dragging left or right z z Touching the central image will restore single image display z z To browse images grouped by shooting date in...

Page 251: ...me At a volume of 0 is displayed z z To switch frames touch the scrollbar or drag left or right z z To resume playback touch z z Touch to return to the screen in step 2 of Viewing 247 Switching Displa...

Page 252: ...rmation Display Simple Information Display Detailed Information Display RGB Histogram GPS Information Display Switching display modes is not possible while the camera is connected via Wi Fi to devices...

Page 253: ...ion display on the 6 tab and then press the button 2 Choose information to display z z Press the buttons to choose information to display and then press the button to add a mark z z To return to the m...

Page 254: ...vel of brightness Viewing the histogram is a way to check exposure z z The histogram can also be accessed while shooting 235 460 RGB Histogram GPS Information Display Still Images Movies z z The RGB h...

Page 255: ...y an RGB histogram at the top of the Info Display 2 6 screens Choose Info Display 2 5 on the Playback information display setting screen on the 6 tab press the button press the buttons to choose RGB a...

Page 256: ...ge z z Still images shot in mode are labeled with icon z z Choose a still image labeled with and press the button 2 Play the digest movie z z Press the buttons to choose and then press the button z z...

Page 257: ...to simple information display mode 251 the names of up to five detected people registered in Face ID 92 will be displayed z z Press the button several times until simple information display is activa...

Page 258: ...r toward to display images in an index Moving the lever again will increase the number of images shown z z To display fewer images move the zoom lever toward Fewer images are shown each time you move...

Page 259: ...rag up or down on the screen to scroll through displayed images z z To view fewer thumbnails per screen spread your fingers apart z z Touch an image to choose it and touch it again to view it in singl...

Page 260: ...ition z z In single image display press the button choose in the menu and choose a condition z z When or is selected you can view only images matching this condition by pressing the buttons or turning...

Page 261: ...screen to choose a person 3 View the filtered images z z Images matching your conditions are displayed in yellow frames To view only these images press the buttons or turn the dial z z To cancel filte...

Page 262: ...All Images in Search in Protecting Images 272 or Select All Images in Search in Erasing Multiple Images at Once 279 Adding Images to the Print List DPOF 435 or Adding Images to a Photobook 441 If you...

Page 263: ...h group of images that were shot on the same date Single image Jumps by 1 image at a time Jump 10 Images Jumps by 10 images at a time Jump 100 Images Jumps by 100 images at a time 1 Choose a condition...

Page 264: ...ragging left or right with two fingers Viewing Individual Images in a Group Still Images Movies Images saved as source data in mode 143 are grouped and only the first image is displayed However you ca...

Page 265: ...258 and magnify them Magnifying Images 269 You can apply your actions to all images in the group at once by choosing Protect All Images in Group in Protecting Images 272 All Images in Group in Erasing...

Page 266: ...ce ID names are not displayed and for people whose names have been erased Changing Names 1 Access the setting screen z z Press the button and choose Face ID Info on the 3 tab 58 z z Press the buttons...

Page 267: ...he dial to choose Overwrite and then press the button 4 Choose the name of the person to overwrite with z z Follow step 2 in Overwriting and Adding Face Information 100 to choose the name of the perso...

Page 268: ...Erasing Names z z On the screen displayed in step 3 in Changing Names 266 choose Erase and press the button z z After Erase is displayed press the buttons or turn the dial to choose OK and then press...

Page 269: ...ut 10x by continuing to hold the zoom lever z z The approximate position of the displayed area 1 is shown for reference z z To zoom out move the zoom lever toward You can return to single image displa...

Page 270: ...n in focus Focus Check When multiple positions are in focus press the button repeatedly to switch to other positions Touch Screen Operations z z Spread your fingers apart pinch out to zoom in z z You...

Page 271: ...z z Press the button to stop the slideshow The camera s power saving functions 49 are deactivated during slideshows To pause or resume slideshows press the button You can switch to other images durin...

Page 272: ...tons or turn the dial is displayed z z To cancel protection choose OFF is no longer displayed Protected images on a memory card will be erased if you format the card 387 Protected images cannot be era...

Page 273: ...dividually 1 Choose Select z z Following the procedure in Using the Menu 272 choose Select and press the button 2 Choose an image z z Press the buttons or turn the dial to choose an image and then pre...

Page 274: ...nd then press the button Images will not be protected if you switch to Shooting mode or turn the camera off before finishing the setup process in step 3 You can also select or clear images by touching...

Page 275: ...Using the Menu 272 choose Select Range and press the button 2 Choose a starting image z z Press the button z z Press the buttons or turn the dial to choose an image and then press the button 3 Choose...

Page 276: ...oose Protect and then press the button You can also choose the first or last image by turning the dial when the top screen in steps 2 and 3 is displayed To cancel protection for groups of images choos...

Page 277: ...ect All Images and press the button 2 Protect the images z z Press the buttons or turn the dial to choose OK and then press the button Clearing All Protection at Once You can clear protection from all...

Page 278: ...urn the dial to choose an image 2 Erase the image z z Press the button z z After Erase is displayed press the buttons or turn the dial to choose Erase and then press the button z z The current image i...

Page 279: ...erase at once Be careful when erasing images because they cannot be recovered However protected images 272 cannot be erased Choosing a Selection Method 1 Access the setting screen z z Press the button...

Page 280: ...ng step 2 in Choosing Images Individually 273 is displayed z z To cancel selection press the button again is no longer displayed z z Repeat this process to specify other images 3 Erase the images z z...

Page 281: ...llowing the procedure in Choosing a Selection Method 279 choose Select Range and press the button 2 Choose images z z Follow steps 2 3 in Selecting a Range 275 to specify images 3 Erase the images z z...

Page 282: ...Once 1 Choose Select All Images z z Following the procedure in Choosing a Selection Method 279 choose Select All Images and press the button 2 Erase the images z z Press the buttons or turn the dial t...

Page 283: ...llows 1 Choose z z Press the button and then choose in the menu 55 2 Rotate the image z z Press the or button depending on the desired direction Each time you press the button the image is rotated 90...

Page 284: ...tab 58 2 Rotate the image z z Press the buttons or turn the dial to choose an image z z The image is rotated 90 each time you press the button z z To return to the menu screen press the button On the...

Page 285: ...rotation which rotates images based on the current camera orientation z z Press the button choose Auto Rotate on the 5 tab and then choose Off 58 Images cannot be rotated 283 when you set Auto Rotate...

Page 286: ...to all of those images Viewing 247 Viewing Slideshows 271 Protecting Images 272 Erasing Images 278 Adding Images to the Print List DPOF 435 Adding Images to a Photobook 441 z z Press the button and th...

Page 287: ...e button A confirmation message is displayed z z Press the buttons or turn the dial to choose OK and then press the button Images will not be tagged as favorites if you switch to Shooting mode or turn...

Page 288: ...gned to four touch gestures Touch Actions in single image display Using Touch Actions Functions z z Drag across the screen as shown z z The function assigned to is now activated z z Similarly you can...

Page 289: ...to them as desired 1 Access the setting screen z z Press the button and then choose Set Touch Actions on the 6 tab 58 2 Assign a function to a Touch Action z z Press the buttons or turn the dial to c...

Page 290: ...to displaying the next image tagged as a favorite Previous Favorite Switch to displaying the previous image tagged as a favorite Next Date Switch to displaying the first image with the next shooting d...

Page 291: ...unction in the menu When is shown on an editing screen you can touch instead of pressing the button if you prefer When is shown on an editing screen you can touch instead of pressing the button if you...

Page 292: ...w file 3 Review the new image z z Press the buttons or turn the dial to choose Yes and then press the button z z The saved image is now displayed Editing is not possible for images shot at a recording...

Page 293: ...ress the buttons or turn the dial to choose an image and then press the button 3 Choose an image size z z Press the buttons or turn the dial to choose the size and then press the button 4 Save as a ne...

Page 294: ...then press the button 55 2 Resize move and adjust the aspect ratio of the cropping frame z z To resize the frame move the zoom lever z z To move the frame press the buttons z z To change the frame or...

Page 295: ...images cannot be edited Cropped images cannot be cropped again Cropped images cannot be resized or have Creative filters applied Cropped images will have a lower number of recording pixels than uncrop...

Page 296: ...er Effects Apply effects equivalent to shooting in and modes to images and save them as separate images 1 Choose an effect z z Press the button choose in the menu and then choose the effect 55 z z Pre...

Page 297: ...vertical press the buttons on the screen in step 2 To move the frame press the buttons again To return the frame to horizontal orientation press the buttons The same operations are available by press...

Page 298: ...on z z Press the button and then choose Red Eye Correction on the 3 tab 58 2 Choose an image z z Press the buttons or turn the dial to choose an image 3 Correct the image z z Press the button z z Red...

Page 299: ...may not be corrected accurately To overwrite the original image with the corrected image choose Overwrite in step 4 In this case the original image will be erased Protected images cannot be overwritt...

Page 300: ...mage z z Press the buttons or turn the dial to choose a RAW image 2 Access the setting screen z z Press the button to choose in the menu and then choose the desired option either by pressing the butto...

Page 301: ...d then press the button to return to the screen in step 3 5 Save the settings z z If you chose press the buttons to choose press the button press the buttons or turn the dial to choose OK and then pre...

Page 302: ...ose an effect for each option by turning the dial while an option is selected on the screen in step 3 Moving the zoom lever toward on the screen in step 3 will zoom in and magnify the image To compare...

Page 303: ...ection method z z Choose the desired option 58 z z To return to the menu screen press the button Choosing Images Individually 1 Choose Select z z Following the procedure in Using the Menu 303 choose S...

Page 304: ...s z z Follow steps 2 5 in Processing RAW Images on the Camera 300 to process images Selecting a Range 1 Choose Select Range z z Follow the procedure in Using the Menu 293 to choose Select Range and th...

Page 305: ...camera and the ones processed using Digital Photo Professional will not be exactly the same Up to 500 images can be chosen at a time To choose the processing method from the menu press the buttons to...

Page 306: ...button z z The movie editing panel and editing bar are now displayed 2 Specify portions to cut z z 1 is the movie editing panel and 2 is the editing bar z z Press the buttons to choose or z z To speci...

Page 307: ...vie z z Press the buttons to choose and then press the button The edited movie is now played z z To edit the movie again repeat step 2 z z To cancel editing press the button choose OK either press the...

Page 308: ...write in step 4 In this case the original movie will be erased If the memory card lacks sufficient space only Overwrite will be available Movies may not be saved if the battery pack runs out while sav...

Page 309: ...ose New File and then press the button z z Choose Compress Sav and then press the button Image Quality of Compressed Movies Before Compression After Compression movies cannot be compressed Edited movi...

Page 310: ...1 Select the clip to erase z z Follow steps 1 2 in Viewing Short Movies Created When Shooting Still Images Digest Movies 256 to play a short movie and press the button to access the movie control pane...

Page 311: ...erasure z z Press the buttons or turn the dial to choose OK and then press the button z z The clip is erased and the short movie is overwritten is not displayed if you select a clip when the camera is...

Page 312: ...t 2 3 minutes Before using this feature make sure the battery pack is fully charged Creating albums also requires free space on the memory card As a guideline use a memory card with a capacity of 16 G...

Page 313: ...ce ID information you registered before shooting may be selected for albums Images selected are those that have the same subject shot during the same month as the image displayed before you access the...

Page 314: ...ess the button z z After Busy is displayed the home screen is displayed 3 Preview an album z z Press the buttons to choose a person or Date or Event as the album theme and then press the button z z Af...

Page 315: ...during the preview drag left and to jump to the previous chapter drag right You can specify the color effect in step 4 by choosing Change Color Effect and pressing the button To preview how the album...

Page 316: ...Music Settings and press the button z z The screen at left is displayed when you use a new or recently formatted memory card Choose OK either press the buttons or turn the dial press the button and wa...

Page 317: ...cannot be added later Background music in albums cannot be removed or changed Chapters of albums with background music cannot be edited 310 If you prefer not to add background music set Add BGM to No...

Page 318: ...and press the button 2 Choose a selection method z z Choose Image Selection Date Selection or Person Selection and then press the button 3 Choose album elements z z Once you select the elements for yo...

Page 319: ...s Add background music as described in Adding Background Music to Albums 316 and then press the button 5 Choose a color effect z z On the screen in step 4 of Viewing Albums Story Highlights 312 choose...

Page 320: ...ection From the second time you create a custom album Select images based on previous settings is displayed If you choose Yes the previous still images or short clips are labeled with and multiple ima...

Page 321: ...e Short Clip Mix on the 2 tab and then choose Merge Clips 58 2 Specify clips to combine z z Press the buttons or turn the dial to choose a clip to combine from the top of the screen and then press the...

Page 322: ...econds a preview of the combined clips is played 4 Save the movie z z Choose Save and then press the button z z Once the movie is saved Saved is displayed 5 Play the movie z z Choose Play Back Movie o...

Page 323: ...p move the zoom lever toward on the screen in step 2 To rearrange clips press the button on the screen in step 2 select a clip press the button press the buttons or turn the dial and then press the bu...

Page 324: ...ontents Wi Fi Functions Send images wirelessly from the camera to a variety of compatible devices and use the camera with Web services Before using Wi Fi be sure to read Wi Fi Wireless LAN Precautions...

Page 325: ...ther compatible devices are collectively referred to as smartphones Computer Use software to save camera images to a computer connected via Wi Fi Web Services Add your account information to the camer...

Page 326: ...onnect the camera to a smartphone as you would connect it to a computer or other device Multiple smartphones can be added Before connecting to the camera you must install the free dedicated Camera Con...

Page 327: ...in Shooting mode when the devices are touched together you can choose and send images on the image selection screen Once the devices are connected you can also shoot remotely and geotag your shots 377...

Page 328: ...Once the Camera Connect download page is displayed download and install the app 2 Establish the connection z z Make sure the camera is off or in Shooting mode z z Touch the N Mark on the smartphone w...

Page 329: ...n the dial to choose Yes and then press the button z z You can now use the smartphone to browse import or geotag images on the camera or shoot remotely 4 Send an image z z Turn the dial to choose an i...

Page 330: ...is not established keep the devices together until the camera screen is updated If you attempt connection when the camera is off a message may be displayed on the smartphone reminding you to turn on...

Page 331: ...sending 365 To disable NFC connections choose MENU 58 4 tab Wireless settings Wi Fi Settings NFC Off Connecting via NFC When Camera Is in Playback Mode z z Press the button to turn the camera on z z T...

Page 332: ...a Is Off or in Shooting Mode 328 to enter it The camera does not keep a record of smartphones you connect to via NFC in Playback mode You can preset images to transfer at your desired size 370 Adding...

Page 333: ...dial to choose and then press the button 4 Choose Add a Device z z Press the buttons or turn the dial to choose Add a Device and then press the button z z The camera SSID and password are displayed 5...

Page 334: ...one 7 Select the camera to connect to z z On the camera selection screen displayed on the smartphone choose the camera to begin pairing 8 Adjust the privacy setting z z Press the buttons or turn the d...

Page 335: ...onfirmation screen either press the buttons or turn the dial and then press the button You can also use the smartphone to end the connection z z To add multiple smartphones repeat the above procedure...

Page 336: ...add a new device display the device selection screen by pressing the buttons and then configure the setting If you prefer not to display recent target devices choose MENU 58 4 tab Wireless settings Wi...

Page 337: ...s 1 4 in Adding a Smartphone 332 2 Connect the smartphone to the access point 3 Choose Switch Network z z Press the buttons or turn the dial to choose Switch Network and then press the button z z A li...

Page 338: ...teps 8 9 in Adding a Smartphone 332 to configure the privacy settings and send images Previous Access Points You can reconnect to any previous access points automatically by following step 4 in Adding...

Page 339: ...Starter and Home Basic editions are not supported Windows 7 N European version and KN South Korean version require a separate download and installation of Windows Media Feature Pack For details check...

Page 340: ...process z z Installation may take some time depending on computer performance and the Internet connection z z Click Finish or Restart on the screen after installation Internet access is required and...

Page 341: ...lessly 1 Confirm that the computer is connected to an access point z z For instructions on checking your network connection refer to the computer user manual 2 Configure the setting z z Click in the f...

Page 342: ...security software may prevent you from completing the settings as described here Check the settings of your security software Saving Images to a Connected Computer Connect to your access point via Wi...

Page 343: ...eded to adjust network settings contact the system administrator for details These settings are very important for network security Exercise adequate caution when changing these settings For informati...

Page 344: ...ed device 1 Confirm that the computer is connected to an access point z z For instructions on checking the connection refer to the device and access point user manuals 2 Access the Wi Fi menu z z Pres...

Page 345: ...ion and then press the button 6 Choose PBC Method z z Press the buttons or turn the dial to choose PBC Method and then press the button 7 Establish the connection z z On the access point hold down the...

Page 346: ...y z z When this screen is displayed on the camera click the Start menu on the computer click Control Panel and then click Add a device z z Double click the connected camera icon z z Driver installatio...

Page 347: ...rt images z z Click Import Images from Camera and then click Import Untransferred Images z z Images are now saved to the Pictures folder on the computer in separate folders named by date z z Click OK...

Page 348: ...n also change the camera nickname on the screen in step 2 62 When the camera is connected to a computer the camera screen is blank Mac OS If CameraWindow is not displayed click the CameraWindow icon i...

Page 349: ...d z z Press the button to access the keyboard and then enter the password 62 z z Press the buttons or turn the dial to choose Next and then press the button 4 Choose Auto z z Press the buttons or turn...

Page 350: ...e the same password choose Next either press the buttons or turn the dial and press the button Previous Access Points You can reconnect to any previous access points automatically by following step 4...

Page 351: ...site for details on browser Microsoft Internet Explorer etc requirements including settings and version information For information on countries and regions where CANON iMAGE GATEWAY is available visi...

Page 352: ...ess used on your computer or smartphone to receive a notification message for completing linkage settings 1 Access the Wi Fi menu z z Press the button z z If the Device Nickname screen is displayed pr...

Page 353: ...ts 344 or in steps 2 4 in Connecting to Listed Access Points 348 5 Enter your email address z z Once the camera is connected to CANON iMAGE GATEWAY via the access point a screen is displayed for enter...

Page 354: ...ve a notification message at the email address entered in step 5 z z The screen is displayed to notify that the e mail notification was sent Press the button z z now changes to 8 Access the page in th...

Page 355: ...il application is not configured to block email from relevant domains which may prevent you from receiving the notification message You can also change the camera nickname on the screen in step 1 382...

Page 356: ...http www canon com cig to visit CANON iMAGE GATEWAY 2 Configure the Web service you want to use z z Follow the instructions displayed on the smartphone or computer to set up the Web service 3 Choose...

Page 357: ...If multiple recipients or sharing options are used with a Web service choose the desired item on the Select Recipient screen either press the buttons or turn the dial and then press the button 3 Send...

Page 358: ...saved images be in the camera You can also send multiple images at once resize images and add comments before sending 365 To view images uploaded to CANON iMAGE GATEWAY on a smartphone try the dedicat...

Page 359: ...amera as an access point but you can also use an existing access point 337 1 Access the Wi Fi menu z z Press the button 2 Choose z z Press the buttons or turn the dial to choose and then press the but...

Page 360: ...eld enter the password displayed on the camera 5 Choose the printer z z Choose the printer name either press the buttons or turn the dial and then press the button 6 Choose an image to print z z Press...

Page 361: ...you access the Wi Fi menu You can easily connect again by pressing the buttons to choose the device and then pressing the button To add a new device display the device selection screen by pressing th...

Page 362: ...ou cannot connect to a Canon brand camera that does not have a Wi Fi function even if it supports FlashAir Eye Fi cards 1 Access the Wi Fi menu z z Press the button 2 Choose z z Press the buttons or t...

Page 363: ...he dial to choose an image to send press the buttons to choose Send this image and then press the button z z Transfer completed is displayed after the image is sent and the image transfer screen is di...

Page 364: ...a new device display the device selection screen by pressing the buttons and then configure the setting If you prefer not to display recent target devices choose MENU 58 4 tab Wireless settings Wi Fi...

Page 365: ...images you send Sending Multiple Images 1 Choose Select and send z z On the image transfer screen press the buttons to choose Select and send and then press the button 2 Choose a selection method z z...

Page 366: ...to choose additional images z z After you finish choosing images press the button z z Press the buttons or turn the dial to choose OK and then press the button 3 Send the images z z Press the buttons...

Page 367: ...se images z z Follow steps 2 3 in Selecting a Range 275 to specify images z z To include movies press the buttons to choose Incl Movies and then press the button to mark the option as selected z z Pre...

Page 368: ...age selection screen for favorites is displayed If you prefer not to include an image choose the image and press the button to remove z z After you finish choosing images press the button choose OK an...

Page 369: ...ad of the original file Note that this may delay transmission and the file cannot be sent unless there is enough space for it on the memory card When sending movies to smartphones note that the suppor...

Page 370: ...esize images that are larger than the selected size before sending Movies cannot be resized Image size can also be configured in MENU 58 4 tab Wireless settings Wi Fi Settings Resize for Sending Addin...

Page 371: ...nt 62 3 Send the image When a comment is not entered the comment set in CANON iMAGE GATEWAY is automatically sent You can also annotate multiple images before sending them The same comment is added to...

Page 372: ...e destination On the destination computer you will install and configure Image Transfer Utility a free software compatible with Image Sync 1 Add as a destination z z Add as a destination as described...

Page 373: ...the buttons to choose Stills Movies Preparing the Computer Install and configure the software on the destination computer 1 Install Image Transfer Utility z z Install Image Transfer Utility on a comp...

Page 374: ...images the icon changes to Sending Images Images sent from the camera are automatically saved to the computer If the computer that you intend to send images to is turned off the images will be stored...

Page 375: ...mmended when sending images Even if images were imported to the computer through a different method any images not sent to the computer via CANON iMAGE GATEWAY will be sent to the computer Sending is...

Page 376: ...ne Photo Album app for iPhones or iPads from the App Store or for Android devices from Google Play Log in to CANON iMAGE GATEWAY 351 select your camera model access the Web service settings screen and...

Page 377: ...hone using the dedicated Camera Connect application can be added to images on the camera Images are tagged with information including the latitude longitude and elevation Before shooting make sure the...

Page 378: ...Secure the camera z z Once remote shooting begins the camera lens will come out Lens motion from zooming may also move the camera out of position Keep the camera still by mounting it on a tripod or t...

Page 379: ...tions except pressing the power button are disabled 5 Shoot z z Use the smartphone to shoot mode is used for shooting in modes other than and However some Quick Set and MENU settings you have configur...

Page 380: ...edit z z Press the button z z Press the buttons or turn the dial to choose the icon of a device to edit and then press the button 2 Choose Edit a Device z z Press the buttons or turn the dial to choo...

Page 381: ...rvice Configurable Items Connection Web Services Change Device Nickname 381 O O O O View Settings 332 O Erase Connection Info 382 O O O O O Configurable Not configurable Changing a Device Nickname You...

Page 382: ...ollowing step 4 in Editing Connection Information 380 choose Erase Connection Info and press the button z z After Erase is displayed press the buttons or turn the dial to choose OK and then press the...

Page 383: ...e keyboard 62 and then enter a nickname A message is displayed if the nickname you enter begins with a symbol or space Press the button and enter a different nickname You can also change the nickname...

Page 384: ...settings before using this option 1 Choose Wireless settings z z Press the button and choose Wireless settings on the 4 tab 58 2 Choose Reset Settings z z Press the buttons or turn the dial to choose...

Page 385: ...385 Contents Setting Menu Customize or adjust basic camera functions for greater convenience...

Page 386: ...ave the camera create folders each day you shoot to store shots taken that day z z Choose Create Folder on the 1 tab and then choose Daily z z Images will now be saved in folders created on the shooti...

Page 387: ...n newly inserted memory cards To start saving shots from 0001 use an empty or formatted 387 memory card Formatting Memory Cards Before using a new memory card or a card formatted in another device you...

Page 388: ...lete is displayed Press the button Formatting or erasing data on a memory card only changes file management information on the card and does not erase the data completely When transferring or disposin...

Page 389: ...e memory card to a computer or take other steps to back them up z z On the screen in step 2 of Formatting Memory Cards 387 press the button to choose Low Level Format A icon is displayed z z Follow st...

Page 390: ...choose an option Electronic Level Calibration Calibrate the electronic level if it seems ineffective in helping you level the camera For greater calibration accuracy display grid lines 235 to help you...

Page 391: ...n message is displayed z z Choose OK and then press the button Resetting the Electronic Level Restore the electronic level to its original state as follows Note that this is not possible unless you ha...

Page 392: ...ou to conserve battery power in Shooting mode When the camera is not in use the screen quickly darkens to reduce battery consumption 1 Configure the setting z z Choose Eco Mode on the 2 tab and then c...

Page 393: ...y Off respectively as needed 49 z z Choose Power Saving on the 2 tab and then press the button z z Choose an item press the button and then press the buttons or turn the dial to configure the setting...

Page 394: ...s or turn the dial to adjust the brightness For maximum brightness press and hold for at least one second when the shooting screen is displayed or when in single image display This will override the D...

Page 395: ...f You can also return the setting to Off by holding down the button for at least one second on the shooting screen or in Playback mode during single image display World Clock To ensure that your shots...

Page 396: ...ination z z To set daylight saving time 1 hour ahead choose by pressing the buttons or turning the dial and then choose by pressing the buttons z z Press the button 2 Switch to the destination time zo...

Page 397: ...then adjust the setting either by pressing the buttons or turning the dial Lens Retraction Timing The lens is normally retracted for safety about one minute after you press the button in Shooting mod...

Page 398: ...z Choose Language on the 3 tab and then press the button z z Press the buttons or turn the dial to choose a language and then press the button You can also access the Language screen in Playback mode...

Page 399: ...d is not played during movies 247 if you mute camera sounds To restore sound during movies press the button or drag up across the screen Adjust volume as needed by pressing the buttons or by dragging...

Page 400: ...z z Choose an item and then press the buttons to change the sound The shutter sound in digest movies recorded in mode 71 cannot be changed Hiding Hints and Tips Hints and tips are normally shown when...

Page 401: ...on the 3 tab and then choose Small no info Adjusting the Touch Screen Panel Sensitivity of the touch screen panel can be increased to respond to a lighter touch or you can disable touch control z z C...

Page 402: ...needed z z Choose Units on the 4 tab and then choose ft in Checking Certification Logos Some logos for certification requirements met by the camera can be viewed on the screen Other certification log...

Page 403: ...e buttons or turn the dial to choose Enter Author s Name or Enter Copyright Details Press the button to access the keyboard and enter the name 62 z z Press the button When Accept changes is displayed...

Page 404: ...z Press the buttons or turn the dial to choose OK and then press the button The copyright info already recorded in images will not be deleted Adjusting Other Settings The following settings can also...

Page 405: ...e not restored to default settings Information registered using Face ID 92 1 tab setting Video system 390 2 tab settings Time Zone 395 Date Time 397 and 3 tab setting Language 398 Custom white balance...

Page 406: ...uch as fire etc caused by the malfunction of non genuine Canon accessories e g a leakage and or explosion of a battery pack Please note that any repairs your Canon product may require as a result of s...

Page 407: ...Cable camera end Micro B 2 Memory Card Card Reader Computer TV Video System Included Accessories Power HDMI cable camera end Type D 3 Flash Units PictBridge Compatible Printers High Power Flash HF DC...

Page 408: ...1 Also available for purchase separately 2 A genuine Canon accessory is also available Interface Cable IFC 600PCU 3 Use a commercially available cable no longer than 2 5 m 8 2 ft 4 Use the latest firm...

Page 409: ...he message Battery communication error is displayed if you use a non genuine Canon battery pack and user response is required Note that Canon shall not be liable for any damages resulting from acciden...

Page 410: ...is not visible on an uncharged battery pack Compact Power Adapter CA DC30 CA DC30E z z Insert the included battery pack into the camera for charging Interface Cable IFC 600PCU sold separately is requi...

Page 411: ...or shooting in the rain at the beach or on ski slopes Interface Cable IFC 600PCU z z For connecting the camera to a computer or printer Printers Canon Brand PictBridge Compatible Printers z z Even wit...

Page 412: ...ntents Photo and Movie Storage Connect Station CS100 z z A media hub for storing camera images viewing on a connected TV printing wirelessly on a Wi Fi compatible printer sharing over the Internet and...

Page 413: ...lable HDMI cable not exceeding 2 5 m 8 2 ft with a Type D terminal on the camera end Movies shot at an image quality of or can be viewed in high definition For details on connection or how to switch i...

Page 414: ...TV input to the external input you connected the cable to in step 2 4 Turn the camera on z z Press the button z z Images from the camera are now displayed on the TV Nothing is displayed on the camera...

Page 415: ...are not played while the camera is connected to an HDTV When the camera and TV are connected you can also shoot while previewing shots on the larger screen of the TV To shoot follow the same steps as...

Page 416: ...k and Your Memory Card 33 to open the cover z z Insert the battery pack as described in step 2 of Inserting the Battery Pack and Your Memory Card 33 z z Follow step 4 in Inserting the Battery Pack and...

Page 417: ...ug the compact power adapter into a power outlet 2 z z CA DC30E Plug the power cord into the compact power adapter then plug the other end into a power outlet z z Charging begins and the USB charge la...

Page 418: ...mages even while the battery is charging by turning the camera on and entering Playback mode 44 However you cannot shoot while the battery is charging If the USB charge lamp does not light up remove t...

Page 419: ...l in step 2 of Inserting and Charging the Battery Pack 416 For details about USB connections on the computer refer to the computer user manual Charging is not possible when the camera is off With some...

Page 420: ...the camera Image Transfer Utility Set up Image Sync 372 and receive images Digital Photo Professional Browse process and edit RAW images Picture Style Editor Edit Picture Styles and create and save Pi...

Page 421: ...ite Installing the Software For software installation instructions see Installing the Software 339 Saving Images to a Computer Using a USB cable sold separately camera end Micro B you can connect the...

Page 422: ...ra on to access CameraWindow z z Press the button z z Mac OS CameraWindow is displayed when a connection is established between the camera and computer z z Windows Follow the steps introduced below z...

Page 423: ...ges are now saved to the Pictures folder on the computer in separate folders named by date z z After images are saved close CameraWindow press the button to turn the camera off and unplug the cable z...

Page 424: ...re the following limitations apply It may take a few minutes after you connect the camera to the computer until camera images are accessible Images shot in vertical orientation may be saved in horizon...

Page 425: ...camera to a PictBridge compatible printer with a cable A Canon SELPHY CP printer is used in this example of PictBridge printing Also refer to your printer user manual Easy Print Still Images Movies Pr...

Page 426: ...nsert the plug fully into the camera terminal z z Connect the larger cable plug to the printer For other connection details refer to the printer manual 3 Turn the printer on 4 Choose an image z z Pres...

Page 427: ...button z z Printing now begins z z To print other images repeat the above procedures starting from step 4 after printing is finished z z When you are finished printing turn the camera and printer off...

Page 428: ...ow steps 1 5 in Easy Print 425 to access this screen 2 Configure the settings z z Press the buttons or turn the dial to choose an item and then press the button On the next screen choose an option eit...

Page 429: ...with both the date and file number added Off Default Matches current printer settings Off On Uses information from the time of shooting to print under optimal settings Red Eye1 Corrects red eye No of...

Page 430: ...ng Print Settings 428 to access the printing screen choose Cropping and press the button z z A cropping frame is now displayed indicating the image area to print 2 Adjust the cropping frame as needed...

Page 431: ...aper Settings z z After following step 1 in Configuring Print Settings 428 to access the printing screen choose Paper Settings and press the button 2 Choose a paper size z z Press the buttons or turn...

Page 432: ...n 5 Print the image Available Layout Options Default Matches current printer settings Bordered Prints with blank space around the image Borderless Borderless edge to edge printing N up Choose how many...

Page 433: ...side length z z Press the buttons or turn the dial to choose an item and then press the button On the next screen choose the length either press the buttons or turn the dial and then press the button...

Page 434: ...en press the button On the next screen choose an option either press the buttons or turn the dial and then press the button to return to the printing screen 3 Print the image Movie Printing Options Si...

Page 435: ...ovie control panel and then pressing the button Adding Images to the Print List DPOF Still Images Movies Batch printing 440 and ordering prints from a photo development service can be set up on the ca...

Page 436: ...ress the buttons or turn the dial to choose Print Settings and then press the button On the next screen choose and configure items as needed 58 Print Type Standard One image is printed per sheet Index...

Page 437: ...ing Index will prevent you from choosing On for both Date and File No at the same time Index printing is not available on some Canon brand PictBridge compatible printers sold separately The date is pr...

Page 438: ...inting for the image press the button again is no longer displayed 3 Specify the number of prints z z Press the buttons or turn the dial to specify the number of prints up to 99 z z To set up printing...

Page 439: ...tton z z Follow steps 2 3 in Selecting a Range 275 to specify images z z Press the buttons to choose Order and then press the button Setting Up Printing for All Images Still Images Movies z z Followin...

Page 440: ...then press the button Printing Images Added to the Print List DPOF Still Images Movies z z When images have been added to the print list 435 439 this screen is displayed after you connect the camera t...

Page 441: ...older This is convenient when ordering printed photobooks online or printing photobooks with your own printer Choosing a Selection Method z z Press the button choose Photobook Set up on the 4 tab and...

Page 442: ...elect and press the button 2 Choose an image z z Press the buttons or turn the dial to choose an image and then press the button z z is displayed z z To remove the image from the photobook press the b...

Page 443: ...ges and press the button z z Press the buttons or turn the dial to choose OK and then press the button Removing All Images from a Photobook Still Images Movies z z Following the procedure in Choosing...

Page 444: ...444 Contents Appendix Helpful information when using the camera...

Page 445: ...nserting the battery pack a few times The battery pack runs out of power quickly Battery performance decreases at low temperatures Try warming the battery pack a little by putting it in your pocket fo...

Page 446: ...Shooting Cannot shoot In Playback mode 246 press the shutter button halfway 50 Strange display on the screen under low light 54 Strange display on the screen when shooting Note that the following disp...

Page 447: ...h as macro are deactivated Try shooting with focus lock or AF lock 196 207 Shots are blurry Blurring may occur more often when Touch Shutter is used to shoot depending on shooting conditions Hold the...

Page 448: ...Adjust brightness by using flash exposure compensation or changing the flash output level 210 227 White spots appear in flash shots This is caused by light from the flash reflecting off dust or airbor...

Page 449: ...hutter will not work if you touch the edges of the screen Touch closer to the center of the screen Shooting Movies The elapsed time shown is incorrect or recording is interrupted Use the camera to for...

Page 450: ...Playback Playback is not possible Image or movie playback may not be possible if a computer is used to rename files or alter the folder structure Playback stops or audio skips Switch to a memory card...

Page 451: ...formation display mode 251 choose an image that shows the name of the person for the album before accessing the Story Highlights home screen 312 Memory Card The memory card is not recognized Restart t...

Page 452: ...ion Camera Connect on your smartphone 326 To add a computer first install the software CameraWindow on your computer Also check your computer and Wi Fi environment and settings 339 342 Do not use the...

Page 453: ...or renaming these image files or folders on the computer make sure the images have already been sent to CANON iMAGE GATEWAY or other Web services Cannot resize images for sending Images cannot be res...

Page 454: ...ntered is correct and try adding the destination again Check the email settings on the computer or smartphone If they are configured to block email from certain domains you may not be able to receive...

Page 455: ...the camera To shoot insert a memory card facing the correct way 33 Memory card error 389 If the same error message is displayed even after you have formatted a supported memory card 3 and have inserte...

Page 456: ...ere renamed or already edited on a computer or images shot with another camera Note that starred functions are not available for movies Edit ID Info 266 Magnify 269 Rotate 283 Favorites 286 Edit 291 P...

Page 457: ...ra error was detected error number If this error message is displayed immediately after a shot the image may not have been saved Switch to Playback mode to check for the image Frequent display of this...

Page 458: ...oint manually make sure that you entered the correct SSID Incorrect password Incorrect Wi Fi security settings Check the access point security settings 342 IP address conflict Reset the IP address so...

Page 459: ...g failed Memory card locked The write protect switch of the memory card in the camera to receive the images is set to the locked position Slide the write protect switch to the unlocked position Receiv...

Page 460: ...9 11 13 5 7 38 39 40 41 42 1 Shooting mode 466 Scene icon 76 2 Flash mode 208 3 Flash exposure compensation Flash output level 210 227 4 Metering method 167 5 High ISO speed NR 171 6 ND Filter 173 7...

Page 461: ...Set menu 55 24 Focus range 190 191 AF lock 207 25 AF frame 196 Spot AE point frame 167 26 Grid lines 235 27 AE lock 166 FE lock 211 28 Shutter speed 219 223 29 Aperture value 221 30 Electronic level 1...

Page 462: ...icon or message indicates the battery charge level Display Details Sufficient charge Slightly depleted but sufficient Blinking red Nearly depleted Charge the battery pack soon Charge the battery Deple...

Page 463: ...t image no Total no of images 5 Histogram 254 6 Battery level 462 7 Wi Fi signal strength 369 8 Image Sync 372 9 Image editing 291 Movie compression 309 10 Favorites 286 11 Protection 272 12 Folder nu...

Page 464: ...3 Short clip playback effect 157 26 High ISO speed NR 171 27 Focus range 190 191 Red eye correction 298 28 Image quality Frame rate movies 105 Group playback 264 29 Compression image quality 213 Recor...

Page 465: ...10 To continue skipping backward keep holding down the button Previous Frame For fast rewind keep holding down the button Next Frame For fast forward keep holding down the button Skip Forward or Next...

Page 466: ...n 165 1 O O O O O O ISO Speed 169 AUTO 1 O O O O O O O O ISO 125 12800 1 O O O O Drive Mode 90 1 O O O O O O O O O 1 O O O O O O 1 O O O O O O Flash firing 208 1 O O O O 1 O O O O O O 1 O O 2 2 1 O O...

Page 467: ...O O O O O O O O ISO Speed 169 AUTO O O O O O O O O O O O ISO 125 12800 Drive Mode 90 O O O O O O O O O O O O Flash firing 208 O O O O O O O O O O O 2 O O O O O O O O O O Flash Exposure Compensation 2...

Page 468: ...O O O O O O ISO Speed 169 AUTO O O O O O O O O O O O ISO 125 12800 O Drive Mode 90 O O O O O O O O O O O O O O O O O O O O O Flash firing 208 O O O O O O O O O O O O O O O O O O O Flash Exposure Comp...

Page 469: ...Standby 4 166 211 1 O O O O AE Lock during recording Exposure Compensation 153 165 1 O O O O O AF Lock when assigned to the Ring function selector 237 1 O O O O O AF Lock when assigned to the movie bu...

Page 470: ...ing recording Exposure Compensation 153 165 O O O O O O O O O O AF Lock when assigned to the Ring function selector 237 O O O O O O O O O O O AF Lock when assigned to the movie button 237 O O O O O O...

Page 471: ...Lock during recording Exposure Compensation 153 165 O O O O O O O O O AF Lock when assigned to the Ring function selector 237 O O O O O O O O O O AF Lock when assigned to the movie button 237 O O O O...

Page 472: ...52 1 O O O O O Move the AF Frame 197 Center 1 O O O O O Periphery 1 O O O O O Touch AF 205 1 O O O O O O O O Face Select 203 1 O O O O O O O O Touch Shutter 89 1 O O O O O O O O Change Shooting Inform...

Page 473: ...O O O O O O O O Move the AF Frame 197 Center O O O O O O O O O Periphery O O 5 5 5 O O O O Touch AF 205 O O 5 5 5 O O O O Face Select 203 O O O O O Touch Shutter 89 O O O 6 O O Change Shooting Inform...

Page 474: ...hange Shooting Information Display 54 O O O O O O O O O O O Available or set automatically Not available 1 Options vary depending on the assigned shooting mode 2 Not available but switches to in some...

Page 475: ...O O O O O 2 O O 1 O O O O Image quality 213 See Shooting Tab 484 Movie rec size 105 When Set to NTSC 1 O O O O O O O O 1 O O O O O O O O 1 O O O O O O O O 1 O O O O O O O O 1 O O O O O O O O When Set...

Page 476: ...O O O O O O O O Image quality 213 See Shooting Tab 484 Movie rec size 105 When Set to NTSC O O O O O O O O O O O O O O O O O O O O O O O O O O O O O O O O O O O O O 3 O O O O O O O O O 3 When Set to P...

Page 477: ...O O O O O O O O O O O O Image quality 213 See Shooting Tab 484 Movie rec size 105 When Set to NTSC O O O O O O O O O O O O O O O O O O O O O O O O O O O O O O O O O O O O O O O O O O O When Set to PA...

Page 478: ...elf Timer Settings Custom Timer Delay 5 1 O O O O O O O O Shots 6 1 O O O O O O ND Filter 173 1 O O O O O O 1 O O O O O O 1 O O O O White balance 176 1 O O O O O O O O 1 O O O O 1 O O O O 1 O O O O WB...

Page 479: ...O O O O O O O O O Self Timer Settings Custom Timer Delay 5 O O O O O O O O O O O Shots 6 O O O O O O O ND Filter 173 O O O O O O O O O O O White balance 176 O O O O O O O O O O O WB Correction 180 WB...

Page 480: ...Timer Settings Custom Timer Delay 5 O O O O O O O O O O O Shots 6 O O O O O O ND Filter 173 O O O O O O O O O O O O O O O O White balance 176 O O O O O O O O O O O O O O O O O O O O O O WB Correction...

Page 481: ...e Function Picture Style 183 1 O O O O O O O 1 O O O O O 1 O O O O Metering mode 167 1 O O O O O O O O 1 O O O O Auto Lighting Optimizer 174 1 O O O O O 1 O O O O 1 O O O O O O O O Available or set au...

Page 482: ...ntents Shooting Mode Function Picture Style 183 O O O O O O O O O O O Metering mode 167 O O O O O O O O O O O Auto Lighting Optimizer 174 O O O O O O O O O O O O Available or set automatically Not ava...

Page 483: ...cally Not available 1 Options vary depending on the assigned shooting mode 2 SERVO when subject movement is detected 3 Synchronizes with the aspect ratio setting and is automatically set 103 4 Set aut...

Page 484: ...O O O RAW 1 O O O O O O O O 1 O O O O O O Still Image Aspect Ratio 103 See Quick Set Menu 475 Shooting information display 235 Screen info toggle settings Shooting Info Histogram Grid display Electro...

Page 485: ...O O RAW O O O O O O O O O O O Still Image Aspect Ratio 103 See Quick Set Menu 475 Shooting information display 235 Screen info toggle settings Shooting Info Histogram Grid display Electronic Level O O...

Page 486: ...O O O O RAW O O O O O O O O O O O O O O O O O O Still Image Aspect Ratio 103 See Quick Set Menu 475 Shooting information display 235 Screen info toggle settings Shooting Info Histogram Grid display El...

Page 487: ...O O O O O O O 2 sec 4 sec 8 sec 1 O O O O O O O O 2 Touch Shutter 89 Enable 1 O O O O O O O O Disable 1 O O O O O O O O Face ID Settings 92 On Off 1 O O O O O O O O Set button 237 1 O O O O O O O O S...

Page 488: ...old O O O O O O O O O O 2 sec 4 sec 8 sec O O O O O O O O O O O 2 Touch Shutter 89 Enable O O O O O O Disable O O O O O O O O O O O Face ID Settings 92 On Off O O O O O O O O O O O Set button 237 O O...

Page 489: ...old O O O O O O O O O O O 2 sec 4 sec 8 sec O O O O O O O O O O O 2 Touch Shutter 89 Enable O O O O O O Disable O O O O O O O O O O O Face ID Settings 92 On Off O O O O O O O O O O O Set button 237 O...

Page 490: ...ick Set Menu 475 AF Frame Size 2 197 Normal 1 O O O O O Small 1 O O O O O Continuous AF 201 On 1 O O O O O O O O Off 1 O O O O O O 4 6 AF MF 202 On Off 1 O O O O O AF assist Beam 112 On 1 O O O O O O...

Page 491: ...Menu 475 AF Frame Size 2 197 Normal O O Small O Continuous AF 201 On O O O O O O O Off O O O O O O O O O O O 4 6 AF MF 202 On Off O O O O O O O O O O AF assist Beam 112 On O O O O O O O O Off O O O O...

Page 492: ...Frame Size 2 197 Normal O O O O O O O O O Small O O O O O O O O O Continuous AF 201 On O O O O O O O O O O Off O O O O O O 4 6 AF MF 202 On Off O O O O O O O O O AF assist Beam 112 On O O O O O O O O...

Page 493: ...1 O O O O O Color Red Yellow Blue 1 O O O O O IS Settings 110 IS Mode Off 1 O O O O O O O O Continuous 1 O O O O O O O O Shoot Only 1 O O O O O O Dynamic IS Low 1 O O O O O O O O Standard 1 O O O O O...

Page 494: ...High O O O O O O O O O O Color Red Yellow Blue O O O O O O O O O O IS Settings 110 IS Mode Off O O O O O O O O O Continuous O O O O O O Shoot Only O O O O O O Dynamic IS Low O O O O O O O O O O Standa...

Page 495: ...O O O O Color Red Yellow Blue O O O O O O O O O IS Settings 110 IS Mode Off O O O O O O O O O O O Continuous O O O O O O O O O O Shoot Only O O O O O O Dynamic IS Low O O O O O O O O O O O Standard O...

Page 496: ...ab 484 ISO Auto Settings Max ISO Speed 1 O O O O Rate of Change Standard 1 O O O O O O O O Fast Slow 1 O O Highlight tone priority 175 Disable 1 O O O O O O O O Enable 1 O O O O Auto Lighting Optimize...

Page 497: ...Tab 484 ISO Auto Settings Max ISO Speed Rate of Change Standard O O O O O O O O O O O Fast Slow Highlight tone priority 175 Disable O O O O O O O O O O O Enable Auto Lighting Optimizer 174 See Quick S...

Page 498: ...b 484 ISO Auto Settings Max ISO Speed O Rate of Change Standard O O O O O O O O O O O Fast Slow Highlight tone priority 175 Disable O O O O O O O O O O Enable O O Auto Lighting Optimizer 174 See Quick...

Page 499: ...Comp See Functions Available in Each Shoot ing Mode 466 Flash Output See Functions Available in Each Shoot ing Mode 466 Shutter Sync 1st curtain 1 O O O O O O O O 2nd curtain 1 O O O O Red Eye Lamp On...

Page 500: ...nual Flash Exp Comp See Functions Available in Each Shooting Mode 466 Flash Output See Functions Available in Each Shooting Mode 466 Shutter Sync 1st curtain O O O O O O 2nd curtain Red Eye Lamp On O...

Page 501: ...O O Manual Flash Exp Comp See Functions Available in Each Shooting Mode 466 Flash Output See Functions Available in Each Shooting Mode 466 Shutter Sync 1st curtain O O O O 2nd curtain Red Eye Lamp On...

Page 502: ...n 180 See Quick Set Menu 475 Picture Style 183 See Quick Set Menu 475 High ISO speed NR 171 Standard 1 O O O O O O O O Low High 1 O O O O Spot AE Point 167 Center AF Point 1 O O O O Safety Shift 221 O...

Page 503: ...ction 180 See Quick Set Menu 475 Picture Style 183 See Quick Set Menu 475 High ISO speed NR 171 Standard O O O O O O O O O O O Low High Spot AE Point 167 Center AF Point Safety Shift 221 On Off O O O...

Page 504: ...Correction 180 See Quick Set Menu 475 Picture Style 183 See Quick Set Menu 475 High ISO speed NR 171 Standard O O O O O O O O O O O Low High Spot AE Point 167 Center AF Point Safety Shift 221 On Off O...

Page 505: ...nu 475 Star Time Lapse Movie Setting 143 Save Stills Enable Disable Effect 3 Shot Interval 15 sec 30 sec 1 min 4 Frame Rate NTSC PAL Shooting Time 60 min 90 min 120 min Unlimited Auto exposure Lock to...

Page 506: ...Star Time Lapse Movie Setting 143 Save Stills Enable Disable O Effect 3 O Shot Interval 15 sec 30 sec 1 min 4 O Frame Rate NTSC PAL O Shooting Time 60 min 90 min 120 min Unlimited O Auto exposure Loc...

Page 507: ...nu 475 Star Time Lapse Movie Setting 143 Save Stills Enable Disable Effect 3 Shot Interval 15 sec 30 sec 1 min 4 Frame Rate NTSC PAL Shooting Time 60 min 90 min 120 min Unlimited Auto exposure Lock to...

Page 508: ...y Standard 1 O O O O O O O O Prominent Time lapse movie settings 158 Shooting scene Scene 1 Scene 2 Scene 3 Interval Shots 1 4 sec 30 900 shots Scene 1 5 10 sec 30 720 shots Scene 2 11 30 sec 30 240 s...

Page 509: ...ty Standard O O O O O O O O O O O Prominent O Time lapse movie settings 158 Shooting scene Scene 1 Scene 2 Scene 3 Interval Shots 1 4 sec 30 900 shots Scene 1 5 10 sec 30 720 shots Scene 2 11 30 sec 3...

Page 510: ...andard O O O O O O O O O O O Prominent Time lapse movie settings 158 Shooting scene Scene 1 Scene 2 Scene 3 O Interval Shots 1 4 sec 30 900 shots Scene 1 5 10 sec 30 720 shots Scene 2 11 30 sec 30 240...

Page 511: ...ls O Movie rec size 105 See Quick Set Menu 475 Wind Filter 156 Auto 1 O O O O O O O O Off 1 O O O O Attenuator 156 Auto 1 O O O O O O O O Off On 1 O O O O Auto slow shutter 154 Enable 1 O O O O O O O...

Page 512: ...Stills Movie rec size 105 See Quick Set Menu 475 Wind Filter 156 Auto O O O O O O O O O Off O O Attenuator 156 Auto O O O O O O O O O O O Off On Auto slow shutter 154 Enable O O O O O O O O O Disable...

Page 513: ...lls Movie rec size 105 See Quick Set Menu 475 Wind Filter 156 Auto O O O O O O O O O Off O O O O O Attenuator 156 Auto O O O O O O O O O O O Off On O O O Auto slow shutter 154 Enable O O O O O O O Dis...

Page 514: ...6 tab are shown on the 4 tab in these modes and 7 Items from the 7 tab are shown on the 5 tab in these modes and Items from the 6 tab are shown on the 5 tab in mode 8 Items from the 7 tab are shown on...

Page 515: ...erence Page 1 Create Folder 386 File Numbering 386 Format 387 Video system 390 Electronic Level 108 Start up Image 392 2 Eco Mode 392 Power Saving 49 Disp Brightness 394 Night Display 395 Time Zone 39...

Page 516: ...ute 399 Volume 399 Sound Options 400 Hints Tips 400 Mode icon size info 401 4 Touch Operation 401 Units 402 Wireless settings 324 Certification Logo Display 402 Copyright Info 403 Reset All 404 My Men...

Page 517: ...Erase 278 Favorites 286 Slideshow 271 2 Album Playback 312 List Play Digest Movies 257 Short Clip Mix 321 Image Search 259 Creative filters 296 3 Resize 291 Cropping 294 Red Eye Correction 298 Face ID...

Page 518: ...nts Tab Item Reference Page 5 Transition Effect 247 Index Effect 258 Scroll Display 247 Group Images 264 Auto Rotate 285 Resume 247 Image jump with 263 6 Set Touch Actions 288 Playback information dis...

Page 519: ...act a Canon Customer Support Help Desk To prevent condensation from forming on the camera after sudden changes in temperature when the camera is transferred from cold to warm environments put the came...

Page 520: ...ize 1 0 type Lens Focal Length 35mm film equivalent 8 8 36 8 mm 24 100 mm Zoom Magnification 4 2x Step Zoom 24 28 35 50 85 100 mm Digital zoom Magnification Approx 4x Max Magnification digital x optic...

Page 521: ...OT H Approx 8 0 shots sec max 30 shots ONE SHOT L Approx 4 0 shots sec SERVO H Approx 5 4 shots sec max 46 shots SERVO L Approx 4 0 shots sec Built In Flash Flash Range Wide angle end 50 cm 7 0 m 1 6...

Page 522: ...60 1 80 1 100 1 125 1 160 1 200 1 250 1 320 1 400 1 500 1 640 1 800 1 1000 1 1250 1 1600 1 2000 Speeds in for M mode only Cannot be set 1 6 or slower in Manual movie mode Aperture F number 1 8 11 W 2...

Page 523: ...264 Audio MPEG 4 AAC LC stereo Power Source Battery Pack NB 13L Interface Wired Hi Speed USB Micro HDMI Type D Wireless Wi Fi Specifications IEEE 802 11b g n Frequency 2 4 GHz Channels 1 11 Security...

Page 524: ...ing Time Continuous Shooting 2 Approx 1 hr 30 min Playback Time 3 Approx 5 hr 1 Total time when shooting repeatedly under the following conditions In mode with all other settings set to defaults With...

Page 525: ...mum Wide Angle Maximum Telephoto 5 cm 2 0 in infinity 40 cm 1 3 ft infinity Other modes 5 cm 2 0 in infinity 40 cm 1 3 ft infinity 5 cm 50 cm 2 0 in 1 6 ft 5 cm 50 cm 2 0 in 1 6 ft 1 5 m 20 m 5 0 65 6...

Page 526: ...is as follows Note that the number of shots available varies by aspect ratio Number of shots per 16 GB memory card approx shots 1786 2999 3982 6656 6073 11043 7712 RAW 525 The values in the table are...

Page 527: ...9 min 59 sec 640 x 480 NTSC PAL 10 hours 22 min 35 sec 1 hour Actual frame rate 23 976 fps The values in the table are based on Canon measurement conditions and may change depending on the subject mem...

Page 528: ...4 F Compact Power Adapter CA DC30 CA DC30E Rated Input 100 240 V AC 50 60 Hz 0 07 A 100 V 0 045 A 240 V Rated Output 5 0 V DC 0 55 A Charging Time Approx 5 hr Charged with NB 13L inserted in the camer...

Page 529: ...attery pack Charging 31 Eco mode 392 Level 462 Power saving 49 C Camera Reset all 404 Camera access point mode 338 Camera Connect 326 CameraWindow 420 CANON iMAGE GATEWAY 351 Clock 65 Color white bala...

Page 530: ...es 286 FE lock 211 File numbering 386 Fireworks shooting mode 118 Fish eye effect shooting mode 127 Flash Deactivating flash 209 Flash exposure compensation 210 On 209 Slow synchro 209 Focus bracketin...

Page 531: ...cus range 190 Magnified display 269 Manual focus focus range 191 Manual movie mode 229 Memory cards 3 Recording time 527 Menu Basic operations 58 Table 466 Metering method 167 Miniature effect shootin...

Page 532: ...22 Self timer 86 2 second self timer 87 Customizing the self timer 88 Sending images 362 Sending images to another camera 362 Sending images to a smartphone 326 Sending images to Web services 351 Serv...

Page 533: ...e camera 395 Troubleshooting 445 TV display 413 Tv shooting mode 219 U Underwater macro focus range 120 Underwater shooting mode 119 V Viewing 44 Image search 259 Index display 258 Jump display 263 Ma...

Page 534: ...ission or service transaction permission from the Japanese government is necessary to export strategic resources or services including this product outside Japan Because this product includes American...

Page 535: ...de Be sure to use the wireless LAN function of this product within the guidelines noted in this guide Canon accepts no responsibility for damages or loss if the function and product are used in ways o...

Page 536: ...se networks you are authorized to use This product searches for Wi Fi networks in the vicinity and displays the results on the screen Networks you are not authorized to use unknown networks may also b...

Page 537: ...thorized information or springboard attacks where someone gains unauthorized access to your network as a springboard to cover their tracks when infiltrating other systems To prevent these types of pro...

Page 538: ...LLC HDMI the HDMI logo and High Definition Multimedia Interface are trademarks or registered trademarks of HDMI Licensing LLC The iFrame logo and the iFrame symbol are trademarks of Apple Inc Wi Fi Wi...

Page 539: ...ODE VIDEO IN COMPLIANCE WITH THE AVC STANDARD AVC VIDEO AND OR ii DECODE AVC VIDEO THAT WAS ENCODED BY A CONSUMER ENGAGED IN A PERSONAL ACTIVITY AND OR WAS OBTAINED FROM A VIDEO PROVIDER LICENSED TO P...

Reviews: