


7
6
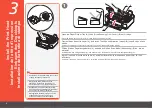
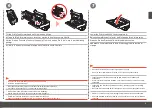
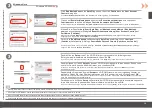
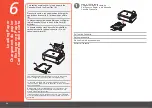
Premere con forza sulla leva di bloccaggio della testina di stampa e abbassarla.
•
Una volta installata la testina di stampa, non rimuoverla se non in caso di effettiva
necessità.
•
Evitare che la testina di stampa urti le parti laterali del supporto.
•
Eseguire l'installazione della cartuccia in un ambiente adeguatamente illuminato.
•
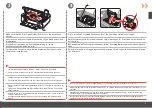
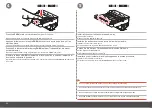
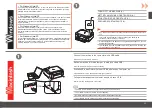
Inclinare in avanti la testina di stampa e posizionarla come illustrato.
Abbassare completamente la leva di bloccaggio della testina di
stampa.
Halten Sie den Druckkopf nach vorne geneigt fest, und setzen Sie ihn ein, wie in der Abbildung
gezeigt.
Stoßen Sie mit dem Druckkopf nicht seitlich an die Halterung.
•
Achten Sie beim Einsetzen auf eine gut beleuchtete Umgebung.
•
Fassen Sie den Druckkopf-Arretierhebel fest an, und klappen Sie ihn vorsichtig
nach unten.
•
Nach dem Einsetzen sollte der Druckkopf nicht unnötig wieder ausgebaut werden.
•
Klappen Sie den Druckkopf-Arretierhebel nach unten.
Ne cognez pas la tête d'impression sur les bords du porte-tête d'impression.
•
Procédez à l'installation dans un environnement bien éclairé.
•
Tenez fermement le levier de blocage de tête d'impression et abaissez-le
doucement.
•
Une fois la tête d'impression installée, ne la retirez que lorsque c'est absolument
nécessaire.
•
Inclinez la tête d'impression vers l'avant et mettez-la en place comme illustré.
Baissez complètement le levier de blocage de tête d'impression.
Do not knock the Print Head against the sides of the holder.
•
Install in a well-lit environment.
•
Pinch the Print Head Lock Lever firmly and lower it gently.
•
Once you have installed the Print Head, do not remove it unnecessarily.
•
Tilt the Print Head forward and set it in place as shown.
Lower the Print Head Lock Lever completely.


