background image

87

Editing

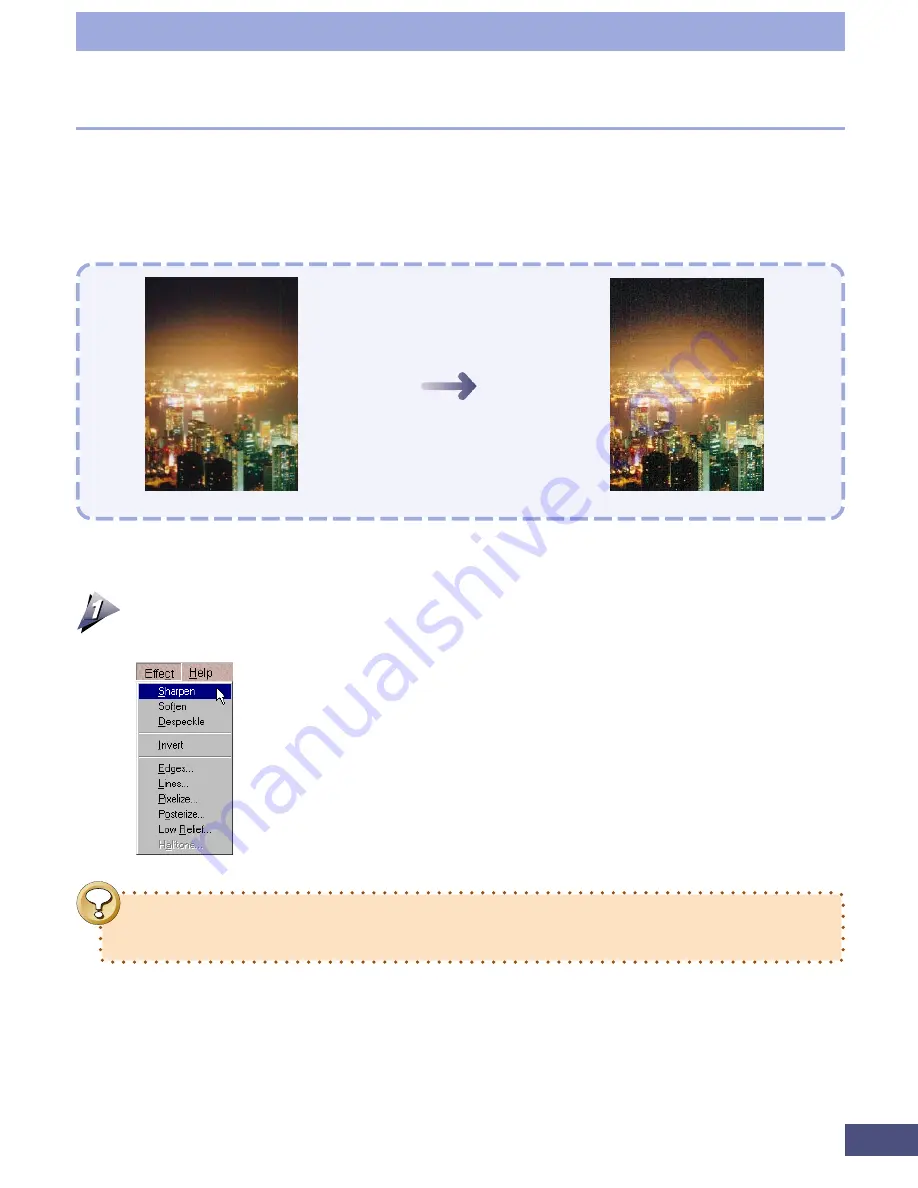
Original

Sharpen Effect

Adjusting an Image

● 

Sharpening an Image

With the image type set to 8-bit grayscale or 24-bit color, use the sharpen effect
when an image is slightly out of focus or you wish to clarify the outlines of an
object.

Procedures

Click the [Effect] menu and select [Sharpen].

The sharpen effect will be applied to the image in the preview window.

Processing an image repeatedly with the sharpen effect may reveal dirt or
scratches on the document or a light colored halo around outlines.

Summary of Contents for LEGRIA FS36

Page 1: ...CanoCraft FS 3 6 forCanoScanFS2710 CanoScan2700FFilmScanner UsersGuide Two Ways to Learn About CanoCraft FS 3 6 Quick Start Jump right into scanning Steps 1 3 Methodical approach ...

Page 2: ...e best scanning results Detailed information on care of the scanner and handling the accompanying CD ROM When using the accompanying application software Detailed information on how to use CanoCraft FS CanoScan FS2710 Product Guide Describes operating procedure from set up and software installation to scanning and confirmation of operation Please read before using the scanner for the first time Pr...

Page 3: ... to Use this Guide Quick Start A digest of the complete CanoCraft FS operating procedures Those who wish to jump into scanning should read this section Step 1 Basic Procedures An explanation of how to install CanoCraft FS and the various program window names and functions Be sure to read this section Step 2 Scanning A step by step explanation of the scanning process Be sure to read this section St...

Page 4: ...ft FS Copy Program Window 21 Settings Display Area Pop Up Menu 22 CanoCraft FS Menu Commands 23 Menu Bar Pull Down Menus 23 How to Find Out More About a Procedure You Don t Understand 25 Step 2 Scanning Scanning Procedures 27 Selecting the Film Type 29 Selecting the Image Type 30 Determining the Image Format 31 Selecting Resolution and Magnification Settings 32 About Resolution and Magnification 3...

Page 5: ...asy Mode 55 Brightness Tab 55 Coloring Tab 56 Adjusting Highlights and Shadows Easy Mode 57 Adjusting a Histogram Expert Mode 58 How to Interpret a Histogram 59 How to Adjust a Histogram 59 Adjusting Brightness Contrast Expert Mode 61 Adjusting Brightness 62 Adjusting Contrast 62 Adjusting Gamma Values Expert Mode 63 Setting the Gamma Value Correctly 64 Adjusting a Tone Curve Expert Mode 65 How to...

Page 6: ...ard 85 Copying an Image 85 Clearing the Clipboard 85 Redoing an Edit 86 Undoing the Previous Action 86 Redoing an Action After the Undo Command 86 Undo All 86 Adjusting an Image 87 Sharpening an Image 87 Blurring an Image 88 Removing Noise 89 Inverting an Image 90 Formatting an Image 91 Find the Edges 91 Find Lines 92 Pixelate 93 Posterize 94 Low Relief 95 Halftone 96 Editing a Saved File 97 Proce...

Page 7: ...ft FS Copy 101 Copying 102 Copying Procedures 102 Adjusting CanoCraft FS Copy Settings 107 Changing the Printer Settings 107 Changing the Scanner Settings 108 Scan Resolution 109 Film Type 109 Exposure 109 Focus 109 Adjust Alt A 110 Preferences 110 Version Information 110 Appendices Troubleshooting 112 Problems with Software Installation 112 Problems Starting Software Programs 113 Problems with Sc...

Page 8: ...dows 98 and Windows NT 4 0 the screen capture examples in this guide are taken from Windows 95 References to Windows in this guide apply to all three versions above CanoCraft FS 3 6 may be used to operate CanoScan 2700F and CanoScan FS2710 film scanners This guide presents the operating procedures using the CanoScan FS2710 as the primary example Button and Menu Conventions in the Text Buttons that...

Page 9: ...tcuts Large Easy to Read Preview Window Priority has been placed on making it easy to examine scans by maximizing the size of the preview window Preview window sizes vary according to the monitor resolution and type of film being scanned Canon ColorGear Color Management System The proprietary Canon ColorGear color management system produces consistent results from input and output devices reducing...

Page 10: ...Quick Start Jump Right into Scanning ...

Page 11: ...your CanoScan FS2710 2700F package into the CD ROM drive CD will auto run and installation menu appears Click Install Uninstall Software from the menu and install CanoCraft FS If you have an old version of CanoCraft FS version 3 1 or 3 5 ensure that you delete uninstall it before you install version 3 6 2 Start CanoCraft FS p 18 Double click the CanoCraft FS icon in the CanoCraft FS folder or clic...

Page 12: ...and Coloring pp 50 72 Click the Adjust button or click the Image menu and select Adjust Adjust the shadows and highlights or coloring of the image easy mode In expert mode the image s brightness and coloring can be revised by adjusting gamma values tone curve or the histogram Quick Start Easy Mode Expert Mode Progress Bar The scan s progress is indicated by the length of the bar and a percentage f...

Page 13: ...lick the File menu and select Save to open the Save dialog Specify the destination and name for the scanned image The selected scan area will be scanned with the specified brightness and coloring adjustments and saved to a file During the scan a bar indicates the progress of the procedure 9 Print p 77 Click the File menu and select Print to output the scan results to a printer Quick Start ...

Page 14: ...Step 1 Basic Procedures ...

Page 15: ...tium or Higher Hard Disk 50 MB or more Main Memory RAM Windows 95 16 MB or more 32 MB or more recommended Windows 98 32 MB or more 64 MB or more recommended Windows NT 24 MB or more 40 MB or more recommended Display 256 colors or more 65 000 or more recommended Other CD ROM drive If you are using an old version of CanoCraft FS version 3 1 or 3 5 ensure that you delete uninstall it before you insta...

Page 16: ...dows 95 You can check the Windows 95 version in the System Properties dialog Open the control panel double click the System icon and select the General tab If yours is an old version of Windows 95 select Choose from the list and click the OK button In the next window that displays select Unsupported device and click the OK button General Tab System Properties Dialog This area will show the version...

Page 17: ...scanner will display under the Other Device category This is not a problem because CanoCraft FS is equipped with its own specialized driver for Canon film scanners If the following message displays during installation there is insufficient free space on the hard disk to install CanoCraft FS Delete files off the disk to free sufficient space or change the drive setting to one with sufficient free s...

Page 18: ...g CanoCraft FS from the Windows Desktop Plug in the scanner turn on your computer and start Windows Ensure that you turn the scanner power on before starting Windows The scanner cannot be operated with CanoCraft FS if the scanner power is off when Windows is started Double click the CanoCraft FS icon in the CanoCraft FS folder or click the Start button on the Windows taskbar and select Programs Ca...

Page 19: ...mport Select TWAIN Source and CanoScan FS2710 Start CanoCraft FS by clicking File Import and TWAIN Select TWAIN 32 if TWAIN 16 also displays in the menu TWAIN 16 is intended for use with Windows 3 1 and is incompatible with CanoCraft FS Please refer to the instruction manual accompanying each program for the detailed procedures for summoning CanoCraft FS from TWAIN compliant applications Closing C...

Page 20: ...the film type and ColorGear settings Also displays the image file size and the remaining free space on the specified save disk Submenu Zoom In Button p 38 Expands the selected area to fill the preview window Zoom Out Button p 38 Contracts the selected area to the size prior to zooming Zoom Reset Button p 38 Returns a zoomed image to the original preview size Help Button p 25 Displays Help topics f...

Page 21: ... Button Displays Help topics for CanoCraft FS Copy Start Button p 105 Starts copying Copy Number Display p 105 Displays the number of copies currently specified Numbers can be input directly Reset Button Resets the number of copies to one Brightness Slide Bar p 105 Adjusts the copy density The value displays to its right and will accept direct input Printer Setup Button p 107 Displays the printer ...

Page 22: ...g the Set tings menu and selecting Output Resolution Magnification p 35 The output magnification can be set to either 50 100 200 400 or 800 Adjusting the output magnification value in the display box at the top of the program window also allows custom magnification values It can also be adjusted with the output resolution setting at the top of the preview window Film Type p 29 You can select betwe...

Page 23: ...s document size coloring and printing method Prints the scanned image shortcut key Ctrl P Closes CanoCraft FS shortcut key Ctrl Q Edit E Reverses the last action shortcut key Ctrl Z Restores a reversed action shortcut key Ctrl Y Reverses all actions Copies the selection to the clipboard shortcut key Ctrl C Deletes the clipboard contents Settings S Sets the film type Sets the scanning mode Sets add...

Page 24: ...ge Deletes noise from the image Inverts the colors of the image Finds the edges of the image Finds the vertical and horizontal lines of the image Pixelates the image Posterizes the image Embosses the image Converts the image to halftones Device Sets the scanner model in a multiple scanner configuration Performs a self test of the scanner Checks the scanner version and SCSI ID Help H Displays an al...

Page 25: ...derstand CanoCraft FS is equipped with a context sensitive Help function that teaches procedures on screen If you do not understand a procedure while running CanoCraft FS click the Help button Instructions will display in the Help window You can also click on the Help menu to display topics or index tabs which explain procedures and terminology and how to use the Help function ...

Page 26: ...Step 2 Scanning ...

Page 27: ... grayscale images Determine the image size and resolution pp 32 36 Set the scan resolution output resolution and magnification to suit your requirements for the printing size and monitor size of the image Insert the film Refer to the Quick Start Guide or electronic manual Initiate the preview scan p 37 Start off by previewing the image before initiating the final scan Adjust the color balance half...

Page 28: ...the 24 bit color setting for most images unless you require particularly fine color definition Grayscale images are expressed in black white or varying tones of gray 8 bit grayscale images are expressed in 256 tones 12 bit grayscale images use 4096 tones Black and white images are expressed in just two colors white or black The threshold value determines the brightness value at which a particular ...

Page 29: ...Type It is important to select the correct film type in the film type settings menu to obtain the correct color balance in the scanned image Position the mouse cursor over an option and click to select it The menu will close and the new selection will appear in the settings display area If you are scanning several films of the same type consecutively this setting need only be set the first time If...

Page 30: ...tely 29 megabytes at the 12 bit grayscale setting 19 6 megabytes at the 8 bit grayscale setting 9 8 megabytes and at the black and white setting 1 2 megabytes The 12 bit grayscale and 36 bit color settings are not available with the CanoScan 2700F model Right click the settings display area Scans at 8 bits per RGB channel Use this setting for standard color images Scans at 12 bits per RGB channel ...

Page 31: ...ticularly high definition grayscale images are required Black and White Images are expressed in two colors only black and white The threshold value determines the brightness value at which a particular pixel is set to black or white Attempting to scan images in the 12 bit grayscale or 36 bit color scanning modes in application programs not compatible with these modes may cause the programs to hang...

Page 32: ...determines the appearance of an image on a monitor or when output to a printer The ratio of the scan resolution to the output resolution is called the output magnification When both the scan and output resolution are the same the scanned image size and the output are the same size When the output resolution is lower than the scan resolution the image is magnified and when it is higher the image is...

Page 33: ...lect a setting by right clicking the settings display area positioning the mouse over an option and clicking it When the menu disappears the new value will appear in the settings display area To change the setting with the output magnification box at the top of the preview window set the units to DPI and click the up or down arrows or input a value directly into the box Data Volume Varies with Sca...

Page 34: ...ed setting Cancels the selection and closes the dialog Accepts the new settings and closes the dialog Selecting an Output Resolution Setting Select an output resolution setting that matches your printer and the purpose of the scanned image Select a setting by right clicking the settings display area highlighting an option with the mouse cursor and clicking it When the menu disappears the new value...

Page 35: ...tep 2 Scanning Procedures for Setting the Output Resolution Select the output resolution best suited to your intended print and monitor sizes Select a setting by right clicking the settings display area highlighting an option with the mouse cursor and clicking it When the menu disappears the new value will appear in the settings display area To change the setting with the output magnification box ...

Page 36: ... Canon BJC 4000 Series the image is expressed using 360 dots per inch However color printing is expressed with three colors including cyan magenta and yellow a process completely separate from monochrome printing Accordingly set the output resolution for a printer such as the Canon BJC 4000 Series to the same value as the printer resolution for monochrome printing but set it to approximately half ...

Page 37: ...the resolution settings preview the image and specify the scan area Once the preview scan commences the preview image will begin to display in the preview window Changes in categories such as image type and brightness are reflected immediately in the preview window However the preview image is only an approximation of how the final image will appear A message similar to Initializing film scanner P...

Page 38: ...ge for Verification To zoom a portion of an image to verify its contents click and drag the mouse cursor over the area of interest and click the Zoom In button The Zoom Out button contracts the selected area to the size prior to zooming The Zoom Reset button returns a zoomed image to the original preview size ...

Page 39: ...scanned Rotating the Image to Change Its Orientation The preview image can be rotated in 90 increments or flipped vertically or horizontally This can be used to correctly orient images that were shot with the camera held sideways or images that were incorrectly oriented in the scanner when scanned Rotate Flip Dialog Click a rotate or flip icon to change the sample thumbnail in the dialog to the de...

Page 40: ... of the Preview Image up to Expectations If the image you are scanning is difficult to reproduce with standard scanning parameters and the preview image is not up to expectations click the Adjust button or click the Image menu and select Adjust to change the image properties such as brightness and coloring See Step 3 Adjusting Images p 49 for information on adjusting brightness and coloring ...

Page 41: ...n Area Click and drag the mouse cursor over the portion of the image you wish to set as the scan area A frame will appear around the selected area You can drag the mouse cursor in any direction Clicking outside the frame or right clicking the mouse deselects the scan area Double clicking outside the frame expands the selection to fill the preview window If no area is selected the entire preview im...

Page 42: ...locked state and unlocks the file Unlocked State In the unlocked state the scan area can freely be selected and changed You can also change the output magnification scan resolution settings at the top of the preview window and the scan resolution output resolution and output magnification settings in the settings display area Selection Frame in the Preview Window Positioning the mouse cursor over ...

Page 43: ...n the output magnification or scan resolution are altered in the boxes at the top of the preview window the Custom option in the output magnification and scan resolution sections of the settings display area pop up menu becomes selectable Output Resolution Settings Display Area If the output resolution setting in the settings display area is altered the output magnification returns to 100 and the ...

Page 44: ...the preview window by clicking the arrows or inputting a value directly When the units to the right are set to the output magnification is altered and when set to DPI the scan resolution changes The settings display area settings for Output Magnification and Scan Resolution can be altered by right clicking the settings display area and selecting from the pop up menu Elevating the output magnificat...

Page 45: ...ting is normal The height and width values are reversed when the preview image is rotated 90 p 39 Please refer to the topic entitled Selecting the Scan Area for instructions on how to change the scan area selection p 41 Click the button to the right and select Fixed Aspect Ratio to fix the aspect ratio or select Nor mal to set the aspect ratio to variable If fixed aspect ratio has been selected in...

Page 46: ...k the Scan button or click File menu and select Scan Final Scan and Saving Once you have finished adjusting the preview image and scan area settings you can initiate the final scan and save the file When CanoCraft FS is used as a TWAIN driver in a TWAIN compliant application the Save button title changes to Scan In addition the Save menu option is deactivated The procedures after the Scan button h...

Page 47: ...inished About File Formats The scanned image is saved as a file in the specified location There are many types of image file formats A few examples include the TIFF PCX JPEG and bitmap formats However the file formats accommodated by each application can vary If the scanned image is to be further processed with imaging editing software select a file format that can be read by that program Standard...

Page 48: ...f you are scanning negative film with the exposure adjustment set to Auto the expected coloration may depending upon the image not turn out as expected In that case reset the highlight settings using the eyedropper tool white pointer tool in the histogram tab of the Adjust dialog In expert mode display the Adjust dialog by clicking the Image menu and selecting Adjust or click the Adjust button p 5...

Page 49: ...49 Step 3 Adjusting Images ...

Page 50: ...loring with color correction Choose the best matched sample p 56 Too Bright or Too Dark Adjust the highlights and shadows Choose the best matched sample pp 55 57 Go to p 54 To Obtain Better Images If the preview image requires adjustment refer to the flowchart below for the suggested procedures If you wish to reject your adjustments simply click the Preview button again to redisplay the image as i...

Page 51: ...by specifying the highlight and shadows values in the image p 58 Adjust the Contrast Correct the contrast between highlights and shadows p 61 Correct Coloring with the Brightness settings Correct the brightness of the entire image p 61 Which requires adjustment Brightness or Coloring Adjust the Gamma Values Adjust the brightness to match the display characteristics p 63 Adjust the Color Balance Ad...

Page 52: ...method if certain color tones are too strong or weak relative to others This method can be used on these image types 24 Bit Color Adjusting the Histogram Expert Mode p 58 A histogram shows the concentrations of dots at particular brightness levels Halftone gradations can be smoothened by adjusting the highest level of brightness highlights or darkness shadows This method can be used on these image...

Page 53: ...he image data As a highly selective method adjusting the tone curve limits the effect on the overall image and can smoothen halftone gradients more finely than the histogram method This method can be used on these image types 8 Bit Grayscale 12 Bit Grayscale 24 Bit Color 36 Bit Color Adjusting Color Balance Expert Mode p 67 Correct the balance between the three primary colors in a color image red ...

Page 54: ...m with various image processing functions Easy Mode Categories Brightness 24 Bit Color 8 Bit Grayscale Color Balance 24 Bit Color 36 Bit Color Threshold Black and White Expert Mode Categories Histograms 24 Bit Color 36 Bit Color 8 Bit Grayscale 12 Bit Grayscale Brightness Contrast 24 Bit Color 36 Bit Color 8 Bit Grayscale 12 Bit Grayscale Gamma Values 24 Bit Color 36 Bit Color 8 Bit Grayscale 12 B...

Page 55: ... brightness Accepts the adjustments and applies them to the preview image in the preview window Adjusting Brightness and Coloring Easy Mode In easy mode the brightness and coloring of 24 Bit Color images can be adjusted with the adjust dialog The brightness and coloring of an image may vary significantly if the display and printer color profiles differ To ensure conformity test repeatedly to ensur...

Page 56: ...d closes the adjustment dialog Original Image Adjusted Image Click on the sample closest to the desired coloring Accepts the adjustments and applies them to the preview image in the preview window Step 3 Adjusting Images Coloring Tab Click on the samples until the adjusted image reaches the desired coloring in the coloring tab The coloring of the adjusted image changes each time you click a sample...

Page 57: ...sted Image Click on the sample closest to the desired brightness Accepts the adjustments and applies them to the preview image in the preview window Step 3 Adjusting Images Adjusting Highlights and Shadows Easy Mode In easy mode the highlights and shadows of 8 Bit Grayscale images can be adjusted with the brightness tab of the adjustment dialog Brightness Tab Click on the samples until the adjuste...

Page 58: ...Click here to change all three RGB channels at once Click one of these to change any one of the R G or B channels Cancels the settings and closes the dialog Accepts the settings and closes the dialog Resets all the settings to the initial values Resets the histogram to its starting values Adjusting a Histogram Expert Mode In expert mode the highlights and shadows of 24 Bit Color 36 Bit Color 8 Bit...

Page 59: ...ify an area for which a histogram will be generated The heights of the peaks of the histogram are directly related to the volume of data with the corresponding values How to Adjust a Histogram To change the contrast in an image the distribution of data between shadows and highlights can be adjusted by dragging the shadow and highlight marks at the bottom of the histogram All of the data lying to t...

Page 60: ...he preview image and click to set either the highlights or shadows respectively equal to the level of that area To improve the reproduction of dark areas change the value of the shadows in the histogram tab from 1 to 0 then scan Be aware however that the noise of the scanned image may increase For your reference the default setting for shadows is 1 ...

Page 61: ...for color images or adg for grayscale images Brightness Contrast Cancels the settings and closes the dialog Accepts the settings and closes the dialog Resets all the settings to the initial values Restores the brightness and contrast settings to the initial values Adjusting Brightness Contrast Expert Mode In expert mode the overall brightness and contrast of 24 Bit Color 36 Bit Color 8 Bit Graysca...

Page 62: ...tness 128 Standard Brightness 190 Brightness 80 Adjusting Contrast Contrast is the degree of deviation between light and dark areas Raising the contrast accentuates the difference between the light and dark areas Lowering the contrast reduces the difference between the two Contrast 128 Standard Contrast 170 Contrast 100 Raising the contrast of pictures with a blurred focus is effective in adding c...

Page 63: ...he Gamma Value Tab and select a gamma value Step 3 Adjusting Images Clicking this box allows you to select a custom value Drag the slider tab left or right or click the arrows to change the value Click a checkbox to select a preset gamma value With the Custom box selected set the gamma value within a range of 0 10 to 10 00 The value will change as the slider is moved You can also input a value dir...

Page 64: ...isplay each have their own distinct gamma value which is defined as the coefficient each program or device uses to match its output data to its input data For CanoCraft FS the input data is the image data it receives from the scanner and the output data is the data it sends to the display For the display the input data is the image data it receives from CanoCraft FS and its output is the image tha...

Page 65: ...e Tab Click the Tone Curve Tab and adjust the tone Curve Click on the tone curve to display the control points then drag one to change the curve shape You can set a multiple number of control points Loads settings from files with the extension adc for color images or adg for grayscale images Saves settings to a file with the extension adc for color images or adg for grayscale images Select the cha...

Page 66: ...e emphasized providing the image with a sharp contrast Output Input Make the curve shape as smooth as possible to provide a natural appearing effect The changes in the settings will be reflected in the preview image so check the preview image from time to time as you make changes How to Interpret the Tone Curve In CanoCraft FS the data from the scanner is the input and the data sent to the display...

Page 67: ... and adjust the color balance Dragging the slider tab or clicking the arrows changes the settings 127 127 Values corresponding to the positions of the slider tabs display here Values can also be directly input into the boxes without dragging the slider tabs Loads settings from files with the extension adc for color images Saves settings to a file with the extension adc for color images Cancels the...

Page 68: ...he portion of the image over which the mouse cursor is positioned is displayed here The values are expressed in the XXX YYY format where YYY represents a gamma value of 1 0 and the XXX represents the post adjustment color values The XXX values will not change unless the color adjustment is conducted with the Color Balance function ...

Page 69: ...y changing the threshold value you can alter the appearance of an image as shown below The default setting for CanoCraft FS is 128 Threshold Tab Change the settings with the slider or by directly inputting values into the boxes You can save and reload the settings Click the Image menu and select Adjust or click the Adjust button Threshold Tab Larger number input or slider moved to the right Lower ...

Page 70: ...rexposed or that has an extremely bright or dark background The auto color adjustment function is turned off when the exposure setting is adjusted The default setting for the auto color adjustment function is on so that the scanner can automatically adjust the exposure to the film type With CanoScan FS2710 only the exposure needs to be adjusted Both the exposure and the film type settings need to ...

Page 71: ...gives it a dark effect To do this the scanner will slow the scan speed for negative film and accelerate it for positive film About Film Types CanoScan 2700F Users The film base color of color negative films generally used to output prints on photographic paper varies between manufacturers and individual products As a result you must select the correct film type when setting the exposure manually t...

Page 72: ...itself is out of focus there is little chance of obtaining a sharp focused image by adjusting the focus setting If the image in the film itself is out of focus you can make it less noticeable by adjusting the contrast and applying the sharpen effect Click the Settings menu and select Focus Focus Settings Dialog Click the round button to select Autofocus or Manual Focus If you select manual focus d...

Page 73: ...Other Functions ...

Page 74: ...is first installed Auto Eject Placing a check in this option causes the scanner to automatically eject the film at the end of the scan This option is set to on when CanoCraft FS is first installed Auto eject only ejects the film after the final scan not after a preview scan Set the Exposure and Autofocus Settings for Final Scan The exposure and autofocus settings are usually set automatically to t...

Page 75: ...haracteristics between scanners displays and printers When set to on this function reduces the effort required to set the printer color balance Turn it off when you wish to perform the color correction with Photoshop or other image editing programs This option is set to on when CanoCraft FS is first installed You can also turn it on and off by right clicking the settings display area ...

Page 76: ...utput Resolution File 340 dpi Scan Resolution 340 dpi Output Magnification 100 Size Units Inches Exposure Auto color balance On Film Type 2700F Only A Exposure Default Halftone Autofocus On Preferences Save Preview Image Off Single Scan Off Auto Eject On Adjusts the exposure and focus settings during the final scan Off ColorGear color matching On Adjustment Mode Easy Mode Brightness 0 Contrast 0 G...

Page 77: ...rinter settings to match the printer Refer to the manual that accompanied the printer for details on turning on the power and paper handling Print Dialog Set the number of copies desired and click OK to start printing Click the File menu and select Print Click the arrow to select an alternate printer to the one shown Click the Properties button to adjust the printer settings The number of copies t...

Page 78: ... the print quality and colors This function can only be selected when CanoCraft FS is used as a stand alone program It cannot be selected when CanoCraft FS is started from within a TWAIN compliant application Setting the printer settings once is sufficient unless the printer selection changes or other setting changes are required The printer settings are identical to those in the Windows printer s...

Page 79: ...x modem is correctly connected and set Printer Dialog Set the paper size and orientation and click OK to start the transmission Printer Dialog Click the File menu and select Fax The printer dialog will display Click the arrow on the printer name box to select a fax modem To select a fax modem click the button and select an option from the pull down menu To set the fax modem settings click the Prop...

Page 80: ...resolution This function can only be selected when CanoCraft FS is used as a stand alone program It cannot be selected when CanoCraft FS is started from within a TWAIN compliant application This feature is only available if faxing software has been installed in Windows and a fax modem is correctly connected The fax settings for CanoCraft FS are identical to those for Windows If your fax modem is c...

Page 81: ...ached scanner This function cannot be accessed when CanoCraft FS is started as a TWAIN Driver from a TWAIN compliant application To select a scanner in this case use the application program s scanner selection function Scanner Selection Dialog This dialog allows you to select between different scanner models Scanner Selection Dialog Click the Device menu and select Select Click the button on the r...

Page 82: ... lamp Initiate the self test after the scanner has been completely set up using the following procedures The self test can also be used to check a suspected malfunction during use Ensure that you eject any film from the scanner before you initiate the self test If a message displays during the procedure follow the instructions in the message Self Test Dialog Eject the film from the scanner and cli...

Page 83: ...83 Other Functions Click the Help menu and select About Viewing Version Data The About dialog displays the scanner hardware version SCSI ID and other version information ...

Page 84: ...This section describes the image editing functions of CanoCraft FS Experiment with the numerous image processing features to understand how they can be used on freshly scanned images and images loaded from disk ...

Page 85: ...shortcut for copying the selection to the clipboard is Ctrl C The selection can only be pasted at the resolution of the preview image Clearing the Clipboard Clicking the Edit menu and selecting Clear deletes the contents of the clipboard To view the contents of the clipboard click the Start button on the Windows taskbar and select Programs Accessories and Clipboard Viewer If Clipboard Viewer is no...

Page 86: ...ch as brightness and coloring adjustments The keyboard shortcut for this command is Ctrl Z Redoing an Action After the Undo Command Clicking the Edit menu and selecting Redo reverses the Undo and Undo All commands restoring image edits and adjustments such as brightness and coloring adjustments The keyboard shortcut for this command is Ctrl Y Undo All Clicking the Edit menu and selecting All rever...

Page 87: ...ect when an image is slightly out of focus or you wish to clarify the outlines of an object Procedures Click the Effect menu and select Sharpen The sharpen effect will be applied to the image in the preview window Processing an image repeatedly with the sharpen effect may reveal dirt or scratches on the document or a light colored halo around outlines ...

Page 88: ... use the soften effect to create a fuzzy or slightly unfocused image Procedures Click the Effect menu and select Soften The soften effect will be applied to the image in the preview window Processing an image repeatedly with the soften effect may cause it to appear blurred Be careful not to overuse this effect ...

Page 89: ...ten an image that appears coarse This effect removes the noise associated with image data Procedures Click the Effect menu and select Despeckle The despeckle effect will be applied to the image in the preview window Processing an image repeatedly with the despeckle effect may cause it to appear too dense Be careful not to overuse this effect ...

Page 90: ...it grayscale or 24 bit color use the invert effect to transform a positive into a negative or vice versa Procedures Click the Effect menu and select Invert The preview image will transform into the opposite state positive or negative Inverting an image a second time restores it to its original state ...

Page 91: ...o an image to accentuate object outlines There are four effects thin thick horizontal and vertical Procedures Click the Effect menu and select Edges The edges window will display Click the Edges Option Selection button and select an effect from the pull down menu The image will appear with the effect applied in the sample window Click the OK button to accept the effect The edges of the image will ...

Page 92: ...e effects horizontal vertical and both Procedures Click the Effect menu and select Lines The lines window will display Click the Lines Option Selection button and and select an effect from the pull down menu The image will appear with the effect applied in the sample window Click the OK button to accept the effect The lines of the image will be accentuated as shown in the sample in the Lines windo...

Page 93: ...gs 2x2 3x3 4x4 and 5x5 Procedures Click the Effect menu and select Pixelize The pixelate window will display Click the Pixel Number Selection button and select an effect from the pull down menu The image will appear with the effect applied in the sample window Click the OK button to accept the effect The pixels of the image will be grouped as shown in the sample in the Pixelate window Sample Windo...

Page 94: ... posterizing Procedures Click the Effect menu and select Posterize The posterize window will display Click the Posterize Level Selection button and select an effect from the pull down menu The image will appear with the effect applied in the sample window Click the OK button to accept the effect The image will be posterized as shown in the sample in the Posterize window Sample Window Displays the ...

Page 95: ...utton and select an effect from the pull down menu The image will appear with the effect applied in the sample window Click the OK button to accept the effect The image will be processed with a the low relief effect as shown in the Low Relief window Emboss Sculpt Metalize Original Sample Window Displays the low relief effect samples Low Relief Effect Selection Button Light Icons The emboss and scu...

Page 96: ...ne angled dot horizontal line vertical line and threshold Procedures Click the Effect menu and select Halftone The halftone window will display Click the Halftone Pattern Selection button and select an effect from the pull down menu The image will appear with the effect applied in the sample window Click the OK button to accept the effect The image will be converted into a black and white image as...

Page 97: ...g or for saving to a new file Procedures for Loading a Saved File To load a saved file follow the procedures below Click the File menu and select Open The open dialog will display Select the desired file and click the Open button The selected file will display in the preview window You can edit and process images displayed in the preview window with the adjust menu commands ...

Page 98: ...ile formats You can select formats ending with the extensions BMP DIB GIF JPG PIX RLE TIF and FPX Click here after you select the file location and format and input a name Saving a File After Editing You can save a file that has been loaded from disk and processed by saving it under a new name Procedures Click the File menu and select Save As The save as dialog will display Input a new file name a...

Page 99: ...e menu and select Close The image in the preview window will disappear The Image not saved message appears if the preview image is deleted before being saved Clicking Yes to the Save image question causes it to be written to disk If you select No the file will be cleared from the preview window without being saved to disk ...

Page 100: ...noScan 2700F FS 2710 film scanner to output scanned images directly to your printer Use the following procedures to operate the program Always turn on the scanner and printer power before you start Windows and use CanoCraft FS Copy CanoCraft FS Copy and CanoCraft FS cannot be run simultaneously ...

Page 101: ...play and any other peripheral devices connected to your computer Turn the computer on and start Windows Ensure that you turn the scanner power on before you start Windows You will not be able to use CanoCraft FS Copy if the scanner power was off when you started Windows Select CanoCraft FS Copy by double clicking its desktop icon or click ing the Start menu on the Windows taskbar and selecting Pro...

Page 102: ...You can click the Add Edit or Remove buttons to add to change or delete output sizes Copying Copying Procedures Once you have the CanoCraft FS Copy control panel displayed follow the procedures below to insert film into the scanner and output copy images on the printer Click the arrow paper size selection button to the right of the paper size display and select a paper size for printing Click the ...

Page 103: ... printable area of the page if the scale to page option is selected in the image output size box The image will be printed at the selected size if the custom option is selected The registered sizes in the size list of the custom option can be changed or deleted New sizes can also be added Insert the film into the scanner ...

Page 104: ...resolution color balance and ColorGear settings can also be adjusted from the pull down menu displayed by clicking the Settings button p 74 IX240 film refers to film complying with IX240 standards Select an image type Select the Color or Grayscale setting to match your film The color option is only available when a color printer is selected in the printer box Click an icon to select Negative or Po...

Page 105: ...r is properly inserted in the printer and click the Start button The film will be scanned and the image will print Adjust the brightness by dragging the slider or inputting a value in the box Click the numbers on the ten key pad or enter a number from the computer keyboard to set the number of copies Stop Button Click here to stop printing ...

Page 106: ...ed or if a set period of time passes without the scanner being operated after the power is turned on If this happens remove the film from the scanner and follow the instructions on the screen There is generally no need to pay attention to the actual resolution at which the film is scanned because it is automatically calibrated according to the printer resolution paper size and image output size Th...

Page 107: ...e correctly connected and turned on then turn on the computer and start Windows Changing the Printer Settings Specify the printer by clicking the printer selection button to the right in the printer area and selecting a printer from the pull down menu Click the Setup button on the left of the printer area and set the paper size orientation and source settings Clicking the Properties button will di...

Page 108: ...n menu The name of the scanners registered in Windows will display in the pull down menu CanoScan FS2710 will normally display Click the Settings button to the left of the scanner display box and select a setting from the pull down menu Refer to the next page for instructions regarding the menu categories and settings procedures Adjust the settings as required and click the OK button ...

Page 109: ...s the manual adjustment of the exposure setting scan speed for film that has been intentionally over or underexposed or that has an extremely bright or dark background Please refer to the Adjusting the Exposure Settings topic for instructions on adjusting the exposure setting p 70 Focus Switches between the autofocus and manual focus settings for printing While the autofocus setting is sufficient ...

Page 110: ...re active during the final scan and when the program is closed Please refer to the Setting the CanoCraft FS Preference Settings topic in the Other Functions section for instructions regarding preference settings p 74 The program cannot be set to save the preview image and automatically close when the final scan is finished Version Information The About dialog displays such information as the CanoS...

Page 111: ...ications Interface Auto Detection of SCSI scanners Image Types Black and White 8 bit grayscale 12 bit grayscale CanoScan FS2710 24 bit color 36 bit color CanoScan FS2710 Film Types 35 mm color negatives and positives 35 mm monochrome IX240 color negatives and positives IX240 monochrome Brightness Settings 256 levels Contrast Settings 256 levels Density Settings 256 levels black and white images on...

Page 112: ...cted to the scanner Please take time now to print out and fill in the System Information page in the CanoScan FS2710 2700F Getting Started guide Problems with Software Installation Installation is unsuccessful Cause Insufficient memory to run the installer program Solution Close other software programs that are running and rein stall Setup initialization error message displays Cause Insufficient f...

Page 113: ...ting Started Guide Problems Starting Software Programs Specified device not found message displays Cause 1 Scanner power is off Solution Close Windows Turn on the scanner power first then restart Windows and run auto configuration Cause 2 Scanner power was off when Windows was started Solution Close Windows Turn on the scanner power first then restart Windows and run auto configuration Cause 3 Sca...

Page 114: ...S before starting CanoCraft FS Copy Problems with Scanning Initializing film scanner Please remove film message displays Cause 1 Scanner power turned on with a film already inserted Solution Remove the film and follow the instructions on the screen Cause 2 Set period of time passed without scanner being operated after power turned on Solution Remove film and follow the instructions on the screen I...

Page 115: ...ghtness settings are incorrect Solution Click the Adjust button and reset the color balance and brightness settings p 55 Colors sometimes appear at the boundaries of highlights and shadows when negative films are scanned Cause 1 The exposure function is set to auto color adjustment Solution 1 In the exposure adjustment dialog click the check box to remove the check mark beside the auto color adjus...

Page 116: ...etting p 69 Black border around film included in scanned image Cause Scan area not set Solution Set the scan area p 41 Cannot freely specify the scan area in the preview window Cause Fixed aspect ratio selected Solution Reset aspect ratio to normal setting p 45 Scanning is taking a long time Cause Scan resolution is set too high Solution Lower the scan resolution to the minimum setting and rescan ...

Page 117: ...a file format recognized by the application p 46 Cause 2 File size is too large for the application to handle Solution Resave at a lower scan resolution p 32 Problems with Printing Printing fails or printing errors Cause 1 Printer not receiving power Solution Turn the printer power on See the printer manual Cause 2 Printer is not on line Solution Place printer on line See the printer manual Garble...

Page 118: ...stall However CanoCraft FS Uninstall will leave some information behind in the WIN INI and other files The same procedures can be used to uninstall an old version of CanoCraft FS such as 3 1 or 3 5 Uninstalling with the CanoCraft FS Uninstall Program in the Start Menu Click the CanoCraft FS Uninstall icon in the CanoCraft FS desktop folder or click the Start menu and select Programs Canon CanoCraf...

Page 119: ...anoScan FS2710 2700F film scanner into the computer drive Select Install Uninstall Software from the menu Click the Uninstall tab at the top and select the Open the Add Remove Programs Dialog button at the bot tom Select CanoCraft FS from the list in the Add Remove Programs dialog and click the Add Remove button Clicking the Add Remove button displays a dialog similar to the CanoCraft FS Uninstall...

Page 120: ...irm each stage of the process To run the configuration process ensure that the scanner is correctly attached and turned on before Windows is started CanoCraft FS Automatic Configuration This setting allows CanoCraft FS to automatically configure its settings to operate correctly with the scanners and printers connected to the computer Procedures Double click the CanoCraft FS Automatic Configuratio...

Page 121: ...s setting when you wish to switch between more than one scanner or printer or when you wish to create a special configuration Otherwise the automatic configuration setting is recommended for most cases see prior page Procedures Double click the CanoCraft FS Configuration icon The current settings will display in the configuration manager Click the button to the left of the configuration manager an...

Page 122: ...r to adjust these settings The printer and fax settings are the same as those set by Windows There is no need to change these settings if they were correctly set with Windows The settings window for the attached installed printer will display Select the printer name corresponding to your printer and click the Properties button to set the paper and graphics settings Refer to the manual accompanying...

Page 123: ...ed with CanoCraft FS The scanner will not operate properly if these settings are incorrect Ensure that you confirm that the displayed scanner name corresponds to the scanner attached to the computer Click the Close button after you have finished adjusting the settings The name and SCSI ID of the scanner attached to the computer will display if it is correctly attached and powered up If the scanner...

Page 124: ...UPER GOLD 400 DD 100 DD 400 IMPRESA 50 JX 100 LV 100 LV 200 LV 400 XG 400 HDC 100 HDC 400 OPTIMA 100 OPTIMA 400 ULTRA 50 XRG 100 XRG 200 XRG 400 XRS 100 XRS 400 Film Film Type A C B B A B B C C C C A B C B B B D D C C C C C C A D A D A D D D C C Film Type List of Film Types Please refer to the following list to select the correct film type ranging from A to D to specify in the Exposure Adjustment ...

Page 125: ...125 Appendices IX240 Film Film Manufacturer Fuji Kodak Konica AGFA nexia F nexia A nexia H ADVANTiX 100 ADVANTiX 200 ADVANTiX 400 JX 400 FUTURA 100 FUTURA 400 B B B A A A B A B ...

Page 126: ...lso come as a negative or positive film Of these color negatives are the most commonly used 36 Bit Color Image Images scanned as red green and blue light and reproduced in gradients of 4096 tones per color 12 bit A color image can be expressed in up to 68 7 billion color tones 4096 x 4096 x 4096 On a computer display no difference can be discerned between 24 bit and 36 bit color IX240 A new film s...

Page 127: ...56 x 256 x 256 ColorGear A proprietary Canon color management system that produces consistent coloring between input and output devices such as a scanner and computer display Contrast The difference in highlights and shadows when an image is scanned Raising the contrast produces a sharply defined image lowering it produces a softer less focused image Dither Pattern The arrangement of dots used to ...

Page 128: ...t value or any further output devices such as a printer The relationship between the input and output is called the gamma value A value of 1 represents output that equals the input A gamma value of less than one indicates that the output is brighter than the original and values over one indicate that the output is darker The graphical representation of the relationship is called the gamma curve or...

Page 129: ... light reflected from the original film with its sensors Color printers use the complementary colors to RGB namely cyan magenta yellow and black CYMK to express colors Cyan yellow and magenta are referred to as the three base tones of color Scan The process whereby a scanner is used to read information off an original document or image In CanoCraft FS clicking the Save or Scan button causes the sc...

Page 130: ...Brightness 61 Brightness Setting 105 Brightness Slide Bar 21 Brightness Tab 55 57 61 Brightness Contrast Tab 61 C CanoCraft FS Close 19 CanoCraft FS Icon 11 18 CanoCraft FS Program Window 20 CanoCraft FS Remove 118 CanoCraft FS Start 18 CanoCraft FS Uninstall 15 118 Clear 85 Clipboard 85 Close 99 Close Box 20 Color 31 Color Balance Tab 67 Coloring Setting 55 Coloring Tab 56 Contrast 61 Copy 85 Cop...

Page 131: ... Image Format 31 Image in the Preview Window 99 Image Type 22 30 Image Type Button 21 Installing CanoCraft FS 15 Invert 90 L Lines 92 Lock Button 20 42 43 Low Relief 95 M Magnification 22 32 36 Menu Bar 20 23 Menu Commands 23 Mouse Cursor 38 41 N Noise 89 Number of copies 105 O Open 97 Output Magnification 102 Output Magnification Box 33 35 Output Magnification Scan Resolution 20 43 44 Output Reso...

Page 132: ...Save 46 Save As 98 Scan 46 Scan Area 41 Scan Resolution 22 32 33 108 109 Scan Resolution Setting 33 Scanner Settings 108 Scanner Setup Button 21 Scanning Procedures 27 Selecting the Scanner 81 Selection Frame 43 44 Self Test 82 Sending a Fax 79 Settings 23 107 Settings Button 20 Settings Display Area 20 22 Shadow 57 Sharpen 87 Soften 88 Specifications 111 Start 101 Start Button 21 Starting CanoCra...

Page 133: ...urbevoie Cedex France Tél 01 4199 7777 Fax 01 4199 7951 Hotline Tél 01 4199 7070 CANON DEUTSCHLAND GmbH Europark Fichtenhain A10 47807 Krefeld Postfach 528 47705 Krefeld Germany TEL 02151 345 0 FAX 02151 345 102 CANON Hotline Service Customer Support 02151 349 555 Info Desk 02151 349 566 Mailbox 02151 349 577 Telefax 02151 349 588 CANON ITALIA S p A Palazzo L Strada 6 20089 MilanoFiori Rozzano MI ...

Page 134: ...ofddorp The Netherlands CANON BENELUX BELGIUM N V S A Bessenveldstraat 7 1831 Diegem Belgium CANON GmbH Zetschegasse 11 1232 Wien Austria CANON SCHWEIZ A G Industriestrasse 12 CH 8305 Dietlikon Switzerland Tel 01 83561 61 Fax 01 835 68 60 Hotline 157 30 20 CANON ESPAÑA S A C Joaquin Costa No 41 28002 Madrid Spain Teléfono de attención al cliente 901 301301 Tel 91 5384500 Fax 91 4117780 CANON AUSTR...

Page 135: ...simshatsui Kowloon Hong Kong CANON SINGAPORE PTE LTD 79 Anson Road 09 01 06 Singapore 079906 CANON LATIN AMERICA INC 6505 Blue Lagoon Drive Suite 325 Miami Florida 33126 U S A CANON EUROPA N V Bovenkerkerweg 59 61 P O Box 2262 1180 EG Amstelveen The Netherlands CANON INC 30 2 Shimomaruko 3 chome Ohta ku Tokyo 146 8501 Japan CANON INC 1998 CREATED IN JAPAN Appendices ...

Reviews: