background image

56   

Chapter 4   Operating Procedures


When Using Server Authentication

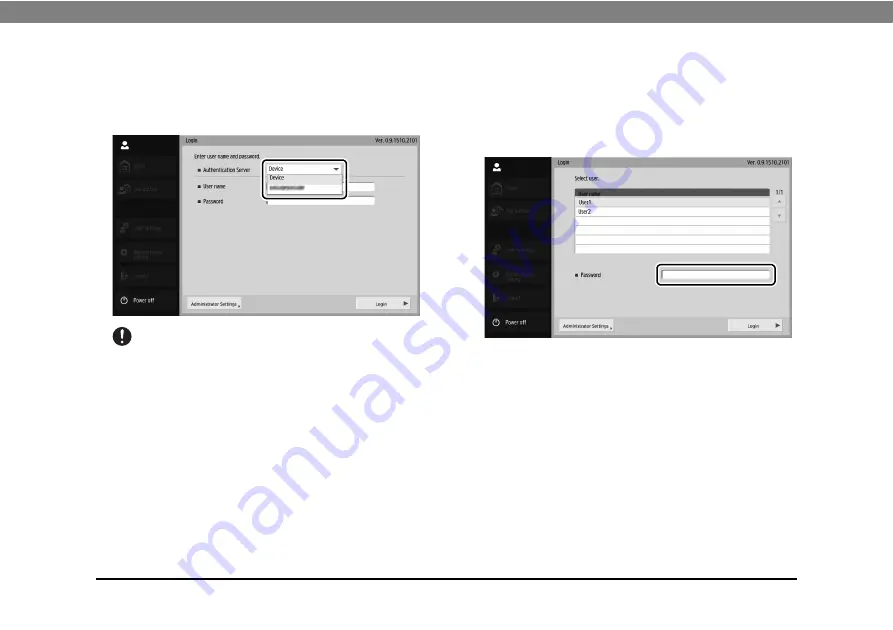
The login screen when you use server authentication is a 
key in type, and a list box is displayed for selecting Device 
Authentication and Server Authentication.

IMPORTANT

When you use server authentication to log in, you are registered 
as a new user of server authentication.

List Type Login

Use the procedure below to log in to the list type login 
screen. 

1.

Select the user that will log in, and press the 
[Password] entry box.

The keyboard screen appears. 

Summary of Contents for imageFORMULA ScanFront 400

Page 1: ...Please read this manual before using the scanner After you finish reading this manual keep it in a safe place for future reference Setup and Operation Guide ...

Page 2: ... 2 this device must accept any interference received including interference that may cause undesired operation Note This equipment has been tested and found to comply with the limits for a Class B digital device pursuant to Part 15 of the FCC Rules These limits are designed to provide reasonable protection against harmful interference in a residential installation This equipment generates uses and...

Page 3: ...ng to the WEEE Directive 2002 96 EC and your national law This product should be handed over to a designated collection point e g on an authorized one for one basis when you buy a new similar product or to an authorized collection site for recycling waste electrical and electronic equipment EEE Improper handling of this type of waste could have a possible negative impact on the environment and hum...

Page 4: ...ney or bank notes domestic and foreign Postage stamps revenue stamps or other similar stamps Stock certificates bond certificates promissory notes cheques or other valuable certificates Passports licenses or other certificates or documents issued by government officials or agencies This is not an exhaustive list Canon is not responsible for how this scanner is used by an individual Please note tha...

Page 5: ...ses This product includes open source software For details on the license conditions for each open source software refer to the OpenSource txt file stored in the LICENSE folder on the software setup disc Copyright 2016 by CANON ELECTRONICS INC All rights reserved No part of this publication may be reproduced or transmitted in any form or by any means electronic or mechanical including photocopying...

Page 6: ... 400 to a shared folder on a server PC or client PC on the network or to an FTP server send it to a printer for printing or deliver it to a remote location via e mail or Internet fax service When using the scanner without a network environment you can also save the image files to USB memory About the ScanFront 400 Web Application Mode The ScanFront 400 is equipped with an operation mode called Web...

Page 7: ...on This manual is stored as a PDF file on the supplied application disc and requires Adobe Reader to open You can download Adobe Reader from the Adobe Web site Symbols Used in This Manual The following symbols are used in this manual to explain procedures restrictions handling precautions and instructions that should be observed for safety WARNING Indicates a warning concerning operations that may...

Page 8: ...ettings of the scanner Chapter 3 Handling This chapter describes the types of documents that can be scanned and the basic operations of the scanner Chapter 4 Operating Procedures This chapter describes the basic operating procedures for the scanner Chapter 5 User Settings This chapter describes the User Settings for the administrator to configure settings Chapter 6 Troubleshooting This chapter des...

Page 9: ...FF 26 Turning the Power ON 26 Turning the Power OFF 27 5 Configuring the Scanner Settings 28 Network Settings 29 Configuring the Date and Time and Confirming the Time Zone 32 Mail Server Settings 34 Chapter 3 Handling 1 Documents 36 Plain Paper 36 Business Card 37 Card plastic 37 Passport 37 2 Preparing the Scanner 38 Preparing the Document Feed Tray and Eject Tray 38 Changing the Feed Method 39 U...

Page 10: ...ing 66 6 Registering and Editing Addresses 71 Registering a New Address 71 Modifying an Address 76 Copying an Address 77 Chapter 5 User Settings 1 User Settings 80 2 User Administration 81 3 Address Book Settings 87 Registering New Addresses 88 Modifying Addresses 88 Copying Addresses 88 4 Job Button Settings 89 Registering New Job Buttons 89 Copying Job Buttons 92 Editing Jobs 93 Exporting Job Bu...

Page 11: ... Before Use 1 Important Safety Instructions 12 Installation Location 12 Power 13 Moving the Scanner 13 Handling 13 Disposal 15 2 Names and Functions of Parts 16 Front and Document Feed and Eject Trays 16 Rear 17 ...

Page 12: ...nt of dust accumulates Avoid warm or humid locations such as in the vicinity of a water faucet water heater or humidifier and avoid locations where the fumes from ammonia paint thinner or other volatile chemicals may be present Avoid locations that are subject to vibration Avoid exposing the scanner to rapid changes in temperature If the room in which the scanner is installed is cold but rapidly h...

Page 13: ...nnected easily in an emergency Use only the AC adapter provided with this scanner Also do not use the AC adapter provided with the scanner with any other electrical devices Model MG1 5039 If you have any questions regarding the power supply contact your local authorized Canon dealer or service representative for further information Moving the Scanner When moving the scanner always hold it with bot...

Page 14: ... which has been well wrung out Never use alcohol benzene paint thinner or any other flammable substances If the scanner makes strange noises or gives off smoke heat or strange odors or the scanner does not function or other abnormalities occur when you use the machine immediately turn the power OFF and disconnect the power plug from the power outlet Then contact your local authorized Canon dealer ...

Page 15: ...s are placed around the power plug you will be unable to disconnect it in an emergency Do not allow water or flammable substances alcohol paint thinner benzene etc to spill into the scanner as this may result in a fire or electric shock Turn OFF the power for safety when not using the scanner for a long period of time such as overnight Also turn OFF the power and disconnect the AC adapter from the...

Page 16: ...Front c Panel Unit Open this when there is a paper jam or to perform maintenance See p 48 d Touch Panel Touch this screen to operate the ScanFront e Lock Lever Locks the panel unit Pull the lever toward you to unlock the panel unit See p 48 f Document Guides Adjust these to match the width of the document See p 42 g Document Feed Tray Place documents here See p 38 h Feed Support Pull this out to s...

Page 17: ...ompatible USB memory device USB keyboard or USB mouse m Eject Tray Support Open this when scanning multiple documents of varying sizes at one time Scanned documents are arranged in the tray by supporting and lifting up the document eject tray from the bottom Rear n Kensington Slot This is an anti theft slot that enables a key chain or lock to be connected to prevent theft o Power Connector 24 V DC...

Page 18: ...18 Chapter 1 Before Use ...

Page 19: ... 22 3 Before Setting Up the Scanner 24 Connecting the AC Adapter 24 Connecting the Network Cable 25 4 Turning the Power ON and OFF 26 Turning the Power ON 26 Turning the Power OFF 27 5 Configuring the Scanner Settings 28 Network Settings 29 Configuring the Date and Time and Confirming the Time Zone 32 Mail Server Settings 34 ...

Page 20: ... it OFF 5 ScanFront Setup See p 28 To set up the scanner configure the administrator settings This guide describes how to configure the network settings how to set the date and time and confirm the time zone and how to configure mail server settings for sending e mail For details on other settings refer to the ScanFront 400 INSTRUCTIONS electronic manual For a Web browser use Microsoft Internet Ex...

Page 21: ...sc Feed Tray Attach this to the scanner during installation See p 22 Application Disc The following manuals are stored as PDF files on this disc INSTURCTIONS Setup and Operation Guide AC Adapter Cord length 4 9 ft 1 5 m Warranty Card U S A and Canada only Power Cord Cord length 3 3 ft 1 m The shape of the power plug varies by country and region Registration Card U S A and Canada only Make sure to ...

Page 22: ...all of the packing materials protecting the scanner 1 Remove the orange tape 3 pieces securing the outer case 2 Attach the feed tray and gently open the document eject tray 3 Remove the sheet 4 Pull the lock lever toward you and then fully open the panel unit Lock lever ...

Page 23: ... 5 Remove the sheet 6 Remove the stopper and sheet from the feed roller 7 Gently close the panel unit Press on both sides of the unit until you hear a click which indicates the unit is locked 8 Gently close the document eject tray ...

Page 24: ...able Connecting the AC Adapter Follow the procedure shown below to connect the AC adapter CAUTION Make sure to use only the AC adapter and power cord included with the scanner a Connect the power cord and AC adapter b Insert the plug of the AC adapter into the power connector c Connect the power cord to the wall outlet The shape of the power plug varies by country and region ...

Page 25: ...Chapter 2 ScanFront Setup 25 Connecting the Network Cable Insert the network cable connector RJ 45 into the LAN port ...

Page 26: ...ch panel Display Off has activated to turn the panel display off You can touch the touch panel to restore the display Refer to Adjust the wait time until the display automatically turns off on p 152 of the ScanFront 400 INSTRUCTIONS When the power indicator is flashing but nothing appears on the touch panel the Low Power mode has activated to temporarily stop scanner operations To switch out of Lo...

Page 27: ...ner stops responding you can press and hold the power button to force shutdown In such cases any configured settings may be lost and startup may not be possible Pressing and holding the power button to force shutdown may result in malfunction so do not perform this operation under normal circumstances After ScanFront transitions to Low Power Mode while not connected to a network power will automat...

Page 28: ...vileges are restricted by the administrator cannot perform registration and editing Job Button Settings Register and edit jobs for Shared Job Button You can register and edit jobs for Shared Job Button and My Job Button in the User Settings Users whose function privileges are restricted by the administrator cannot perform registration and editing Device Configuration Configure the scanner settings...

Page 29: ... those of all other devices Under default settings the IP address is assigned automatically by the DHCP server When a DHCP server is not used clear the DHCP server Enable check box and enter a fixed address For details contact your network administrator The IP address is used for the URL when accessing the scanner from an external terminal s web browser Be sure to write down the IP address in case...

Page 30: ...30 Chapter 2 ScanFront Setup 4 Press Network setting 5 Confirm the Device name and IP address 6 Press the Device name or IP address entry box A keyboard entry screen appears ...

Page 31: ...setting make sure to select a unique name that is different from those of all other devices The device name can be a combination of letters A Z a z numbers 0 9 and hyphens up to 15 characters long The device name must begin with a letter You cannot end the device name with a hyphen 8 Confirm the new device name and IP address and press OK The Device Configuration screen appears Proceed to configur...

Page 32: ...lectronic manual IMPORTANT Make sure that the time zone is set to your region of use If the time zone is set to the wrong region the recorded sending times and time stamps for image files will not match the time setting displayed on the scanner 1 Press Date time settings The Date time screen appears 2 Configure the date and time Hint To change a setting press the pull down menu of the target item ...

Page 33: ...ess the pull down menu of the target item and change the setting IMPORTANT If the correct time zone is not set the time stamps that are saved for the send time of e mail messages and for the saved image files will be incorrect When Enable daylight saving time is selected the correct time may not be reflected In this case set the correct time 6 Press OK Close to return to the Home screen ...

Page 34: ...erver Settings To send scanned images via e mail open the Server Settings screen from the administrator settings and register a mail server For details refer to Server Settings on p 137 of the ScanFront 400 INSTRUCTIONS electronic manual ...

Page 35: ...reparing the Document Feed Tray and Eject Tray 38 Changing the Feed Method 39 USB Port 39 3 Placing Documents 41 Placing a Document 41 Placing a Folded Document 42 Placing a Long Document 43 Placing a Card 43 Placing a Carrier Sheet 44 Placing a Carrier Sheet for Passports 45 4 Clearing a Paper Jam or Double Feed Error 47 ...

Page 36: ...ment is dry before scanning it Scanning documents with the ink still wet may soil the rollers or scanning glass cause lines or smudges to appear on images or dirty other documents Always clean the rollers or scanning glass after scanning a document written in pencil Scanning documents with pencil written on them may soil the rollers or scanning glass cause stripes to appear in images or dirty othe...

Page 37: ...O standard Card thickness 0 055 1 4 mm or smaller Orientation Horizontal feeding only Embossed cards Embossed cards can be scanned Loading capacity 10 cards non embossed 1 card embossed CAUTION When scanning cards place them to be fed horizontally If you place cards to be fed vertically they may not be ejected properly and cards that get jammed may be damaged when you remove them Embossed cards ma...

Page 38: ...Front s Detailed Settings screen according to the type of document placed Preparing the Document Feed Tray and Eject Tray Prepare the trays in accordance with the type of document 1 Open the document eject tray a 2 Open the feed support b Hint Pull out the center tray extension when output documents are likely to fall out of the tray When scanning documents of different size at the same time the s...

Page 39: ...an documents made of thick paper set Non Separation Feeding Mode to ON IMPORTANT When scanning multiple page documents that are fastened together such as invoices place the documents so that the edge that is fastened together is facing down USB Port You can insert a USB memory device into the USB port to store image files You can also connect a USB keyboard and USB mouse to operate the ScanFront I...

Page 40: ...annot be written to the USB memory This scanner does not support USB memory equipped with password security data encryption or functions other than data storage Use a USB memory device that is formatted in the FAT16 FAT32 or exFAT file system Make sure that the USB memory has sufficient space to store images ...

Page 41: ...n into the tray with the top edge of the document at the bottom of tray Placing a Document Follow the procedure below to place a document 1 Adjust the document guides to be wider than the width of the document 2 Fan the document 3 Place the document face down with its top edge at the bottom of the tray ...

Page 42: ...ot exceed 10 mm in height including curls Placing a Folded Document Folio Scan enables you to scan documents that are larger than A4 LTR and therefore do not fit in the feeder The maximum size is 11 17 A3 To use the function fold the document in half lengthwise and place it into the feeder The ScanFront will scan both sides and combine the scanned images into a single image IMPORTANT When folding ...

Page 43: ...han the standard formats set Page Size to Auto size When scanning a document that is folded in half set Resolution dpi to 300 dpi or less When scanning a document that is folded in half the Double feed detection by Ultrasonic function cannot be used Placing a Long Document You scan documents up to 120 3048 mm in length IMPORTANT When scanning a long document set Page Size to Auto size Long When sc...

Page 44: ...fer to Document type on p 94 of the ScanFront 400 INSTRUCTIONS Placing a Carrier Sheet When scanning a document that requires extra protection from damage insert the document into an optional carrier sheet before placing it in the scanner 1 Set Document type to Carrier sheet in the Detailed Settings screen Refer to Document type on p 94 of the ScanFront 400 INSTRUCTIONS 2 Insert the document into ...

Page 45: ...ing a single sheet of 21 lb bond 80 g m2 paper per scan Placing a Carrier Sheet for Passports When scanning a passport insert the passport into an optional carrier sheet for passports before placing it in the scanner 1 Set Document type to Carrier sheet passport type in the Detailed Settings screen Refer to Document type on p 94 of the ScanFront 400 INSTRUCTIONS 2 Open the page of the passport tha...

Page 46: ...cantly different from the size of the carrier sheet document jamming may occur and the scanner s correction functions may not operate properly When scanning a passport place the passport so that the side with more pages is fed into the scanner The thickness limit for scannable documents is 0 236 6 mm with the passport inserted in the carrier sheet If 0 236 6 mm is exceeded document jamming may occ...

Page 47: ...ouble feed error is detected at the first page of a document the following messages appear Hint If you press Complete the display returns to the previous screen If you want to continue scanning reset the document before progressing with screen operations Press Continue to resume scanning If a paper jam or double feed error is detected in the middle of a document the following messages appear ...

Page 48: ... you press Complete the scanned images up until the paper jam or double feed error are saved and scanning completes The display switches to the Send screen If you press Abort the scanned images are canceled and the display returns to the previous screen IMPORTANT When the message above is displayed and the scanner transitions to Low Power Mode all of the data scanned up until that point is discard...

Page 49: ...Detailed Settings screen In addition limit the number of documents placed on the scanner to about 10 sheets A dirty or worn feed roller or documents stuck together as a result of static electricity are common causes of paper jams or double feed errors If the feed roller is dirty clean it If paper jams or double feed errors continue to occur even after cleaning purchase an Exchange Roller Kit and r...

Page 50: ...50 Chapter 3 Handling ...

Page 51: ...ation 56 List Type Login 56 Key in Type Login 57 4 Screen Displayed after Login 59 Home Screen 59 Job Button Screen 60 5 Scanning Procedures 61 Scanning From the Home Screen 61 Scanning From the Job Button Screen 62 Address Selection Screen 62 USB Memory Screen 64 Print Settings Screen 65 Scanning 66 6 Registering and Editing Addresses 71 Registering a New Address 71 Modifying an Address 76 Copyin...

Page 52: ...inistrator password is registered in the Administrator Settings screen and the user password is registered in the User Settings screen Scan Send Settings screen Refer to p 85 of the ScanFront 400 INSTRUCTIONS Scan The process after scanning differs depending on the Send Settings Refer to p 98 of the ScanFront 400 INSTRUCTIONS Scanning finishes A document confirmation message appears See p 68 The d...

Page 53: ...or is lit but nothing appears on the touch panel Display Off has activated to turn the panel display off You can touch the touch panel to restore the display Refer to Adjust the wait time until the display automatically turns off on p 152 of the ScanFront 400 INSTRUCTIONS When the power indicator is flashing but nothing appears on the touch panel the Low Power mode has activated to temporarily sto...

Page 54: ...anner stops responding you can press and hold the power button to force shutdown In such cases any configured settings may be lost and startup may not be possible Pressing and holding the power button to force shutdown may result in malfunction so do not perform this operation under normal circumstances After ScanFront transitions to Low Power Mode while not connected to a network power will autom...

Page 55: ... There are two types of login screen a list type login screen for selecting from a list of registered users and a key in type login screen for entering a user name and password List Type Login Screen Key in Type Login Screen Hint Set the type of login screen in System administration Login type setting of the Administrator Settings screen ...

Page 56: ...splayed for selecting Device Authentication and Server Authentication IMPORTANT When you use server authentication to log in you are registered as a new user of server authentication List Type Login Use the procedure below to log in to the list type login screen 1 Select the user that will log in and press the Password entry box The keyboard screen appears ...

Page 57: ... sensitive Make sure to enter the password correctly 3 Press Login to log in to the scanner 4 The Home screen or Job Button screen appears Key in Type Login In the key in type login screen enter your user name and password to log in 1 Press the User name Passwrd entry box The keyboard screen appears ...

Page 58: ... are case sensitive Make sure to enter the user and password registered during device authentication correctly If you do not know the user name and password registered for server authentication contact the domain server administrator 3 Press Login to log in to the scanner 4 The Home screen or Job Button screen appears ...

Page 59: ...ns open an address selection screen See Scanning Procedures on p 61 b User Settings button Open the User Settings screen For details see User Settings on p 80 c Administrator setting button Opens the Administrator Settings screen For details refer to Configuring Administrator Settings on p 34 of the ScanFront 400 INSTRUCTIONS IMPORTANT If a user whose use of the Home screen is restricted logs in t...

Page 60: ...Keys Use these keys to find specific Job Buttons when there are many Job Buttons displayed for example IMPORTANT The document is scanned immediately after you press the job button Make sure to place your document before you press the job button See Placing Documents on p 41 Register and edit job buttons in the Administrator Settings screen or the User Settings screen If you are unable to edit a jo...

Page 61: ... press the destination E mail FTP Fax or Shared folder selection button in Address type the address selection screen opens to specify an address to send an image file If you press the USB memory destination selection button press Downward and specify the folder in the USB memory to which you want to save the image file If you press the Printer destination selection button configure the printer set...

Page 62: ... sending an image file see Flow of Scanner Operations on p 52 Job buttons cannot be used to save image files to USB memory or send them to printers for printing Address Selection Screen From the address selection screen you can select the address to send an image file and register addresses a Address Book type Selects the address book type Shared Address Book or My Address Book If the address book...

Page 63: ...egister new addresses and edit addresses g Detail Info button Displays detailed information for the address h My E mail address Displays the email address of the currently logged in user when the user s email address is registered and Send to my mailbox p 82 is enabled in the User Administration screen Hint This is not displayed when the address book type is LDAP Address Book When Direct Transmiss...

Page 64: ...Enter the folder path of the USB memory You can also press Downward to select a folder b USB Memory Display Displays the inserted USB memory Hint When you insert a USB memory device you can assign a number to it If you want to insert or replace a USB memory stick while the USB memory screen is open press the Back button to return to the Home screen update the USB memory information and then reopen...

Page 65: ... file system will not be changed Print Settings Screen The print settings screen enables you to specify the printer on which to use FTP printing a Printer IP address Enter the printer s IP address b User name Enter the user name configured for the printer s FTP printing c Password Enter the password configured for the printer s FTP printing d Save Password Save the entered password e Use passive m...

Page 66: ...cify the folder in the USB memory to save the image file in Steps 2 to 4 See USB Memory Screen on p 64 1 Select a destination Press a destination button to select a destination The address selection screen appears 2 Use Address Book type and Address type to display the address to send the image file 3 Press a displayed address to select it A checkmark is added to the icon for the selected address ...

Page 67: ...IONS IMPORTANT When you use a job button for scanning the subsequent procedure varies as follows in accordance with the job button settings For details see Registering New Job Buttons on p 89 If When you select this Job Button is set to Skip Scan Setting Screen and you press a job button scanning is started without displaying the Scan Send Settings screen of Step 4 If Send the files immediately af...

Page 68: ...ess confirmation screen of Step 10 appears When the confirmation message is left displayed and the scanner transitions to Low Power Mode all of the data scanned up until that point is discarded Refer to Adjust the wait time until the Low Power Mode on p 152 of the ScanFront 400 INSTRUCTIONS 7 Check the document and go to the next step Press Complete to go to the Send screen Press Continue to resum...

Page 69: ... 90 degrees clockwise Enlarge the image Reduce the image IMPORTANT Rotations and size modifications will be applied to all scanned images that can be displayed in the Send screen When you press Scan more pages the Scan Settings screen appears allowing you to change scan conditions After changing the settings press Check image and send to return to the Send screen Hint When the preview image is enl...

Page 70: ...nd Settings screen the image is sent without displaying the address confirmation screen and the operation ends 10 Confirm the address and press OK to send the scanned image IMPORTANT If a send error message appears check the address settings and send destination and try again 11 Returns to the screen set for Screen after sending in Send Settings of the Scan Send Settings screen ...

Page 71: ...ocedure below to register a new address or modify an address in the address book Registering a New Address 1 Make selections for Address Book type and Address type press Edit and then press New 2 Register the address in accordance with the setting conditions of the address type E mail Registration Screen Name Enter the name to appear in the address book E mail address Enter the sender s address fo...

Page 72: ...ame of the shared folder and the path of the sub folder to register Hint If the path of the sub folder is unknown use the procedure below to specify the sub folder 1 Enter the host name user name password and domain and then press Browse to access the computer that is making the shared folder public 2 Specify any sub folder within the displayed folder 3 Press Downward to move to a level lower than...

Page 73: ...pear in the address book FTP server Enter the address of the FTP server Folder path Enter the path of the sub folder when specifying a sub folder on the FTP server Hint If the path of the sub folder is unknown use the procedure below to specify the sub folder 1 Enter the server address user name and password and click Browse to log in to the FTP server 2 Specify any sub folder at the level of the ...

Page 74: ...ANT Always enter the fingerprint when Protocol is set to SFTP Confirmation Confirm the fingerprint Use FTP proxy Traverse the firewall via an FTP proxy server to connect to an external FTP server Configure settings for the proxy server in the FTP Proxy screen Refer to p 143 of the ScanFront 400 INSTRUCTIONS Use passive mode Use passive mode for sending to the FTP server IMPORTANT Use passive mode ...

Page 75: ...up from Address Book type and Address type The selected addresses are displayed in the list IMPORTANT When you add shared folders to groups do not add multiple shared folders with different access privileges to one group Using a group to simultaneously send to shared servers and the like and multiple shared folders with different access privileges may result in a send error ...

Page 76: ...address is wrong or has been changed 1 Select the type of the address to modify and press Detail Info Detailed information for the address appears 2 Check the detailed information for the selected address 3 Press Edit and then press Modify The edit screen for the address appears 4 Modify the address Hint For details on editing items see Registering a New Address on p 71 ...

Page 77: ...red Address Book 1 Select the address book entry to copy 2 Select the address press Edit and then press Copy The Specify Destination and Confirmation screen appears 3 Select the type for the copy destination address book and press OK The address is copied and the address book of the copy destination appears ...

Page 78: ...78 Chapter 4 Operating Procedures ...

Page 79: ...istration 81 3 Address Book Settings 87 Registering New Addresses 88 Modifying Addresses 88 Copying Addresses 88 4 Job Button Settings 89 Registering New Job Buttons 89 Copying Job Buttons 92 Editing Jobs 93 Exporting Job Buttons 94 Importing Job Buttons 95 ...

Page 80: ...7 Register and manage entries in Shared Address Book available to all users and My Address Book provided for each user c Job Button Settings See Job Button Settings on p 89 Register and manage job buttons in Shared Job Button available to all users and My Job Button provided for each user d Show Operation History Displays the operation history of logged in users Hint When history is selected and D...

Page 81: ...he administrator SMTP POP Before SMTP Authentication This is displayed when the administrator has set Mail Server Authentication Method to other than SMTP in the mail server settings Enter the user name and password that will be used for authentication by the mail server IMPORTANT When entering a password select the Change Password check box before entry For a user logged in by server authenticati...

Page 82: ...t this to Yes to display the email address of the logged in user in the address book If an email address is set for the user the user s email address will be displayed even if it has not been registered in the address book The user s email address is displayed at the very top of the address list Custom file name Display the Custom file name Settings screen See Custom File Name Settings on p 82 Ind...

Page 83: ...nfigure in this screen The position of String can be changed but its check box cannot be deselected Separator Select the Enable check box to include a separator between character strings in the file name and select a character to use as the separator in the list box String Specify a string to include in the file name User name Select the Enable check box to include the user name in the file name D...

Page 84: ... files The order of the components that are included in the index file can be configured in the Index item settings screen IMPORTANT The following characters cannot be used in strings contained in the index file Order of information Displays the components included in the index file in the order specified in the settings ...

Page 85: ...ser name in the index file You can change the default field name User as necessary Date Select the Enable check box to include the date in the index file and select a format for the date in the Format list box You can change the default field name Date as necessary Time Select the Enable check box to include the time in the index file and select a format for the time in the Format list box You can...

Page 86: ...es that are in the scanned image in the index file You can change the default field name PageNumber as necessary Destination path Select the Enable check box to include the destination path in the index file You can change the default field name Folder as necessary Sheets Select the Enable check box to include the number of pages that are in the scanned image in the index file You can change the d...

Page 87: ...ss Selection Screen on p 62 IMPORTANT If the administrator has restricted editing of address books the address book settings will be as follows For details contact your administrator If editing is restricted for only one of My Address Book and Shared Address Book it is only possible to copy addresses from the restricted address book and paste them into the unrestricted address book If editing is r...

Page 88: ...he available settings vary depending on the type of address E mail Shared folder FTP Server Fax or Group Modifying Addresses Modify an address when there is a send error because the information of the transfer destination registered for the address is wrong or has been changed For details on how to modify an address see 6 Registering and Editing Addresses Modifying an Address on p 76 Copying Addre...

Page 89: ...ton b Job Button List Displays the registered job buttons c Select unselect all Button Select all job buttons or clear all selected job buttons d Edit Button Register new job buttons and edit job buttons e Detail Info Button Display details on the job buttons f Jump Keys Use these keys to find specific Job Buttons when there are many Job Buttons displayed for example Registering New Job Buttons Yo...

Page 90: ... Scan Setting screen when the job button is pressed Skip Scan Setting Screen Starts scanning without displaying the Scan Setting screen when the job button is pressed IMPORTANT If you select Skip Scan Setting Screen scanning starts as soon as the job button is pressed regardless of whether or not a document is inserted Custom File Name Settings Display the Custom file name Settings screen See Cust...

Page 91: ...20160514154030123 mmddyyyy File name 05142016154030123 ddmmyyyy File name 14052016154030123 The last three digits indicate the number of milliseconds You can select Custom to configure additional file name settings The additional settings are identical to those in the Custom File Name Settings see p 82 under User Administration Index Settings Specify whether to attach metadata index files to scann...

Page 92: ...the individual user job button settings displayed by pressing the Edit button in the job column in the user list of the User Administration screen you can copy job buttons between Shared Job Button and My Job Button 1 Select the job button to copy and then press Edit Copy The Copy screen appears 2 Press OK A duplicate job button with the same name as the copy source is created 3 Change the name an...

Page 93: ... can edit the settings of a registered job 1 Select the job button to edit and then press Edit Modify The Edit screen appears 2 Change the job button settings and then press OK For details on the settings see Registering New Job Buttons on p 89 ...

Page 94: ...a different server because you are for example changing the server 1 Press Edit Export The Export screen appears 2 Enter the necessary information for each item Hint Press Connection test to check the connection for the entered host name Press Browse to display the Shared folder screen and then specify the host and shared folder 3 Press OK Exporting starts When the process is complete a message ap...

Page 95: ...n for the entered host name Press Browse to display the Shared folder screen and then specify the host and shared folder 3 For How to write data select the action to perform when importing the job button setting file Replaces the whole data Deletes all currently registered job buttons and overwrites them with the imported job buttons Appends data Adds the imported job buttons to the currently regi...

Page 96: ...96 Chapter 5 User Settings ...

Page 97: ...Chapter 6 Troubleshooting 1 Troubleshooting 98 ...

Page 98: ...e The clock on the computer on which the shared folder is located and the clock on the ScanFront are out of sync Solution Sync the clocks Cannot update the settings Cause The ScanFront is being used or a user has not logged out Solution Check the ScanFront status and then try again Cannot create a new folder shared folder FTP server Cause Permission to write to the shared folder has not been grant...

Page 99: ... sender s address is not displayed at the destination of an e mail message Cause The e mail addresses of the user and administrator have not been registered Refer to p 108 and p 148 of the ScanFront 400 INSTRUCTIONS Solution Contact the administrator and register the e mail addresses Cannot connect to the network IP address conflict problem Cause The IP address that was set is already being used b...

Page 100: ...lowercase letters for the user name and password correctly Cause Authentication Method is set to Active Directory for the authentication server and an IP address or PC name is specified for Host Name Solution Specify the FQDN in Host Name refer to p 140 of the ScanFront 400 INSTRUCTIONS and configure the DNS server to which the specified FQDN is registered in the Network Setting screen refer to p ...

Page 101: ...figured properly Scan Streaks appear in images Cause The scanning glass is dirty Solution Clean the scanning glass Refer to p 175 of the ScanFront 400 INSTRUCTIONS If there are scratches on a scanning glass contact your local authorized Canon dealer Paper becomes jammed Cause The rollers are dirty Solution Clean the rollers Refer to p 175 of the ScanFront 400 INSTRUCTIONS Cause A feed error relate...

Page 102: ... Separation Feeding Mode to OFF and scan the pages one by one Cause The retard roller and feed roller are dirty Solution Clean the retard roller anf feed roller Refer to Remove the retard roller and feed roller and remove any dirt from them on p 176 of the ScanFront 400 INSTRUCTIONS A stack of documents are fed together Cause Non Separation Feeding Mode is set to ON See p 39 Solution Set Non Separ...

Page 103: ...ower Cause The AC adapter is not connected properly or the power plug is not inserted Solution Check the connections of the AC adapter and power plug If the problem is not resolved after checking the connections contact your local authorized Canon dealer The scanner does not turn ON when the power switch is pressed Cause A USB memory device in inserted in the scanner Solution Remove the USB memory...

Page 104: ...104 Chapter 6 Troubleshooting ...

Page 105: ...ing the AC Adapter 24 Connecting the Network Cable 25 Copying Job Buttons 92 Custom File Name Settings 82 91 D Device Authentication 56 Disposal 15 Documents 36 Double Feed Error 47 E Eject Tray 38 Exporting and Importing Job Buttons 94 F Feed Tray 38 Flow Up Until Sending an Image File 52 H Handling 13 Home Screen 59 I Index Settings 84 Installation Location 12 Introduction 6 J Job Button Screen ...

Page 106: ...acing a Folded Document 42 Placing a Long Document 43 Placing Documents 41 Plain Paper 36 Preparing the Scanner 38 R Registering New Job Buttons 89 S Safety Instructions 12 Scanning 66 Server Authentication 56 Setting Up 28 T Troubleshooting 98 Turning Off the Power 27 54 Turning On the Power 26 53 U USB Memory 64 USB Memory Screen 64 USB Port 39 ...

Page 107: ...Index 107 ...

Page 108: ...DA CANON EUROPA N V BOVENKERKERWEG 59 1185 XB AMSTELVEEN THE NETHERLANDS CANON AUSTRALIA PTY LTD BUILDING A THE PARK ESTATE 5 TALAVERA ROAD MACQUARIE PARK NSW 2113 AUSTRALIA CANON SINGAPORE PTE LTD 1 FUSIONOPOLIS PLACE 15 10 GALAXIS SINGAPORE 138522 CANON INDIA PVT LTD 7TH FLOOR TOWER B DLF CYBER TERRACES DLF PHASE III GURGAON 122002 HARYANA INDIA PUB CE IE 0983 02 CANON ELECTRONICS INC 2016 ...

Reviews: