2-6
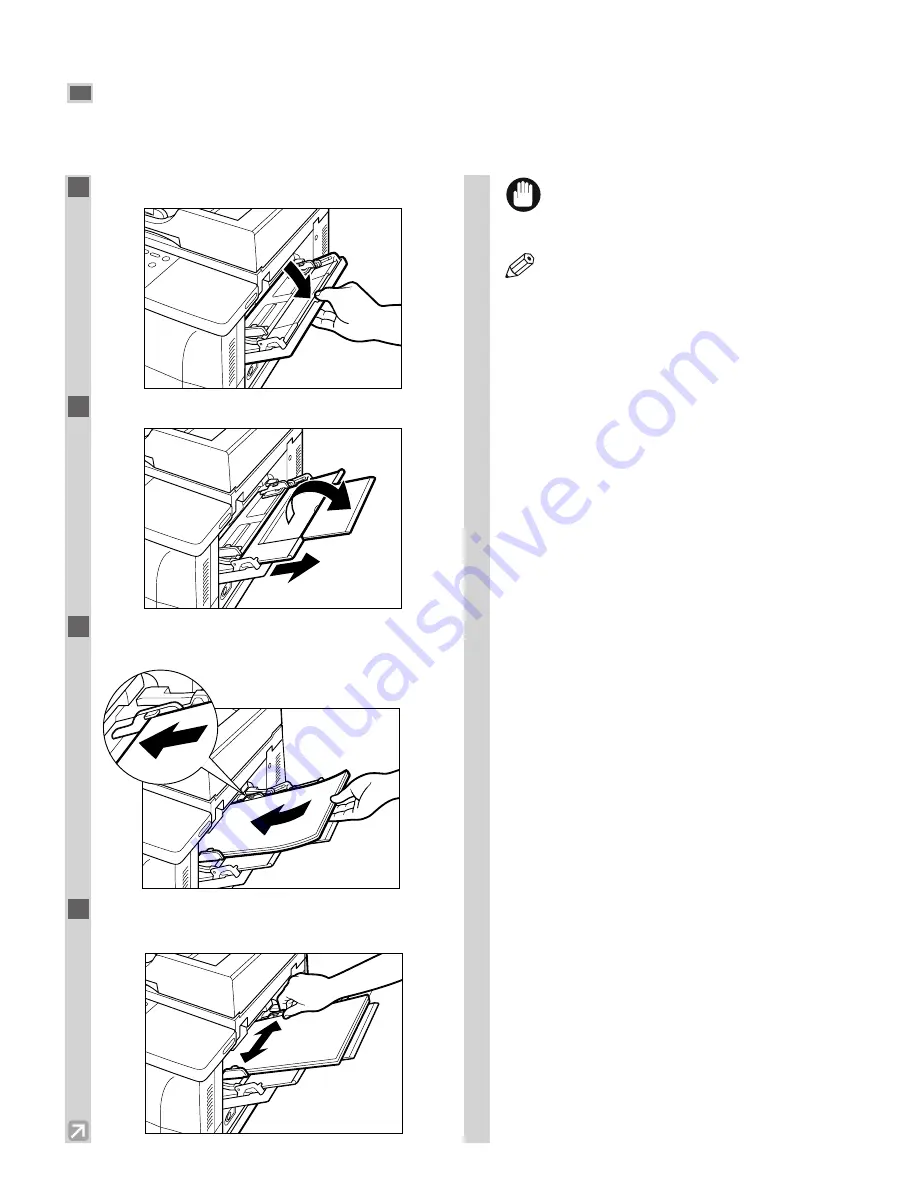
Loading Paper in the Multi-purpose Tray
Use the multi-purpose tray when you want to print on special paper, such as envelopes, transparencies, labels or
heavy paper. You can place up to 100 sheets of 20-lb bond (80 g/m
2
) paper stack (a stack approximately
3
/
16
” or 10
mm high) in the multi-purpose tray to be automatically fed into the machine.
1
Open the multi-purpose tray.
2
Pull out the paper tray.
3
Load the paper stack facing up into the
multi-purpose tray.
4
Adjust the slide guides to fit the size of the
paper stack.
• If the slide guides are not adjusted correctly
for the paper size, the quality of your print
images may be adversely affected.
• When making copies on LTR-size paper
after having continuously copied on paper
smaller than LTR-size paper, the copies
may be dirty. To prevent copies from being
dirty, wait about one minute before making
copies.
• Insert the paper stack into the machine as
far as it will go.
• If the paper is curled, uncurl it before
placing it in the multi-purpose tray. Failure
to do so will cause paper creases and a
paper jam.
• 16 to 32-lb bond (56 to 128 g/m
2
) paper is
acceptable.
• Make sure that the paper stack does not
exceed the paper limit guide.
• Some types of paper may not feed properly
into the multi-purpose tray. For high-
quality copies, be sure to use the paper and
transparencies recommended by Canon.
(
→
p. 2-1)
• Load transparencies one by one.
• When making copies of a small size
document or thick paper, etc., the copy
speed may be slightly slower than usual.
• To specify the paper size every time you
load the paper into the multi-purpose tray,
follow the procedure below:
Press
Additional Functions
, then
select:
COMMON SETTINGS
,
MP TRAY PAPERSIZE
,
OFF
,
SET ON LOADING
.
Load the paper into the multi-purpose
tray, and choose the paper size using
4
(–)
or
e
(+)
, then press
Set
.
For details, refer to “Selecting the Paper
Feeding Location (Cassette or Multi-
purpose Tray).” (
→
p. 4-3)
NOTE
IMPORTANT
Summary of Contents for imageCLASS D661
Page 23: ...2 8 ...
Page 29: ...3 6 ...
Page 69: ...6 12 ...
Page 75: ...A 2 ...
Page 79: ...I 4 U USER DATA setting 7 4 W Weight document 3 1 machine A 1 print media 2 1 Z Zoom 4 5 ...
Page 80: ...I 5 Memo I Index ...
Page 81: ...I 6 Memo ...


