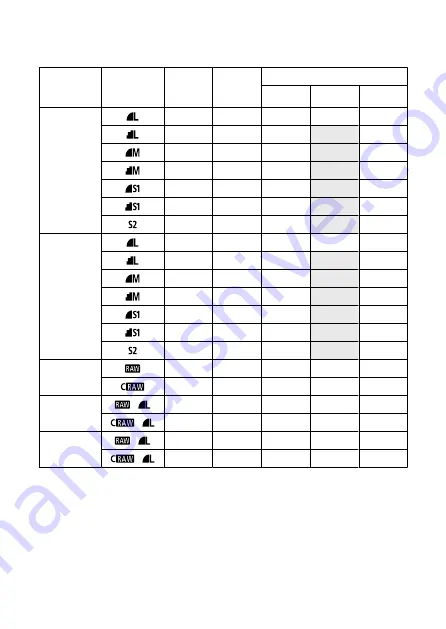
Still photo file size / Number of possible shots / Maximum burst for continuous
shooting
Image quality
File size
[Approx. MB]
Possible
shots
[Approx.]
*1
Maximum burst [Approx.]
*5
SD card
*1
SD card
*1
[Hi-speed]
CFexpress
card
*2
JPEG
*4
13.5
2240
190
350
350
6.8
4450
260
350
7.8
3860
320
350
4.1
7330
290
350
4.7
6420
330
350
2.6
11360
330
350
1.8
16790
340
350
HEIF
*3
13.4
2240
190
280
280
10.0
2970
210
330
8.3
3580
310
310
6.3
4730
350
360
5.1
5710
340
360
4.0
7330
360
350
1.8
14480
340
360
RAW
*4
45.4
670
66
87
180
21.9
1440
130
260
260
RAW+JPEG
*4
+
45.4+13.5
520
64
79
160
+
21.9+13.5
870
100
130
240
RAW+HEIF
*3
+
45.4+13.4
480
61
74
90
+
21.9+13.4
780
110
140
140
* 1: The number of possible shots and maximum burst (SD card) apply to a UHS-I compliant 32 GB SD card
based on Canon testing standards. The number of possible shots and maximum burst (SD card [Hi-speed])
apply to a UHS-II compliant 32 GB SD card based on Canon testing standards.
* 2: The number of shots available and maximum burst (CFexpress card) apply to a 325 GB CFexpress
card conforming to Canon testing standards.
* 3: Available when [
HDR PQ
] for HDR shooting is set to [
Enable
].
* 4: When [
HDR PQ
] for HDR shooting is set to [
Disable
].
* 5: With mechanical shutter or electronic 1st-curtain shutter, shot at approx. 12 fps.
* File size, number of possible shots, and maximum burst vary depending on shooting conditions (including
1.6x crop/aspect ratio, subject, memory card brand, ISO speed, Picture Style, and Custom Function).
772
Summary of Contents for EOS R5 C
Page 1: ...PUB DIE 0561 000 Advanced User Guide PHOTO edition Digital Cinema Camera ...
Page 28: ... 9 10 14 16 20 21 23 22 17 18 19 2 1 8 3 6 7 12 4 5 15 13 11 28 ...
Page 34: ...3 Using a slim cable 34 ...
Page 35: ...Using a thick cable 3 Included interface cable 4 Using a slim cable Using a thick cable 35 ...
Page 36: ...5 Using a slim cable Using a thick cable 36 ...
Page 37: ...6 Using a slim cable Using a thick cable 4 HDMI cable sold separately 37 ...
Page 56: ...Changing the Interface Language To change the interface language see Language 56 ...
Page 78: ... AF Start Button Equivalent to pressing the shutter button halfway except in mode 78 ...
Page 84: ...Menu Screen in Mode In mode some tabs and menu items are not displayed 84 ...
Page 91: ...Dragging Sample screen Menu screen Slide your finger while touching the screen 91 ...
Page 252: ...Note High speed display is always used when Shutter mode is set to Electronic 252 ...
Page 266: ...Clearing Settings 1 Select Shooting info disp 2 Select Reset 3 Select OK 266 ...
Page 267: ...Viewfinder Display Format 1 Select VF display format 2 Select an option 267 ...
Page 283: ...AF2 1 Focus ring rotation 2 RF lens MF focus ring sensitivity 3 sensitivity AF pt select 283 ...
Page 364: ...Magnified view Note You can also magnify display by double tapping with one finger 364 ...
Page 369: ...369 ...
Page 386: ...4 Erase the images Press the button then press OK 386 ...
Page 388: ...4 Erase the images Select OK 388 ...
Page 428: ...2 Select Portrait relighting Turn the dial to select an image to adjust then press 428 ...
Page 470: ...4 Select Enable 5 Select Wi Fi Bluetooth connection 6 Select Connect to smartphone 470 ...
Page 488: ...4 Set Size to send 5 Take the picture 488 ...
Page 491: ... 2 Sending multiple selected images 1 Press 2 Select Send selected 491 ...
Page 493: ...4 Select Size to send On the displayed screen select an image size 5 Select Send 493 ...
Page 496: ... 4 Sending all images on the card 1 Press 2 Select Send all card 496 ...
Page 497: ...3 Select Size to send On the displayed screen select an image size 4 Select Send 497 ...
Page 499: ...3 Select Size to send On the displayed screen select an image size 4 Select Send 499 ...
Page 516: ...7 Select OK The selected images are transferred to the computer 516 ...
Page 519: ...Select OK to transfer the selected images to the computer 519 ...
Page 530: ...Steps on the camera 2 10 Select OK The icon changes to 11 Select Upload to Web service 530 ...
Page 546: ...6 Select Transfer 7 Select OK The selected images are transferred to the FTP server 546 ...
Page 549: ...Select OK to transfer the selected images to the FTP server 549 ...
Page 570: ...4 Select OK 570 ...
Page 574: ...Note To delete connection settings see Changing or Deleting Connection Settings 574 ...
Page 619: ...3 Select Create folder 4 Select OK To rename the folder select Change folder name 619 ...
Page 631: ...3 Format the card Select OK 631 ...
Page 638: ...Language 1 Select Language 2 Set the desired language 638 ...
Page 641: ...Example Multi function lock 641 ...
Page 642: ...Changing the Help Text Size 1 Select Help text size 2 Select an option 642 ...
Page 705: ...Note and dials cannot be customized in mode Control ring on RF lenses and mount adapters 705 ...


