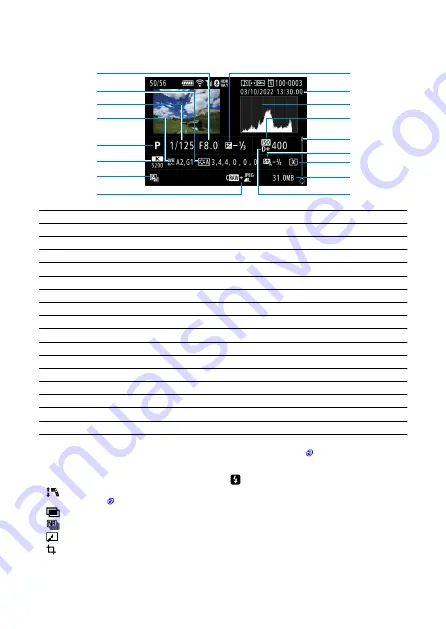
Detailed information display for still photos
(2)
(1)
(9)
(10)
(11)
(12)
(13)
(14)
(15)
(16)
(17)
(4)
(5)
(6)
(7)
(8)
(3)
(1)
Aperture value
(2)
Picture Style/Settings
(3)
Shutter speed
(4)
White balance correction/Bracketing
(5)
Shooting mode/Multiple exposure/Frame Grab
(6)
White balance
(7)
Auto Lighting Optimizer
(8)
Image quality/Edited image/Cropping
(9)
Exposure compensation amount
(10)
Shooting date and time
(11)
Histogram (Brightness/RGB)
(12)
ISO speed
(13)
Scroll bar
(14)
Flash exposure compensation amount/Bounce/HDR shooting/Multi Shot Noise Reduction
(15)
Metering mode
(16)
File size
(17)
Highlight tone priority
* For images captured in RAW+JPEG/HEIF shooting, indicates RAW file sizes.
* Lines indicating the image area will be displayed for images taken with the aspect ratio set (
) and with RAW or RAW+JPEG
set for image quality.
* For images with added cropping information, lines are shown to indicate the image area.
* During flash photography without flash exposure compensation, [
] will be displayed.
* [
] indicates images shot with bounce flash photography.
* An icon for the effect (
) and the dynamic range adjustment amount is displayed for images captured in HDR shooting.
* [
] indicates images captured in multiple-exposure shooting.
* [
] indicates images processed with Multi Shot Noise Reduction.
* [
] indicates images created and saved by performing RAW image processing, resizing, cropping, or frame-grabbing.
* [
] indicates images cropped and then saved.
767
Summary of Contents for EOS R5 C
Page 1: ...PUB DIE 0561 000 Advanced User Guide PHOTO edition Digital Cinema Camera ...
Page 28: ... 9 10 14 16 20 21 23 22 17 18 19 2 1 8 3 6 7 12 4 5 15 13 11 28 ...
Page 34: ...3 Using a slim cable 34 ...
Page 35: ...Using a thick cable 3 Included interface cable 4 Using a slim cable Using a thick cable 35 ...
Page 36: ...5 Using a slim cable Using a thick cable 36 ...
Page 37: ...6 Using a slim cable Using a thick cable 4 HDMI cable sold separately 37 ...
Page 56: ...Changing the Interface Language To change the interface language see Language 56 ...
Page 78: ... AF Start Button Equivalent to pressing the shutter button halfway except in mode 78 ...
Page 84: ...Menu Screen in Mode In mode some tabs and menu items are not displayed 84 ...
Page 91: ...Dragging Sample screen Menu screen Slide your finger while touching the screen 91 ...
Page 252: ...Note High speed display is always used when Shutter mode is set to Electronic 252 ...
Page 266: ...Clearing Settings 1 Select Shooting info disp 2 Select Reset 3 Select OK 266 ...
Page 267: ...Viewfinder Display Format 1 Select VF display format 2 Select an option 267 ...
Page 283: ...AF2 1 Focus ring rotation 2 RF lens MF focus ring sensitivity 3 sensitivity AF pt select 283 ...
Page 364: ...Magnified view Note You can also magnify display by double tapping with one finger 364 ...
Page 369: ...369 ...
Page 386: ...4 Erase the images Press the button then press OK 386 ...
Page 388: ...4 Erase the images Select OK 388 ...
Page 428: ...2 Select Portrait relighting Turn the dial to select an image to adjust then press 428 ...
Page 470: ...4 Select Enable 5 Select Wi Fi Bluetooth connection 6 Select Connect to smartphone 470 ...
Page 488: ...4 Set Size to send 5 Take the picture 488 ...
Page 491: ... 2 Sending multiple selected images 1 Press 2 Select Send selected 491 ...
Page 493: ...4 Select Size to send On the displayed screen select an image size 5 Select Send 493 ...
Page 496: ... 4 Sending all images on the card 1 Press 2 Select Send all card 496 ...
Page 497: ...3 Select Size to send On the displayed screen select an image size 4 Select Send 497 ...
Page 499: ...3 Select Size to send On the displayed screen select an image size 4 Select Send 499 ...
Page 516: ...7 Select OK The selected images are transferred to the computer 516 ...
Page 519: ...Select OK to transfer the selected images to the computer 519 ...
Page 530: ...Steps on the camera 2 10 Select OK The icon changes to 11 Select Upload to Web service 530 ...
Page 546: ...6 Select Transfer 7 Select OK The selected images are transferred to the FTP server 546 ...
Page 549: ...Select OK to transfer the selected images to the FTP server 549 ...
Page 570: ...4 Select OK 570 ...
Page 574: ...Note To delete connection settings see Changing or Deleting Connection Settings 574 ...
Page 619: ...3 Select Create folder 4 Select OK To rename the folder select Change folder name 619 ...
Page 631: ...3 Format the card Select OK 631 ...
Page 638: ...Language 1 Select Language 2 Set the desired language 638 ...
Page 641: ...Example Multi function lock 641 ...
Page 642: ...Changing the Help Text Size 1 Select Help text size 2 Select an option 642 ...
Page 705: ...Note and dials cannot be customized in mode Control ring on RF lenses and mount adapters 705 ...


